Samsung SGH-A707 User Manual (user Manual) (ver.f5) (English) - Page 90
Configuring your Phone's USB Connection - usb cable
 |
View all Samsung SGH-A707 manuals
Add to My Manuals
Save this manual to your list of manuals |
Page 90 highlights
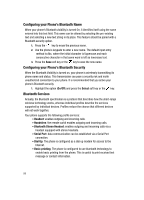
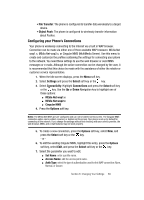
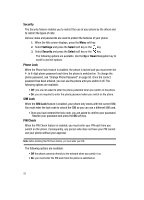
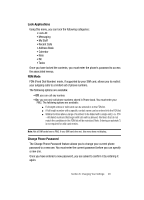
ⅷ User ID: enter the User ID required to connect to the network. ⅷ Password: enter the user password required to connect to the network. ⅷ Protocol: set the connection protocol used by the WAP browser: WAP, HTTP, or Other. ⅷ Home URL: enter the URL address of the page to be used as your homepage. ⅷ Gateway address: (wap1.x only) enter the gateway address of the proxy server. ⅷ Proxy address: (wap2.x and Cingualr MMS) set the proxy server address and port. ⅷ Port: enter the connection port. ⅷ Linger Time (Sec.): set a time period (in seconds) after which the network is disconnected if there has been no new data traffic in that time. ⅷ Advanced Settings: allows you to configure some of the IP-specific information: Static IP, Static DNS, Server information, and Traffic Class. ⅷ Static IP: specify if you want to manually enter an IP address. If you want the IP address to be automatically assigned by the server, remove the check mark. ⅷ Local phone IP: enter the IP address obtained from the network operator, if you checked the Static IP option. ⅷ Static DNS: specify if you want to manually enter the Domain Name Server (DNS) address. If you want the address to be automatically assigned by the server, remove the check mark. ⅷ Server 1/Server 2: enter the Domain Name Server (DNS) addresses. ⅷ Traffic class: select the traffic class. Note: The WAP settings may vary depending on the service provider. Configuring your Phone's USB Connection Your phone can connect to a PC via the included USB cable.The phone can be configured to open launch a default application when an active USB connection is detected. 1. Use the USB adapter cable to connect the handset to the target PC. When an active connection has been established, a USB icon ( ) appears on the phone. 2. When the Idle screen displays, press the Menu soft key. 3. Select Settings and press the Select soft key or the key. 90
-
 1
1 -
2
-
3
-
4
-
5
-
6
-
7
-
8
-
9
-
10
-
11
-
12
-
13
-
14
-
15
-
16
-
17
-
18
-
19
-
20
-
21
-
22
-
23
-
24
-
25
-
26
-
27
-
28
-
29
-
30
-
31
-
32
-
33
-
34
-
35
-
36
-
37
-
38
-
39
-
40
-
41
-
42
-
43
-
44
-
45
-
46
-
47
-
48
-
49
-
50
-
51
-
52
-
53
-
54
-
55
-
56
-
57
-
58
-
59
-
60
-
61
-
62
-
63
-
64
-
65
-
66
-
67
-
68
-
69
-
70
-
71
-
72
-
73
-
74
-
75
-
76
-
77
-
78
-
79
-
80
-
81
-
82
-
83
-
84
-
 85
85 -
 86
86 -
 87
87 -
 88
88 -
 89
89 -
 90
90 -
 91
91 -
 92
92 -
 93
93 -
 94
94 -
 95
95 -
96
-
97
-
98
-
99
-
100
-
101
-
102
-
103
-
104
-
105
-
106
-
107
-
108
-
109
-
110
-
111
-
112
-
113
-
114
-
115
-
116
-
117
-
118
-
119
-
120
-
121
-
122
-
123
-
124
-
125
-
126
-
127
-
128
-
129
-
130
-
131
-
132
-
133
-
134
-
135
-
136
-
137
-
138
-
139
-
140
-
141
-
142
-
143
-
144
-
145
-
146
-
147
-
148
-
149
-
150
-
151
-
152
-
153
-
154
-
155
-
156
-
157
-
158
-
159
-
160
-
161
-
162
-
163
-
164
-
165
-
166
-
167
-
168
-
169
-
170
-
171
-
172
-
173
-
174
-
175
-
176
-
177
 |
 |
