Xerox 3200MFPN User Guide - Page 161
Printing a Phonebook List, Searching with a Particular First Letter
 |
UPC - 095205731958
View all Xerox 3200MFPN manuals
Add to My Manuals
Save this manual to your list of manuals |
Page 161 highlights
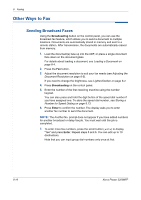
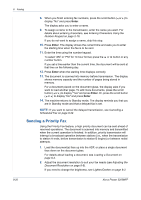
8 Faxing 4. Press the scroll button ( or ) to scroll through the machine's memory until the name and number you want to dial display. You can search upwards or downwards through the entire memory in alphabetical order, from A to Z. While searching through the machine's memory, each entry is preceded by either "S" for speed dial or "G" for group dial numbers. These letters tell you how the number is stored. 5. When the name and/or the number you want displays, press Start or Enter to dial. Searching with a Particular First Letter 1. Press the Fax button. 2. Press Phone Book. 3. Press Enter when "Search&Dial" appears on the display. 4. Press the button labeled with the letter you want to search for. A name beginning with the letter displays. For example, if you want to find the name "MOBILE" press the number 6 button, which is labeled with "MNO". 5. Press the scroll button ( or ) to display the next name. 6. When the name and/or the number you want displays, press Start or Enter to dial. Printing a Phonebook List You can check your automatic dial setting by printing a Phonebook list. 1. Press the Fax button. 2. Press Phone Book. 3. Press Phone Book or the scroll button ( or ) until "Print" appears on the bottom line and press Enter. A list showing your speed dial, and group dial entries prints out. Xerox Phaser 3200MFP 8-17
-
 1
1 -
2
-
3
-
4
-
5
-
6
-
7
-
8
-
9
-
10
-
11
-
12
-
13
-
14
-
15
-
16
-
17
-
18
-
19
-
20
-
21
-
22
-
23
-
24
-
25
-
26
-
27
-
28
-
29
-
30
-
31
-
32
-
33
-
34
-
35
-
36
-
37
-
38
-
39
-
40
-
41
-
42
-
43
-
44
-
45
-
46
-
47
-
48
-
49
-
50
-
51
-
52
-
53
-
54
-
55
-
56
-
57
-
58
-
59
-
60
-
61
-
62
-
63
-
64
-
65
-
66
-
67
-
68
-
69
-
70
-
71
-
72
-
73
-
74
-
75
-
76
-
77
-
78
-
79
-
80
-
81
-
82
-
83
-
84
-
85
-
86
-
87
-
88
-
89
-
90
-
91
-
92
-
93
-
94
-
95
-
96
-
97
-
98
-
99
-
100
-
101
-
102
-
103
-
104
-
105
-
106
-
107
-
108
-
109
-
110
-
111
-
112
-
113
-
114
-
115
-
116
-
117
-
118
-
119
-
120
-
121
-
122
-
123
-
124
-
125
-
126
-
127
-
128
-
129
-
130
-
131
-
132
-
133
-
134
-
135
-
136
-
137
-
138
-
139
-
140
-
141
-
142
-
143
-
144
-
145
-
146
-
147
-
148
-
149
-
150
-
151
-
152
-
153
-
154
-
155
-
 156
156 -
 157
157 -
 158
158 -
 159
159 -
 160
160 -
 161
161 -
 162
162 -
 163
163 -
 164
164 -
 165
165 -
 166
166 -
167
-
168
-
169
-
170
-
171
-
172
-
173
-
174
-
175
-
176
-
177
-
178
-
179
-
180
-
181
-
182
-
183
-
184
-
185
-
186
-
187
-
188
-
189
-
190
-
191
-
192
-
193
-
194
-
195
-
196
-
197
-
198
-
199
-
200
-
201
-
202
-
203
-
204
-
205
-
206
-
207
-
208
-
209
-
210
-
211
-
212
-
213
-
214
-
215
-
216
-
217
-
218
-
219
-
220
-
221
-
222
-
223
-
224
-
225
-
226
-
227
-
228
-
229
-
230
-
231
-
232
-
233
-
234
-
235
-
236
 |
 |
