Xerox 3200MFPN User Guide - Page 82
Installing Printer Software in Windows, Installing Xerox Drivers using the USB port
 |
UPC - 095205731958
View all Xerox 3200MFPN manuals
Add to My Manuals
Save this manual to your list of manuals |
Page 82 highlights
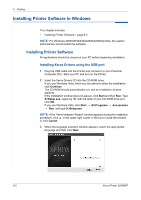
6 Printing Installing Printer Software in Windows This chapter includes: • Installing Printer Software - page 6-2 NOTE: For Windows 2000/XP(32/64bit)/2003(32/64bit)/Vista, the system administrator should install the software. Installing Printer Software All applications should be closed on your PC before beginning installation. Installing Xerox Drivers using the USB port 1. Plug the USB cable into the Printer and connect it to your Personal Computer (PC). Start your PC and turn on the Printer. 2. Insert the Xerox Drivers CD into the CD-ROM drive. If you use Windows Vista, when you are asked to allow the installation, click Continue. The CD-ROM should automatically run, and an installation window appears. If the installation window does not appear, click Start and then Run. Type X:\Setup.exe, replacing "X" with the letter of your CD-ROM drive and click OK. If you use Windows Vista, click Start All Programs Accessories Run, and type X:\Setup.exe NOTE: If the "New Hardware Wizard" window appears during the installation procedure, click in the upper right corner of the box to close the window, or click Cancel. 3. When the language selection window appears, select the appropriate language and then click Next. 6-2 Xerox Phaser 3200MFP
-
 1
1 -
2
-
3
-
4
-
5
-
6
-
7
-
8
-
9
-
10
-
11
-
12
-
13
-
14
-
15
-
16
-
17
-
18
-
19
-
20
-
21
-
22
-
23
-
24
-
25
-
26
-
27
-
28
-
29
-
30
-
31
-
32
-
33
-
34
-
35
-
36
-
37
-
38
-
39
-
40
-
41
-
42
-
43
-
44
-
45
-
46
-
47
-
48
-
49
-
50
-
51
-
52
-
53
-
54
-
55
-
56
-
57
-
58
-
59
-
60
-
61
-
62
-
63
-
64
-
65
-
66
-
67
-
68
-
69
-
70
-
71
-
72
-
73
-
74
-
75
-
76
-
 77
77 -
 78
78 -
 79
79 -
 80
80 -
 81
81 -
 82
82 -
 83
83 -
 84
84 -
 85
85 -
 86
86 -
 87
87 -
88
-
89
-
90
-
91
-
92
-
93
-
94
-
95
-
96
-
97
-
98
-
99
-
100
-
101
-
102
-
103
-
104
-
105
-
106
-
107
-
108
-
109
-
110
-
111
-
112
-
113
-
114
-
115
-
116
-
117
-
118
-
119
-
120
-
121
-
122
-
123
-
124
-
125
-
126
-
127
-
128
-
129
-
130
-
131
-
132
-
133
-
134
-
135
-
136
-
137
-
138
-
139
-
140
-
141
-
142
-
143
-
144
-
145
-
146
-
147
-
148
-
149
-
150
-
151
-
152
-
153
-
154
-
155
-
156
-
157
-
158
-
159
-
160
-
161
-
162
-
163
-
164
-
165
-
166
-
167
-
168
-
169
-
170
-
171
-
172
-
173
-
174
-
175
-
176
-
177
-
178
-
179
-
180
-
181
-
182
-
183
-
184
-
185
-
186
-
187
-
188
-
189
-
190
-
191
-
192
-
193
-
194
-
195
-
196
-
197
-
198
-
199
-
200
-
201
-
202
-
203
-
204
-
205
-
206
-
207
-
208
-
209
-
210
-
211
-
212
-
213
-
214
-
215
-
216
-
217
-
218
-
219
-
220
-
221
-
222
-
223
-
224
-
225
-
226
-
227
-
228
-
229
-
230
-
231
-
232
-
233
-
234
-
235
-
236
 |
 |
