Xerox 6180MFP User Guide - Page 108
Printing from the Control Panel, Retrieve Document Name, Auto Retrieve, Print, User ID, Secure Print
 |
UPC - 095205733839
View all Xerox 6180MFP manuals
Add to My Manuals
Save this manual to your list of manuals |
Page 108 highlights
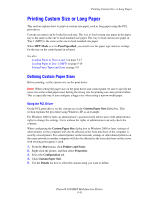
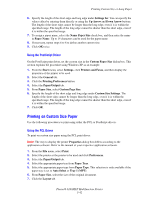
Printing Confidential Document - Secure Print 7. If you want the printer to automatically name the document using the application's document name, in the Retrieve Document Name field, select Auto Retrieve. 8. Click OK twice to accept the Secure Print settings and to send the job. 9. On the Print dialog box click the Print button to send the job to the printer. Printing from the Control Panel To print data stored in the printer by Secure Print: Note: You can also delete, without printing, secure print data stored in the printer. See System Settings on page 9-15. 1. On the control panel, press the Job Status button to display the Walk-Up Features menu. 2. Select Secure Print, and then press the OK button. 3. Select your user name, and then press the OK button. 4. Using the alphanumeric keypad, enter the numeric password, and then press the OK button. 5. Repeat Step 4 for each digit of the password, and then press the OK button. 6. If you submitted more than one secure print job, select the name of the job that you want to print, and then press the OK button. 7. Select Print and Delete or Print and Save, and then press the OK button to print the job. The displayed user ID (up to 8 characters) is the User ID specified in the Secure Print dialog box of the Paper/Output tab of the print driver. For the password, enter the Password set in the Secure Print dialog box of the Paper/Output tab of the print driver. If Password is not configured, there will be no setting on the control panel. The document name displayed (up to 12 characters) is the Document Name specified in the Secure Print dialog box of the Basic tab of the print driver. Phaser® 6180MFP Multifunction Printer 5-45
-
 1
1 -
2
-
3
-
4
-
5
-
6
-
7
-
8
-
9
-
10
-
11
-
12
-
13
-
14
-
15
-
16
-
17
-
18
-
19
-
20
-
21
-
22
-
23
-
24
-
25
-
26
-
27
-
28
-
29
-
30
-
31
-
32
-
33
-
34
-
35
-
36
-
37
-
38
-
39
-
40
-
41
-
42
-
43
-
44
-
45
-
46
-
47
-
48
-
49
-
50
-
51
-
52
-
53
-
54
-
55
-
56
-
57
-
58
-
59
-
60
-
61
-
62
-
63
-
64
-
65
-
66
-
67
-
68
-
69
-
70
-
71
-
72
-
73
-
74
-
75
-
76
-
77
-
78
-
79
-
80
-
81
-
82
-
83
-
84
-
85
-
86
-
87
-
88
-
89
-
90
-
91
-
92
-
93
-
94
-
95
-
96
-
97
-
98
-
99
-
100
-
101
-
102
-
 103
103 -
 104
104 -
 105
105 -
 106
106 -
 107
107 -
 108
108 -
 109
109 -
 110
110 -
 111
111 -
 112
112 -
 113
113 -
114
-
115
-
116
-
117
-
118
-
119
-
120
-
121
-
122
-
123
-
124
-
125
-
126
-
127
-
128
-
129
-
130
-
131
-
132
-
133
-
134
-
135
-
136
-
137
-
138
-
139
-
140
-
141
-
142
-
143
-
144
-
145
-
146
-
147
-
148
-
149
-
150
-
151
-
152
-
153
-
154
-
155
-
156
-
157
-
158
-
159
-
160
-
161
-
162
-
163
-
164
-
165
-
166
-
167
-
168
-
169
-
170
-
171
-
172
-
173
-
174
-
175
-
176
-
177
-
178
-
179
-
180
-
181
-
182
-
183
-
184
-
185
-
186
-
187
-
188
-
189
-
190
-
191
-
192
-
193
-
194
-
195
-
196
-
197
-
198
-
199
-
200
-
201
-
202
-
203
-
204
-
205
-
206
-
207
-
208
-
209
-
210
-
211
-
212
-
213
-
214
-
215
-
216
-
217
-
218
-
219
-
220
-
221
-
222
-
223
-
224
-
225
-
226
-
227
-
228
-
229
-
230
-
231
-
232
-
233
-
234
-
235
-
236
-
237
-
238
-
239
-
240
-
241
-
242
-
243
-
244
-
245
-
246
-
247
-
248
 |
 |
