Adobe 22011292 User Guide - Page 109
Target Product Code, Sample Period, Fine Tune, Find using Analysis, SMPTE Format, SMPTE Offset,
 |
UPC - 883919139081
View all Adobe 22011292 manuals
Add to My Manuals
Save this manual to your list of manuals |
Page 109 highlights
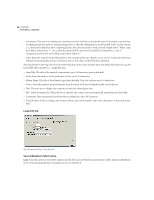
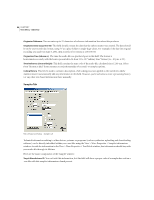
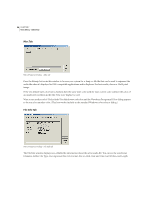
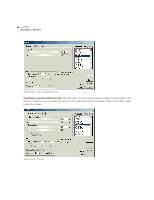
ADOBE AUDITION 95 User Guide Target Product Code You can't edit this information, but this field will show a proper value if a sampler has written a .wav file with this sampler information chunk present. Sample Period The sample rate (or within 1Hz of it) is automatically placed into this box. You can change the text in this field if you wish the sampler to think the data is at a different rate than it actually is. Note: Use this control to select this "base" or "root" note on a sampler that the current audio file is to be assigned to. The audio file's original pitch will be preserved whenever this key is played on a sampler. Fine Tune The actual tone can be entered in this text box in values as precise as 1/100th of a cent. Enter the number of cents above the Note that the tone actually is. Find using Analysis Press this button to have Adobe Audition analyze the audio file to automatically determine the Note and Fine Tune values. • If a sampler loop is selected in the Sampler Loops list, the frequency at the center of that loop is entered into this field for the Note and Fine Tune fields. • If no loops are selected, the center of the entire waveform is used to gain the current note. Note: This value can be off by a few hundredths of a cent, so manual adjustment after finding the note may be necessary. For instance, you may get G#4 at 99.99 cents, which would probably really be A4 and 0 cents. SMPTE Format This field is used to enter in the SMPTE frame rate format for the currently loaded sample. SMPTE Offset Use this field to enter the SMPTE trigger offset point for the currently loaded sample. Example: An audio file for a film soundtrack that would need to be triggered at 45 minutes, 15 seconds and 29 frames, might have a frame rate setting of 30 frames-per-second with an offset of 00:45:14:29. Sampler Loops New loops can be added by first highlighting the range area, and then going to this dialog and pressing the New button. If no area is highlighted, New can still be pressed to add the entire waveform as a new loop. The actual starting point, ending point or length may also be entered in directly by hand in the appropriate fields. Samplers can usually play loops forward, backward, or back and forth and back again. Each loop can be looped a different number of times, or infinitely (as with a sustain loop, and the infinite loop would decay once the synth key is released). Currently this information is only saved in .wav files.
-
 1
1 -
2
-
3
-
4
-
5
-
6
-
7
-
8
-
9
-
10
-
11
-
12
-
13
-
14
-
15
-
16
-
17
-
18
-
19
-
20
-
21
-
22
-
23
-
24
-
25
-
26
-
27
-
28
-
29
-
30
-
31
-
32
-
33
-
34
-
35
-
36
-
37
-
38
-
39
-
40
-
41
-
42
-
43
-
44
-
45
-
46
-
47
-
48
-
49
-
50
-
51
-
52
-
53
-
54
-
55
-
56
-
57
-
58
-
59
-
60
-
61
-
62
-
63
-
64
-
65
-
66
-
67
-
68
-
69
-
70
-
71
-
72
-
73
-
74
-
75
-
76
-
77
-
78
-
79
-
80
-
81
-
82
-
83
-
84
-
85
-
86
-
87
-
88
-
89
-
90
-
91
-
92
-
93
-
94
-
95
-
96
-
97
-
98
-
99
-
100
-
101
-
102
-
103
-
 104
104 -
 105
105 -
 106
106 -
 107
107 -
 108
108 -
 109
109 -
 110
110 -
 111
111 -
 112
112 -
 113
113 -
 114
114 -
115
-
116
-
117
-
118
-
119
-
120
-
121
-
122
-
123
-
124
-
125
-
126
-
127
-
128
-
129
-
130
-
131
-
132
-
133
-
134
-
135
-
136
-
137
-
138
-
139
-
140
-
141
-
142
-
143
-
144
-
145
-
146
-
147
-
148
-
149
-
150
-
151
-
152
-
153
-
154
-
155
-
156
-
157
-
158
-
159
-
160
-
161
-
162
-
163
-
164
-
165
-
166
-
167
-
168
-
169
-
170
-
171
-
172
-
173
-
174
-
175
-
176
-
177
-
178
-
179
-
180
-
181
-
182
-
183
-
184
-
185
-
186
-
187
-
188
-
189
-
190
-
191
-
192
-
193
-
194
-
195
-
196
-
197
-
198
-
199
-
200
-
201
-
202
-
203
-
204
-
205
-
206
-
207
-
208
-
209
-
210
-
211
-
212
-
213
-
214
-
215
-
216
-
217
-
218
-
219
-
220
-
221
-
222
-
223
-
224
-
225
-
226
-
227
-
228
-
229
-
230
-
231
-
232
-
233
-
234
-
235
-
236
-
237
-
238
-
239
-
240
-
241
-
242
-
243
-
244
-
245
-
246
-
247
-
248
-
249
-
250
-
251
-
252
-
253
-
254
-
255
-
256
-
257
-
258
-
259
-
260
-
261
-
262
-
263
-
264
-
265
-
266
-
267
-
268
-
269
-
270
-
271
-
272
-
273
-
274
-
275
-
276
-
277
-
278
-
279
-
280
-
281
-
282
-
283
-
284
-
285
-
286
-
287
-
288
-
289
-
290
-
291
-
292
-
293
-
294
-
295
-
296
-
297
-
298
-
299
-
300
-
301
-
302
-
303
-
304
-
305
-
306
-
307
-
308
-
309
-
310
-
311
-
312
-
313
-
314
-
315
-
316
-
317
-
318
-
319
-
320
-
321
-
322
-
323
-
324
-
325
-
326
-
327
-
328
-
329
-
330
-
331
-
332
-
333
-
334
-
335
-
336
-
337
-
338
-
339
-
340
-
341
-
342
-
343
-
344
-
345
-
346
-
347
-
348
-
349
-
350
-
351
-
352
-
353
-
354
-
355
-
356
-
357
-
358
-
359
-
360
-
361
-
362
-
363
-
364
-
365
-
366
-
367
-
368
-
369
-
370
-
371
-
372
-
373
-
374
-
375
-
376
-
377
-
378
-
379
-
380
-
381
-
382
-
383
-
384
-
385
-
386
-
387
-
388
-
389
-
390
 |
 |
