Adobe 22011292 User Guide - Page 150
Delay Units, Delay Settings
 |
UPC - 883919139081
View all Adobe 22011292 manuals
Add to My Manuals
Save this manual to your list of manuals |
Page 150 highlights
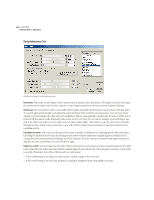
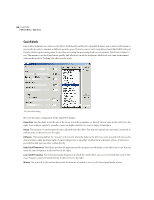
136 CHAPTER 8 Effects Menu - Edit View Delay Units This is a numbered list that displays the different Delay Units and their settings in the format: Delay [delay time] at [Offset] ([Feedback percentage]). Click on a delay unit in the list to adjust the Delay Settings sliders for that particular Delay Unit. The Add button creates a new Delay Unit with the current Delay Settings, and the Remove button deletes the currently highlighted Delay Unit. You can create a maximum of 10 Delay Units. Each delay unit is represented in the graph above as a back-leading arrow starting at the Offset and going back the number of milliseconds stated under Delay. A single delay unit is much the same as the Echo function, but with a slightly different filtering setup. (It uses two sliding bands with variable cutoff points instead of 8 bands of filtering.) Delay Settings These are the characteristics used for the delay settings of each delay unit. Click on a different delay unit in the list (or add a new one) to bring up the Delay settings for that particular delay unit. Offset Adjusts the point in the delay line from which Adobe Audition will take the audio. It is then mixed into an earlier point in the delay line, which will cause echoing. Keep in mind that it's the relative positions of the offsets of the delay units that make a difference, not their absolute position. For instance, if you have two delay units at offsets of 200 and 500, the resulting audio will sound the same if they were at 100 and 400. The difference between the offsets is what is important. Delay Adobe Audition feeds audio back into the delay line after a certain delay. This slider adjusts that delay, in milliseconds. The result is an echo with a period of the delay given to be generated. With several delay units of varying delays added, the final echo pattern could become very complex. Very short delays give ringing or robotic sounding events. Longer delays give more distinct echoes. Feedback •Is the percentage of the original signal to feed back into the delay line. • If the feedback slider is set too high, definite ringing and true feedback will occur. The audio will get louder and louder until it clips and becomes distorted. However, sometimes you may want this effect, which is similar to the feedback you hear when a live microphone is set too close to a loudspeaker. • If the feedback percentage is extremely low, then not very much of the original signal will be fed back into the loop. This results in a very subtle effect. Allpass Feedback To help prevent the DC component from getting out of hand (the waveform tending upwards or downwards until it clips), enable the Allpass Feedback option. When turned on, audio from the destination of the delay loop is mixed back into audio from the originating delay offset. Instead of going one way (from the offset back a certain number of milliseconds), it also goes from the destination up to the source - a sort of forward feedback, or "feedforward". This setting is handy when designing reverb effects. Low-Cut and High-Cut Filters Audio being fed back into the delay line can also be filtered before going back in. With a low-cut filter, the low frequencies are reduced (or boosted) depending on the Cutoff and Boost settings. The High-Cut filter can also cut or even boost the high frequencies. This will make each successive echo filtered slightly differently, for interesting effects.
-
 1
1 -
2
-
3
-
4
-
5
-
6
-
7
-
8
-
9
-
10
-
11
-
12
-
13
-
14
-
15
-
16
-
17
-
18
-
19
-
20
-
21
-
22
-
23
-
24
-
25
-
26
-
27
-
28
-
29
-
30
-
31
-
32
-
33
-
34
-
35
-
36
-
37
-
38
-
39
-
40
-
41
-
42
-
43
-
44
-
45
-
46
-
47
-
48
-
49
-
50
-
51
-
52
-
53
-
54
-
55
-
56
-
57
-
58
-
59
-
60
-
61
-
62
-
63
-
64
-
65
-
66
-
67
-
68
-
69
-
70
-
71
-
72
-
73
-
74
-
75
-
76
-
77
-
78
-
79
-
80
-
81
-
82
-
83
-
84
-
85
-
86
-
87
-
88
-
89
-
90
-
91
-
92
-
93
-
94
-
95
-
96
-
97
-
98
-
99
-
100
-
101
-
102
-
103
-
104
-
105
-
106
-
107
-
108
-
109
-
110
-
111
-
112
-
113
-
114
-
115
-
116
-
117
-
118
-
119
-
120
-
121
-
122
-
123
-
124
-
125
-
126
-
127
-
128
-
129
-
130
-
131
-
132
-
133
-
134
-
135
-
136
-
137
-
138
-
139
-
140
-
141
-
142
-
143
-
144
-
 145
145 -
 146
146 -
 147
147 -
 148
148 -
 149
149 -
 150
150 -
 151
151 -
 152
152 -
 153
153 -
 154
154 -
 155
155 -
156
-
157
-
158
-
159
-
160
-
161
-
162
-
163
-
164
-
165
-
166
-
167
-
168
-
169
-
170
-
171
-
172
-
173
-
174
-
175
-
176
-
177
-
178
-
179
-
180
-
181
-
182
-
183
-
184
-
185
-
186
-
187
-
188
-
189
-
190
-
191
-
192
-
193
-
194
-
195
-
196
-
197
-
198
-
199
-
200
-
201
-
202
-
203
-
204
-
205
-
206
-
207
-
208
-
209
-
210
-
211
-
212
-
213
-
214
-
215
-
216
-
217
-
218
-
219
-
220
-
221
-
222
-
223
-
224
-
225
-
226
-
227
-
228
-
229
-
230
-
231
-
232
-
233
-
234
-
235
-
236
-
237
-
238
-
239
-
240
-
241
-
242
-
243
-
244
-
245
-
246
-
247
-
248
-
249
-
250
-
251
-
252
-
253
-
254
-
255
-
256
-
257
-
258
-
259
-
260
-
261
-
262
-
263
-
264
-
265
-
266
-
267
-
268
-
269
-
270
-
271
-
272
-
273
-
274
-
275
-
276
-
277
-
278
-
279
-
280
-
281
-
282
-
283
-
284
-
285
-
286
-
287
-
288
-
289
-
290
-
291
-
292
-
293
-
294
-
295
-
296
-
297
-
298
-
299
-
300
-
301
-
302
-
303
-
304
-
305
-
306
-
307
-
308
-
309
-
310
-
311
-
312
-
313
-
314
-
315
-
316
-
317
-
318
-
319
-
320
-
321
-
322
-
323
-
324
-
325
-
326
-
327
-
328
-
329
-
330
-
331
-
332
-
333
-
334
-
335
-
336
-
337
-
338
-
339
-
340
-
341
-
342
-
343
-
344
-
345
-
346
-
347
-
348
-
349
-
350
-
351
-
352
-
353
-
354
-
355
-
356
-
357
-
358
-
359
-
360
-
361
-
362
-
363
-
364
-
365
-
366
-
367
-
368
-
369
-
370
-
371
-
372
-
373
-
374
-
375
-
376
-
377
-
378
-
379
-
380
-
381
-
382
-
383
-
384
-
385
-
386
-
387
-
388
-
389
-
390
 |
 |
