Adobe 22011292 User Guide - Page 87
Out of Band Peaks, Adjust Sample Rate
 |
UPC - 883919139081
View all Adobe 22011292 manuals
Add to My Manuals
Save this manual to your list of manuals |
Page 87 highlights
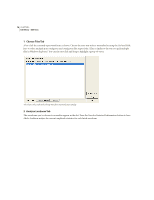
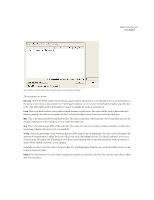
ADOBE AUDITION 73 User Guide Out of Band Peaks These settings determine how Adobe Audition handles out of band peaks. When amplifying audio, the audio samples may go beyond clipping. If this happens, you can choose to just let it clip (and cause distortion) - or you can apply limiting to those areas so the audio doesn't actually clip (which is what's commonly done for the audio of TV commercials so they sound louder). No Limiting (Clip) If this option is chosen, no limiting will be performed, which means you could end up with clipped (distorted) audio. Use Limiting Choose this option to have Adobe Audition's Hard Limiter spring into action, if needed, to keep out of band peaks from clipping. • Look Ahead Time: This is the amount of time (measured in milliseconds) that it will generally take to attenuate the audio before the loudest peak will be hit. Note: If this value is too small, audible distortion effects may be heard. Make sure the value is at least 5 ms. (The default is 12 ms.) • Release Time: This is the time (measured in milliseconds) that it takes for the attenuation to rebound back 12dB (or roughly the time it would take audio to resume normal volume if an extremely loud peak was encountered). Generally around 100 ms (the default) works very well, and will preserve very low bass frequencies. Note: If this value is too long, audio may just stay very quiet, and not resume normal levels for a while. (The default is 200 ms.) Advanced Here's where you can modify the Statistics RMS Width, which is measured in milliseconds. The default is 50 ms. Run Normalize After adjusting the parameters to your preferences, press the Run Normalize button to close the Group Waveform Normalization dialog and perform normalization on all selected waveforms. Adjust Sample Rate Use this command to bring up the Adjust Sample Rate window. It lets you play an audio file at any sample rate that is supported by your sound card. Keep in mind that this command doesn't let you actually convert the audio file - you'll need to go to Edit > Convert Sample Type for that. However, it does let you hear what the current waveform would sound like at a different sample rate.
-
 1
1 -
2
-
3
-
4
-
5
-
6
-
7
-
8
-
9
-
10
-
11
-
12
-
13
-
14
-
15
-
16
-
17
-
18
-
19
-
20
-
21
-
22
-
23
-
24
-
25
-
26
-
27
-
28
-
29
-
30
-
31
-
32
-
33
-
34
-
35
-
36
-
37
-
38
-
39
-
40
-
41
-
42
-
43
-
44
-
45
-
46
-
47
-
48
-
49
-
50
-
51
-
52
-
53
-
54
-
55
-
56
-
57
-
58
-
59
-
60
-
61
-
62
-
63
-
64
-
65
-
66
-
67
-
68
-
69
-
70
-
71
-
72
-
73
-
74
-
75
-
76
-
77
-
78
-
79
-
80
-
81
-
 82
82 -
 83
83 -
 84
84 -
 85
85 -
 86
86 -
 87
87 -
 88
88 -
 89
89 -
 90
90 -
 91
91 -
 92
92 -
93
-
94
-
95
-
96
-
97
-
98
-
99
-
100
-
101
-
102
-
103
-
104
-
105
-
106
-
107
-
108
-
109
-
110
-
111
-
112
-
113
-
114
-
115
-
116
-
117
-
118
-
119
-
120
-
121
-
122
-
123
-
124
-
125
-
126
-
127
-
128
-
129
-
130
-
131
-
132
-
133
-
134
-
135
-
136
-
137
-
138
-
139
-
140
-
141
-
142
-
143
-
144
-
145
-
146
-
147
-
148
-
149
-
150
-
151
-
152
-
153
-
154
-
155
-
156
-
157
-
158
-
159
-
160
-
161
-
162
-
163
-
164
-
165
-
166
-
167
-
168
-
169
-
170
-
171
-
172
-
173
-
174
-
175
-
176
-
177
-
178
-
179
-
180
-
181
-
182
-
183
-
184
-
185
-
186
-
187
-
188
-
189
-
190
-
191
-
192
-
193
-
194
-
195
-
196
-
197
-
198
-
199
-
200
-
201
-
202
-
203
-
204
-
205
-
206
-
207
-
208
-
209
-
210
-
211
-
212
-
213
-
214
-
215
-
216
-
217
-
218
-
219
-
220
-
221
-
222
-
223
-
224
-
225
-
226
-
227
-
228
-
229
-
230
-
231
-
232
-
233
-
234
-
235
-
236
-
237
-
238
-
239
-
240
-
241
-
242
-
243
-
244
-
245
-
246
-
247
-
248
-
249
-
250
-
251
-
252
-
253
-
254
-
255
-
256
-
257
-
258
-
259
-
260
-
261
-
262
-
263
-
264
-
265
-
266
-
267
-
268
-
269
-
270
-
271
-
272
-
273
-
274
-
275
-
276
-
277
-
278
-
279
-
280
-
281
-
282
-
283
-
284
-
285
-
286
-
287
-
288
-
289
-
290
-
291
-
292
-
293
-
294
-
295
-
296
-
297
-
298
-
299
-
300
-
301
-
302
-
303
-
304
-
305
-
306
-
307
-
308
-
309
-
310
-
311
-
312
-
313
-
314
-
315
-
316
-
317
-
318
-
319
-
320
-
321
-
322
-
323
-
324
-
325
-
326
-
327
-
328
-
329
-
330
-
331
-
332
-
333
-
334
-
335
-
336
-
337
-
338
-
339
-
340
-
341
-
342
-
343
-
344
-
345
-
346
-
347
-
348
-
349
-
350
-
351
-
352
-
353
-
354
-
355
-
356
-
357
-
358
-
359
-
360
-
361
-
362
-
363
-
364
-
365
-
366
-
367
-
368
-
369
-
370
-
371
-
372
-
373
-
374
-
375
-
376
-
377
-
378
-
379
-
380
-
381
-
382
-
383
-
384
-
385
-
386
-
387
-
388
-
389
-
390
 |
 |
