Adobe 22011292 User Guide - Page 57
Mix Paste, Silence, Add to Cue List, Wave Properties, Edit Sample Directly
 |
UPC - 883919139081
View all Adobe 22011292 manuals
Add to My Manuals
Save this manual to your list of manuals |
Page 57 highlights
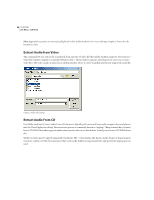
ADOBE AUDITION 43 User Guide Mix Paste Use Mix Paste to mix any audio data from the active clipboard with the currently shown waveform. (You might think of it as a "quick and dirty" alternative to Adobe Audition's more powerful and flexible multitrack functions.) Clipboard data is inserted or overlapped beginning at the current insertion point or selection. Should the format of the waveform data on the clipboard differ from the format of the file it's being pasted into, Adobe Audition automatically converts it before pasting. Trim Trim is used to get rid of unwanted audio (like silence) on one or both sides of the selected audio. Everything in the waveform is removed except for the highlighted selection. Note: The deleted portion(s) aren't copied to the clipboard and can only be retrieved using the Edit > Undo command, or by File > Revert to Saved if you haven't saved the file since trimming. Silence This function silences out the selected range of the waveform. Unlike deleting or cutting a selection - which splices the surrounding material together - Silence leaves the duration of the selection intact, and simply zeroes the amplitude within it. Note: You must select part or all of your waveform first in order for Silence to work. Add to Cue List This command adds the current cursor position to Adobe Audition's Cue List. Wave Properties Access this command to bring up a tabbed window that lets you embed text and graphics, specify certain parameters, and get information about the active waveform. Edit Sample Directly If you Zoom In far enough in Edit View, you can modify each sample of a waveform directly. To do this, select a small portion of the waveform and use the Zoom to Selection button (one of Adobe Audition's Zoom Buttons) to zoom in as far as you can go. The Wave Display zoomed in to the sample level Instead of looking "wavy," the waveform is displayed as a sequence of squares strung together by a line. Those squares are samples. Move your mouse cursor over one. You'll notice the cursor turns into a hand pointer. Left-click on a sample and drag it up or down as desired. Right-click on a sample to display the Edit Sample Directly dialog.
-
 1
1 -
2
-
3
-
4
-
5
-
6
-
7
-
8
-
9
-
10
-
11
-
12
-
13
-
14
-
15
-
16
-
17
-
18
-
19
-
20
-
21
-
22
-
23
-
24
-
25
-
26
-
27
-
28
-
29
-
30
-
31
-
32
-
33
-
34
-
35
-
36
-
37
-
38
-
39
-
40
-
41
-
42
-
43
-
44
-
45
-
46
-
47
-
48
-
49
-
50
-
51
-
 52
52 -
 53
53 -
 54
54 -
 55
55 -
 56
56 -
 57
57 -
 58
58 -
 59
59 -
 60
60 -
 61
61 -
 62
62 -
63
-
64
-
65
-
66
-
67
-
68
-
69
-
70
-
71
-
72
-
73
-
74
-
75
-
76
-
77
-
78
-
79
-
80
-
81
-
82
-
83
-
84
-
85
-
86
-
87
-
88
-
89
-
90
-
91
-
92
-
93
-
94
-
95
-
96
-
97
-
98
-
99
-
100
-
101
-
102
-
103
-
104
-
105
-
106
-
107
-
108
-
109
-
110
-
111
-
112
-
113
-
114
-
115
-
116
-
117
-
118
-
119
-
120
-
121
-
122
-
123
-
124
-
125
-
126
-
127
-
128
-
129
-
130
-
131
-
132
-
133
-
134
-
135
-
136
-
137
-
138
-
139
-
140
-
141
-
142
-
143
-
144
-
145
-
146
-
147
-
148
-
149
-
150
-
151
-
152
-
153
-
154
-
155
-
156
-
157
-
158
-
159
-
160
-
161
-
162
-
163
-
164
-
165
-
166
-
167
-
168
-
169
-
170
-
171
-
172
-
173
-
174
-
175
-
176
-
177
-
178
-
179
-
180
-
181
-
182
-
183
-
184
-
185
-
186
-
187
-
188
-
189
-
190
-
191
-
192
-
193
-
194
-
195
-
196
-
197
-
198
-
199
-
200
-
201
-
202
-
203
-
204
-
205
-
206
-
207
-
208
-
209
-
210
-
211
-
212
-
213
-
214
-
215
-
216
-
217
-
218
-
219
-
220
-
221
-
222
-
223
-
224
-
225
-
226
-
227
-
228
-
229
-
230
-
231
-
232
-
233
-
234
-
235
-
236
-
237
-
238
-
239
-
240
-
241
-
242
-
243
-
244
-
245
-
246
-
247
-
248
-
249
-
250
-
251
-
252
-
253
-
254
-
255
-
256
-
257
-
258
-
259
-
260
-
261
-
262
-
263
-
264
-
265
-
266
-
267
-
268
-
269
-
270
-
271
-
272
-
273
-
274
-
275
-
276
-
277
-
278
-
279
-
280
-
281
-
282
-
283
-
284
-
285
-
286
-
287
-
288
-
289
-
290
-
291
-
292
-
293
-
294
-
295
-
296
-
297
-
298
-
299
-
300
-
301
-
302
-
303
-
304
-
305
-
306
-
307
-
308
-
309
-
310
-
311
-
312
-
313
-
314
-
315
-
316
-
317
-
318
-
319
-
320
-
321
-
322
-
323
-
324
-
325
-
326
-
327
-
328
-
329
-
330
-
331
-
332
-
333
-
334
-
335
-
336
-
337
-
338
-
339
-
340
-
341
-
342
-
343
-
344
-
345
-
346
-
347
-
348
-
349
-
350
-
351
-
352
-
353
-
354
-
355
-
356
-
357
-
358
-
359
-
360
-
361
-
362
-
363
-
364
-
365
-
366
-
367
-
368
-
369
-
370
-
371
-
372
-
373
-
374
-
375
-
376
-
377
-
378
-
379
-
380
-
381
-
382
-
383
-
384
-
385
-
386
-
387
-
388
-
389
-
390
 |
 |
