Adobe 22011292 User Guide - Page 141
Signal and Microphone Placement feet
 |
UPC - 883919139081
View all Adobe 22011292 manuals
Add to My Manuals
Save this manual to your list of manuals |
Page 141 highlights
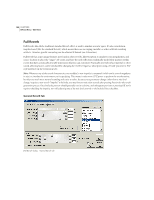
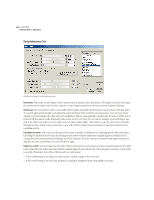
ADOBE AUDITION 127 User Guide Damping Factors Use damping factors to describe the type of virtual room in which the audio is being played. These factors can simulate wall coverings, floor coverings, and other objects in the room that absorb sound. Granted, in real life, various objects absorb different frequencies, but in this simulation all frequencies are reflected equally. For example, the fact that cement reflects high frequencies better than low ones isn't accounted for, but great effects can still be achieved (and they're much more realistic than those of basic Echo functions). The effect of speaker placement enhancing or canceling certain frequencies, though, is still accurate. A damping factor of 1.0 is the highest, simulating total reflectivity, while a factor of 0.0 is the lowest, which represents complete sound absorption (no reflecting surface). To give more control over the environment, apply damping factors to any of the four walls, floor, and ceiling. If a wall has a damping factor of 1.0, it is totally reflective (rather like cement). If a wall has a very low damping factor, like 0.05, it will absorb most of the sound (like carpeting, heavy draperies, or sound proofing panels). You can also lower the damping factor of some of the walls to simulate other objects in the room, which effectively absorb some of the audio. Signal and Microphone Placement (feet) • Source Signal: Enter the desired values of the Source Signal (your waveform or selection), measured in feet, in the Dx (Distance) from Left Wall, Dx from Back Wall, and Dx Above Floor fields. (When using a stereo waveform, you can have different values for both the left and right channels.) The signal will then simulate a single, non-directional point source, meaning that the sound will radiate outwards in all directions. The distance between the source and the walls affects which frequencies are enhanced and is crucial to the overall ambient effect. Use the Dx (Distance) values in conjunction with Room Size values to determine exact 3D placement. If you use a values greater than the dimensions of the room (a Dx Above Floor of 21 feet in a room with a Height of 20 feet, for example), Adobe Audition will use the greatest possible value (20 feet in this case). • Microphone Placement: Enter the desired virtual microphone values, measured in feet, in the Dx (Distance) from Left Wall, Dx from Back Wall, and Dx Above Floor fields. Depending on whether the waveform is mono or stereo, up to two virtual mike pickups can be used. Each microphone is routed to its own respective channel of a stereo audio file. The resulting echoes are exactly what the microphone(s) would pick up in the room at the specified location. Place the virtual microphones in a stereo setting one foot apart to simulate human ears. The placement of and distance between the mikes gives the brain cues about the directions of each echo and the size of the room. Try listening with headphones to virtual microphones that have been placed far apart; this gives a very large "aural" or "spacey" feeling to the sound. Note: Make sure you always place the virtual microphone(s) sufficiently far away from the source. If the microphone and source are too close together, you will just hear the source and no echoes. This is analogous to placing your ear right next to the sound source, where you will hear the sound only (due to its loudness). Mix Left/Right Into Single Source When working with stereo audio, there are actually two source signals (left and right) that can be placed independently. In most instances, the stereo effect will be dramatically enhanced and sound fuller and often richer when this box is unchecked. This does, however, require twice as many calculations as a single audio source. If faster processing is desired, check this option, which will sum the left and right channels of a stereo waveform before routing it to the effects processor.
-
 1
1 -
2
-
3
-
4
-
5
-
6
-
7
-
8
-
9
-
10
-
11
-
12
-
13
-
14
-
15
-
16
-
17
-
18
-
19
-
20
-
21
-
22
-
23
-
24
-
25
-
26
-
27
-
28
-
29
-
30
-
31
-
32
-
33
-
34
-
35
-
36
-
37
-
38
-
39
-
40
-
41
-
42
-
43
-
44
-
45
-
46
-
47
-
48
-
49
-
50
-
51
-
52
-
53
-
54
-
55
-
56
-
57
-
58
-
59
-
60
-
61
-
62
-
63
-
64
-
65
-
66
-
67
-
68
-
69
-
70
-
71
-
72
-
73
-
74
-
75
-
76
-
77
-
78
-
79
-
80
-
81
-
82
-
83
-
84
-
85
-
86
-
87
-
88
-
89
-
90
-
91
-
92
-
93
-
94
-
95
-
96
-
97
-
98
-
99
-
100
-
101
-
102
-
103
-
104
-
105
-
106
-
107
-
108
-
109
-
110
-
111
-
112
-
113
-
114
-
115
-
116
-
117
-
118
-
119
-
120
-
121
-
122
-
123
-
124
-
125
-
126
-
127
-
128
-
129
-
130
-
131
-
132
-
133
-
134
-
135
-
 136
136 -
 137
137 -
 138
138 -
 139
139 -
 140
140 -
 141
141 -
 142
142 -
 143
143 -
 144
144 -
 145
145 -
 146
146 -
147
-
148
-
149
-
150
-
151
-
152
-
153
-
154
-
155
-
156
-
157
-
158
-
159
-
160
-
161
-
162
-
163
-
164
-
165
-
166
-
167
-
168
-
169
-
170
-
171
-
172
-
173
-
174
-
175
-
176
-
177
-
178
-
179
-
180
-
181
-
182
-
183
-
184
-
185
-
186
-
187
-
188
-
189
-
190
-
191
-
192
-
193
-
194
-
195
-
196
-
197
-
198
-
199
-
200
-
201
-
202
-
203
-
204
-
205
-
206
-
207
-
208
-
209
-
210
-
211
-
212
-
213
-
214
-
215
-
216
-
217
-
218
-
219
-
220
-
221
-
222
-
223
-
224
-
225
-
226
-
227
-
228
-
229
-
230
-
231
-
232
-
233
-
234
-
235
-
236
-
237
-
238
-
239
-
240
-
241
-
242
-
243
-
244
-
245
-
246
-
247
-
248
-
249
-
250
-
251
-
252
-
253
-
254
-
255
-
256
-
257
-
258
-
259
-
260
-
261
-
262
-
263
-
264
-
265
-
266
-
267
-
268
-
269
-
270
-
271
-
272
-
273
-
274
-
275
-
276
-
277
-
278
-
279
-
280
-
281
-
282
-
283
-
284
-
285
-
286
-
287
-
288
-
289
-
290
-
291
-
292
-
293
-
294
-
295
-
296
-
297
-
298
-
299
-
300
-
301
-
302
-
303
-
304
-
305
-
306
-
307
-
308
-
309
-
310
-
311
-
312
-
313
-
314
-
315
-
316
-
317
-
318
-
319
-
320
-
321
-
322
-
323
-
324
-
325
-
326
-
327
-
328
-
329
-
330
-
331
-
332
-
333
-
334
-
335
-
336
-
337
-
338
-
339
-
340
-
341
-
342
-
343
-
344
-
345
-
346
-
347
-
348
-
349
-
350
-
351
-
352
-
353
-
354
-
355
-
356
-
357
-
358
-
359
-
360
-
361
-
362
-
363
-
364
-
365
-
366
-
367
-
368
-
369
-
370
-
371
-
372
-
373
-
374
-
375
-
376
-
377
-
378
-
379
-
380
-
381
-
382
-
383
-
384
-
385
-
386
-
387
-
388
-
389
-
390
 |
 |
