Canon PIXMA MX532 Fax Guide - Page 13
Setting the DRPD Ring Pattern US and Canada only
 |
View all Canon PIXMA MX532 manuals
Add to My Manuals
Save this manual to your list of manuals |
Page 13 highlights
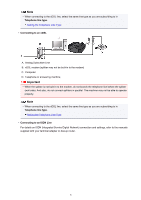
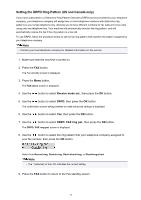
Setting the DRPD Ring Pattern (US and Canada only) If you have subscribed to a Distinctive Ring Pattern Detection (DRPD) service provided by your telephone company, your telephone company will assign two or more telephone numbers with distinctive ring patterns to your single telephone line, allowing you to have different numbers for fax calls and voice calls using only one telephone line. Your machine will automatically monitor the ring pattern, and will automatically receive the fax if the ring pattern is a fax call. To use DRPD, follow the procedure below to set the fax ring pattern that matches the pattern assigned by your telephone company. Note • Contact your local telephone company for detailed information on this service. 1. Make sure that the machine is turned on. 2. Press the FAX button. The Fax standby screen is displayed. 3. Press the Menu button. The FAX menu screen is displayed. 4. Use the button to select Receive mode set., then press the OK button. 5. Use the button to select DRPD, then press the OK button. The confirmation screen asking whether to make advanced settings is displayed. 6. Use the button to select Yes, then press the OK button. 7. Use the button to select DRPD: FAX ring pat., then press the OK button. The DRPD: FAX ring pat. screen is displayed. 8. Use the button to select the ring pattern that your telephone company assigned to your fax number, then press the OK button. Select from Normal ring, Double ring, Short-short-long, or Short-long-short. Note • The * (asterisk) on the LCD indicates the current setting. 9. Press the FAX button to return to the Fax standby screen. 13
-
 1
1 -
2
-
3
-
4
-
5
-
6
-
7
-
 8
8 -
 9
9 -
 10
10 -
 11
11 -
 12
12 -
 13
13 -
 14
14 -
 15
15 -
 16
16 -
 17
17 -
 18
18 -
19
-
20
-
21
-
22
-
23
-
24
-
25
-
26
-
27
-
28
-
29
-
30
-
31
-
32
-
33
-
34
-
35
-
36
-
37
-
38
-
39
-
40
-
41
-
42
-
43
-
44
-
45
-
46
-
47
-
48
-
49
-
50
-
51
-
52
-
53
-
54
-
55
-
56
-
57
-
58
-
59
-
60
-
61
-
62
-
63
-
64
-
65
-
66
-
67
-
68
-
69
-
70
-
71
-
72
-
73
-
74
-
75
-
76
-
77
-
78
-
79
-
80
-
81
-
82
-
83
-
84
-
85
-
86
-
87
-
88
-
89
-
90
-
91
-
92
-
93
-
94
-
95
-
96
-
97
-
98
-
99
-
100
-
101
-
102
-
103
-
104
-
105
-
106
-
107
-
108
-
109
-
110
-
111
-
112
-
113
-
114
-
115
 |
 |