Canon PIXMA MX532 Fax Guide - Page 19
Sending Faxes with the Numeric Buttons - scan
 |
View all Canon PIXMA MX532 manuals
Add to My Manuals
Save this manual to your list of manuals |
Page 19 highlights
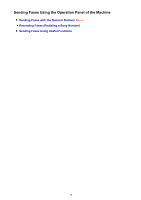
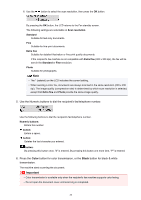
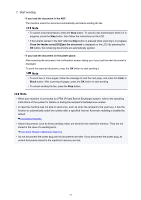
Sending Faxes with the Numeric Buttons This section describes dialing and sending faxes directly using the Numeric buttons. Important • It may be possible that faxes will reach unintended recipients due to the misdialing or incorrect registration of fax/telephone numbers. When you send important documents, it is recommended that you send them after speaking on the telephone. Sending a Fax after Speaking on Telephone 1. Make sure that the machine is turned on. 2. Press the FAX button. The Fax standby screen is displayed. 3. Load documents on the platen glass or in the ADF. Important • When sending a double-sided document, load the document on the platen glass. Double-sided documents cannot be automatically scanned and sent from the ADF. Note • For details on the types, conditions of document, and how to load the document: Loading Originals 4. Adjust the scan contrast and resolution as necessary. Adjust the scan contrast and resolution following the procedure below. 1. Press the Menu button. The FAX menu screen is displayed. 2. Use the button to select FAX TX settings, then press the OK button. 3. Use the button to select Scan contrast, then press the OK button. The Scan contrast screen is displayed. 4. Use the button to select the scan contrast, then press the OK button. The button decreases the scan contrast, and the button increases the scan contrast. By pressing the OK button, the LCD returns to the FAX TX settings screen. 5. Use the button to select Scan resolution, then press the OK button. The Scan resolution screen is displayed. 19
-
 1
1 -
2
-
3
-
4
-
5
-
6
-
7
-
8
-
9
-
10
-
11
-
12
-
13
-
 14
14 -
 15
15 -
 16
16 -
 17
17 -
 18
18 -
 19
19 -
 20
20 -
 21
21 -
 22
22 -
 23
23 -
 24
24 -
25
-
26
-
27
-
28
-
29
-
30
-
31
-
32
-
33
-
34
-
35
-
36
-
37
-
38
-
39
-
40
-
41
-
42
-
43
-
44
-
45
-
46
-
47
-
48
-
49
-
50
-
51
-
52
-
53
-
54
-
55
-
56
-
57
-
58
-
59
-
60
-
61
-
62
-
63
-
64
-
65
-
66
-
67
-
68
-
69
-
70
-
71
-
72
-
73
-
74
-
75
-
76
-
77
-
78
-
79
-
80
-
81
-
82
-
83
-
84
-
85
-
86
-
87
-
88
-
89
-
90
-
91
-
92
-
93
-
94
-
95
-
96
-
97
-
98
-
99
-
100
-
101
-
102
-
103
-
104
-
105
-
106
-
107
-
108
-
109
-
110
-
111
-
112
-
113
-
114
-
115
 |
 |