Canon PIXMA Pro9500 Quick Start Guide - Page 10
Load Limit Mark, Basic Printing, Prepare to load paper., Load the paper. - mark 2
 |
View all Canon PIXMA Pro9500 manuals
Add to My Manuals
Save this manual to your list of manuals |
Page 10 highlights
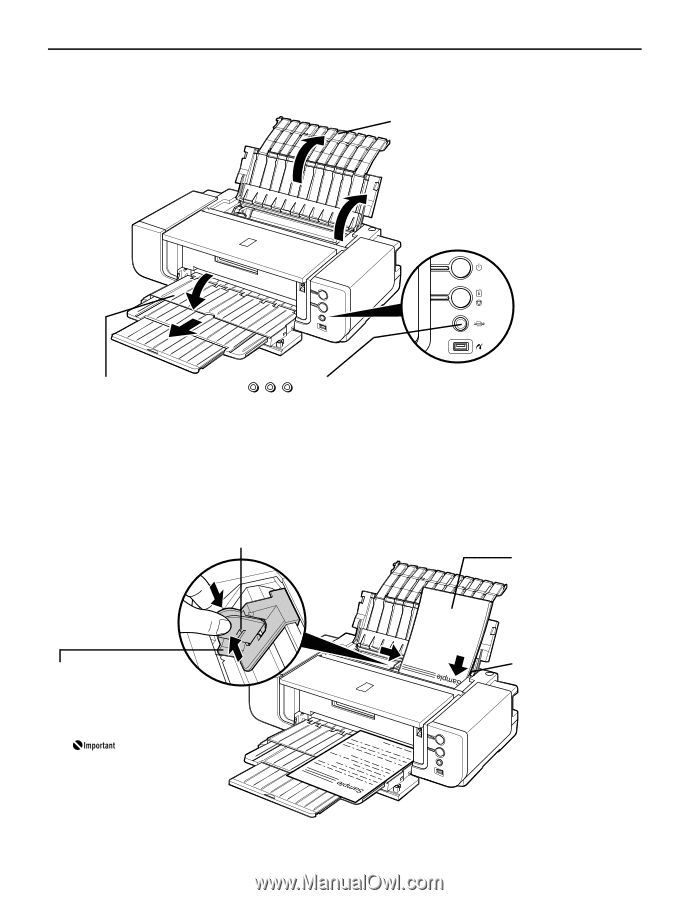
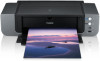
Basic Printing 2 Prepare to load paper. 1 2 (1) 1 Open the Paper Support. 2 Open the Paper Support Extension to support the paper. 1 2 (2) 1 Gently press the mark on the Front Tray. 2 Pull out the Front Tray Extension completely. 3 Load the paper. (3) Ensure that the FRONT FEED button is not lit. If the FRONT FEED button is lit or flashing, set the Front Tray to its normal printing position. See "Returning the Front Tray to Its Normal Printing Position" on page 14. Load Limit Mark Do not load beyond this Load Limit Mark. (1) Load the paper into the Auto Sheet Feeder with the print side facing UP. (3) Pinch the Paper Guide and slide it against the left side of the paper stack. Set the Paper Guide correctly when printing from the Auto Sheet Feeder. The paper may not feed correctly if the Paper Guide is not set correctly. 6 (2) Align the paper stack with the right edge of the Auto Sheet Feeder.
-
 1
1 -
2
-
3
-
4
-
 5
5 -
 6
6 -
 7
7 -
 8
8 -
 9
9 -
 10
10 -
 11
11 -
 12
12 -
 13
13 -
 14
14 -
 15
15 -
16
-
17
-
18
-
19
-
20
-
21
-
22
-
23
-
24
-
25
-
26
-
27
-
28
-
29
-
30
-
31
-
32
-
33
-
34
-
35
-
36
-
37
-
38
-
39
-
40
-
41
-
42
-
43
-
44
-
45
-
46
-
47
-
48
-
49
-
50
-
51
-
52
-
53
-
54
-
55
-
56
-
57
-
58
-
59
-
60
-
61
-
62
-
63
-
64
-
65
-
66
-
67
-
68
-
69
-
70
-
71
-
72
-
73
-
74
-
75
-
76
-
77
-
78
-
79
-
80
-
81
-
82
-
83
-
84
-
85
-
86
-
87
-
88
-
89
-
90
-
91
-
92
-
93
-
94
-
95
-
96
-
97
-
98
-
99
-
100
-
101
-
102
-
103
-
104
 |
 |