Canon PIXMA Pro9500 Quick Start Guide - Page 22
Printing with Windows, Setup CD-ROM, Photo Application Guide - manual
 |
View all Canon PIXMA Pro9500 manuals
Add to My Manuals
Save this manual to your list of manuals |
Page 22 highlights
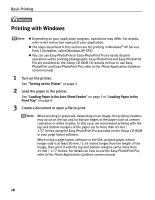
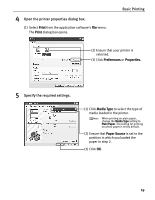
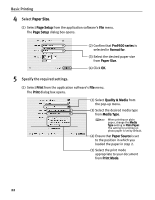
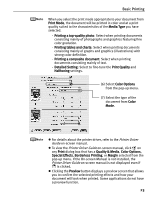
Basic Printing Printing with Windows z Depending on your application program, operations may differ. For details, refer to the instruction manual of your application. z The steps described in this section are for printing in Windows® XP Service Pack 2 (hereafter, called Windows XP SP2). z You can use Easy-PhotoPrint or Easy-PhotoPrint Pro to easily do print operations when printing photographs. Easy-PhotoPrint and Easy-PhotoPrint Pro are provided on the Setup CD-ROM. For details on how to use EasyPhotoPrint and Easy-PhotoPrint Pro, refer to the Photo Application Guide onscreen manual. 1 Turn on the printer. See "Turning on the Printer" on page 2. 2 Load the paper in the printer. See "Loading Paper in the Auto Sheet Feeder" on page 5 or "Loading Paper in the Front Tray" on page 9. 3 Create a document or open a file to print. When printing in grayscale, depending on an image, the printing troubles may occur on the top and/or bottom edges of the paper such as uneven coloration or white streaks. In this case, we recommend printing with the top and bottom margins of the paper set to more than 45 mm / 1.77 inches using the Easy-PhotoPrint Pro provided on the Setup CD-ROM or your page layout software. When using a page layout software or the like, prepare paper whose longer side is at least 90 mm / 3.54 inches longer than the length of the image, then print it with the top and bottom margins set to more than 45 mm / 1.77 inches. For details on how to use the Easy-PhotoPrint Pro, refer to the Photo Application Guide on-screen manual. 18
-
 1
1 -
2
-
3
-
4
-
5
-
6
-
7
-
8
-
9
-
10
-
11
-
12
-
13
-
14
-
15
-
16
-
 17
17 -
 18
18 -
 19
19 -
 20
20 -
 21
21 -
 22
22 -
 23
23 -
 24
24 -
 25
25 -
 26
26 -
 27
27 -
28
-
29
-
30
-
31
-
32
-
33
-
34
-
35
-
36
-
37
-
38
-
39
-
40
-
41
-
42
-
43
-
44
-
45
-
46
-
47
-
48
-
49
-
50
-
51
-
52
-
53
-
54
-
55
-
56
-
57
-
58
-
59
-
60
-
61
-
62
-
63
-
64
-
65
-
66
-
67
-
68
-
69
-
70
-
71
-
72
-
73
-
74
-
75
-
76
-
77
-
78
-
79
-
80
-
81
-
82
-
83
-
84
-
85
-
86
-
87
-
88
-
89
-
90
-
91
-
92
-
93
-
94
-
95
-
96
-
97
-
98
-
99
-
100
-
101
-
102
-
103
-
104
 |
 |
