Canon PIXMA Pro9500 Quick Start Guide - Page 88
POWER, ALARM, Printer, Pro9500 series, Print & Fax Preferences, Edit Printer List, RESUME/CANCEL
 |
View all Canon PIXMA Pro9500 manuals
Add to My Manuals
Save this manual to your list of manuals |
Page 88 highlights
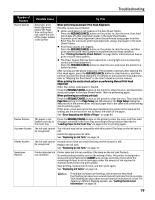
Troubleshooting Problem "Error No.: 300" "Error No.: 1281" "Error No.: 1283" "Error No.: 1284" "Error No.: 1320" "Error No.: 1321" Possible Cause Printer is not ready Try This Ensure that the POWER lamp lights blue. If the POWER lamp is off, turn the printer on. The POWER lamp will flash blue when the printer is initializing. Wait until the POWER lamp stops flashing. When the ALARM lamp is flashing orange, an error may have occurred in the printer. For details on how to resolve the error, refer to "Handling Error Messages" on page 77. Printer is not properly connected Ensure that the printer is securely connected to the computer. z If you are using a relay device such as a USB hub, disconnect it, connect the printer directly to the computer, and try printing again. If printing starts normally, there is a problem with the relay device. Consult the reseller of the relay device for details. z There could also be a problem with the USB cable. Replace the USB cable and try printing again. Printer you want to use is not selected on the Printer popup menu on the Print dialog box Select Pro9500 series on the Printer pop-up menu on the Print dialog box. If Pro9500 series does not appear on the Printer pop-up menu, do the following to confirm the printer settings: 1. Select Print & Fax Preferences from the Printer pop-up menu. When using Mac OS X v.10.3.x or Mac OS X v.10.2.8, select Edit Printer List from the Printer pop-up menu. 2. Ensure that Pro9500 series is displayed and the check box is selected in the screen that is displayed. When using Mac OS X v.10.2.8, ensure that Pro9500 series is displayed in the Printer List. 3. If Pro9500 series is not displayed in the screen displayed in step 2, click Add(+) to add the printer. If you cannot add the printer, follow the procedures described in the Easy Setup Instructions and reinstall the driver. The Front Tray is up when printing from the Auto Sheet Feeder starts Return the Front Tray to its normal printing position. Ensure that paper is loaded in the Auto Sheet Feeder and then press the RESUME/CANCEL button on the printer to resume printing. Refer to "Returning the Front Tray to Its Normal Printing Position" on page 14 for details about how to return the Front Tray to its normal printing position. The Front Tray is pulled up while printing from the Auto Sheet Feeder Return the Front Tray to its normal printing position, then press RESUME/ CANCEL button on the printer and try printing again. Refer to "Returning the Front Tray to Its Normal Printing Position" on page 14 for details about how to return the Front Tray to its normal printing position. Do not move the Front Tray during printing. The Front Tray is pulled down while printing from the Front Tray Return the Front Tray to the Front Paper Feeding Position, then press the RESUME/CANCEL button on the printer and try printing again. Refer to "Loading Paper in the Front Tray" on page 9 for details about how to return the Front Tray to the Front Paper Feeding Position. Do not move the Front Tray during printing. The printer is not Load the paper correctly in the Front Tray according to the procedure described ready to feed paper in "Loading Paper in the Front Tray" on page 9 and press the RESUME/CANCEL from the Front Tray button on the printer. yet The paper is not Press the RESUME/CANCEL button on the printer to clear the error, and then loaded correctly in load the paper correctly in the Front Tray according to the procedure described the Front Tray in "Loading Paper in the Front Tray" on page 9 and try printing again. 84
-
 1
1 -
2
-
3
-
4
-
5
-
6
-
7
-
8
-
9
-
10
-
11
-
12
-
13
-
14
-
15
-
16
-
17
-
18
-
19
-
20
-
21
-
22
-
23
-
24
-
25
-
26
-
27
-
28
-
29
-
30
-
31
-
32
-
33
-
34
-
35
-
36
-
37
-
38
-
39
-
40
-
41
-
42
-
43
-
44
-
45
-
46
-
47
-
48
-
49
-
50
-
51
-
52
-
53
-
54
-
55
-
56
-
57
-
58
-
59
-
60
-
61
-
62
-
63
-
64
-
65
-
66
-
67
-
68
-
69
-
70
-
71
-
72
-
73
-
74
-
75
-
76
-
77
-
78
-
79
-
80
-
81
-
82
-
 83
83 -
 84
84 -
 85
85 -
 86
86 -
 87
87 -
 88
88 -
 89
89 -
 90
90 -
 91
91 -
 92
92 -
 93
93 -
94
-
95
-
96
-
97
-
98
-
99
-
100
-
101
-
102
-
103
-
104
 |
 |
