Canon PIXMA Pro9500 Quick Start Guide - Page 74
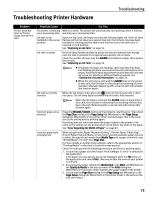
Problem, Possible Cause, Try This, Setup CD-ROM, Digital Photo Printing Guide
 |
View all Canon PIXMA Pro9500 manuals
Add to My Manuals
Save this manual to your list of manuals |
Page 74 highlights
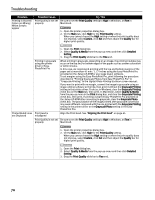
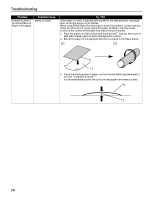
Troubleshooting Problem Printing is Blurred/ Colors are Wrong/ White Streaks appear Possible Cause Print Quality is not set properly Try This Be sure to set the Print Quality setting to High in Windows, or Fine in Macintosh. 1. Open the printer properties dialog box. 2. On the Main tab, click High for the Print Quality setting. When you cannot choose the High setting or when the print quality does not improve, select Custom, click Set and then adjust the Quality bar for higher print quality. 1. Open the Print dialog box. 2. Select Quality & Media from the pop-up menu and then click Detailed Setting. 3. Drag the Print Quality slide bar to the Fine end. Printing in grayscale using the printer driver or EasyPhotoPrint Pro When printing in grayscale, depending on an image, the printing troubles may occur on the top and/or bottom edges of the paper such as uneven coloration or white streaks. In this case, we recommend printing with the top and bottom margins of the paper set to more than 45 mm / 1.77 inches using the Easy-PhotoPrint Pro provided on the Setup CD-ROM or your page layout software. To set margins using the Easy-PhotoPrint Pro, print following the procedure described in "Printing Grayscale Photos from Easy-PhotoPrint Pro" in "Grayscale Printing" in the Digital Photo Printing Guide on-screen manual. If you want to print with no margin, convert the image to grayscale using an image-editing software or the like, then print it without the Grayscale Printing setting in the printer driver. To do so, in Windows, clear the Grayscale Printing check box on the Main tab, then print. In Macintosh, select Quality & Media from the pop-up menu in the Print dialog box, and clear the Grayscale Printing check box, then print. If printing using the Easy-PhotoPrint Pro provided on the Setup CD-ROM after converting to grayscale, clear the Grayscale Photo check box. The gray balance of the image printed after grayscale conversion may seem different compared with the one printed with the Grayscale Printing setting in the printer driver or the Grayscale Photo setting in the EasyPhotoPrint Pro. Printed Ruled Lines Print Head is are Displaced misaligned Align the Print Head. See "Aligning the Print Head" on page 61. Print Quality is not set Be sure to set the Print Quality setting to High in Windows, or Fine in properly Macintosh. 1. Open the printer properties dialog box. 2. On the Main tab, click High for the Print Quality setting. When you cannot choose the High setting or when the print quality does not improve, select Custom, click Set and then adjust the Quality bar for higher print quality. 1. Open the Print dialog box. 2. Select Quality & Media from the pop-up menu and then click Detailed Setting. 3. Drag the Print Quality slide bar to Fine end. 70
-
 1
1 -
2
-
3
-
4
-
5
-
6
-
7
-
8
-
9
-
10
-
11
-
12
-
13
-
14
-
15
-
16
-
17
-
18
-
19
-
20
-
21
-
22
-
23
-
24
-
25
-
26
-
27
-
28
-
29
-
30
-
31
-
32
-
33
-
34
-
35
-
36
-
37
-
38
-
39
-
40
-
41
-
42
-
43
-
44
-
45
-
46
-
47
-
48
-
49
-
50
-
51
-
52
-
53
-
54
-
55
-
56
-
57
-
58
-
59
-
60
-
61
-
62
-
63
-
64
-
65
-
66
-
67
-
68
-
 69
69 -
 70
70 -
 71
71 -
 72
72 -
 73
73 -
 74
74 -
 75
75 -
 76
76 -
 77
77 -
 78
78 -
 79
79 -
80
-
81
-
82
-
83
-
84
-
85
-
86
-
87
-
88
-
89
-
90
-
91
-
92
-
93
-
94
-
95
-
96
-
97
-
98
-
99
-
100
-
101
-
102
-
103
-
104
 |
 |
