Canon PIXMA Pro9500 Quick Start Guide - Page 46
Replacing Ink Tanks, Printing Maintenance, Ensure that the printer is
 |
View all Canon PIXMA Pro9500 manuals
Add to My Manuals
Save this manual to your list of manuals |
Page 46 highlights
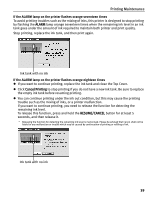
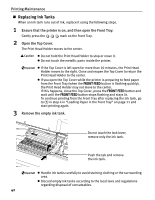
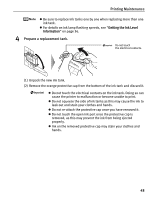
Printing Maintenance „ Replacing Ink Tanks When an ink tank runs out of ink, replace it using the following steps. 1 Ensure that the printer is on, and then open the Front Tray. Gently press the mark on the Front Tray. 2 Open the Top Cover. The Print Head Holder moves to the center. z Do not hold the Print Head Holder to stop or move it. z Do not touch the metallic parts inside the printer. z If the Top Cover is left open for more than 10 minutes, the Print Head Holder moves to the right. Close and reopen the Top Cover to return the Print Head Holder to the center. z If you open the Top Cover while the printer is preparing to feed paper from the Front Tray (when the FRONT FEED button is flashing quickly), the Print Head Holder may not move to the center. If this happens, close the Top Cover, press the FRONT FEED button and wait until the FRONT FEED button stops flashing and stays lit. To continue printing from the Front Tray after replacing the ink tank, go to (3) in step 4 in "Loading Paper in the Front Tray" on page 11 and start printing again. 3 Remove the empty ink tank. Do not touch the lock lever; remove only the ink tank. Push the tab and remove the ink tank. z Handle ink tanks carefully to avoid staining clothing or the surrounding area. z Discard empty ink tanks according to the local laws and regulations regarding disposal of consumables. 42
-
 1
1 -
2
-
3
-
4
-
5
-
6
-
7
-
8
-
9
-
10
-
11
-
12
-
13
-
14
-
15
-
16
-
17
-
18
-
19
-
20
-
21
-
22
-
23
-
24
-
25
-
26
-
27
-
28
-
29
-
30
-
31
-
32
-
33
-
34
-
35
-
36
-
37
-
38
-
39
-
40
-
 41
41 -
 42
42 -
 43
43 -
 44
44 -
 45
45 -
 46
46 -
 47
47 -
 48
48 -
 49
49 -
 50
50 -
 51
51 -
52
-
53
-
54
-
55
-
56
-
57
-
58
-
59
-
60
-
61
-
62
-
63
-
64
-
65
-
66
-
67
-
68
-
69
-
70
-
71
-
72
-
73
-
74
-
75
-
76
-
77
-
78
-
79
-
80
-
81
-
82
-
83
-
84
-
85
-
86
-
87
-
88
-
89
-
90
-
91
-
92
-
93
-
94
-
95
-
96
-
97
-
98
-
99
-
100
-
101
-
102
-
103
-
104
 |
 |