Canon PIXMA Pro9500 Quick Start Guide - Page 83
When performing Automatic Print Head Alignment, the Front Tray
 |
View all Canon PIXMA Pro9500 manuals
Add to My Manuals
Save this manual to your list of manuals |
Page 83 highlights
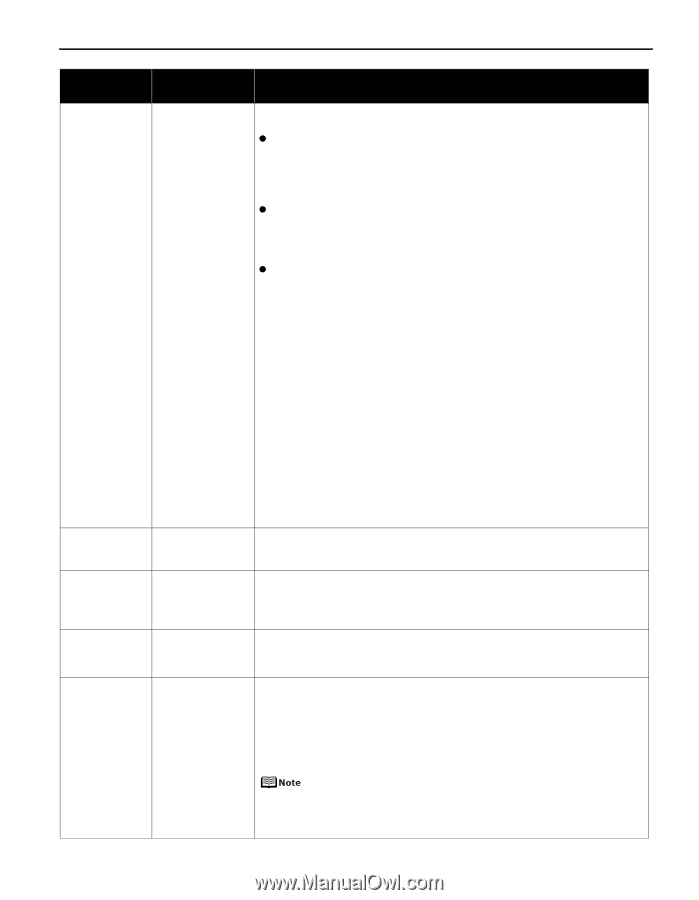
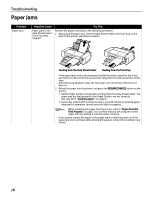
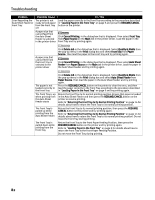
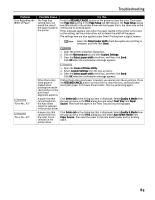
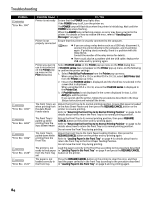
Troubleshooting Number of Flashes Eleven flashes Possible Cause Try This Automatic print head alignment failed/The Page Size setting does not match the size of the paper loaded in the printer When performing Automatic Print Head Alignment Possible causes are as follows: z Letter-sized paper is not loaded on the Auto Sheet Feeder. Press the RESUME/CANCEL button on the printer to clear the error, then load two sheets of Letter-sized plain paper in the Auto Sheet Feeder. Automatic print head alignment cannot be performed using paper from the Front Tray. For automatic print head alignment, always load paper in the Auto Sheet Feeder. z Print Head nozzles are clogged. Press the RESUME/CANCEL button on the printer to clear the error, and then print out the nozzle check pattern to examine the print head condition. See "Printing the Nozzle Check Pattern" on page 48 for information on how to print a nozzle check pattern. z The Paper Output Slot has been exposed to a strong light source preventing correct print head alignment. Press the RESUME/CANCEL button to clear the error and move the printer to a darker location. After carrying out the above measures, if the problem continues after aligning the Print Head again, press the RESUME/CANCEL button to clear the error, and then perform manual print head alignment. For details on manual print head alignment, refer to "Aligning the Print Head" in the User's Guide on-screen manual. When printing the nozzle check pattern or performing Manual Print Head Alignment Other than Letter-sized paper is loaded. Press the RESUME/CANCEL button on the printer to clear the error, and load Lettersized plain paper in the Auto Sheet Feeder. Then try performing again. When performing an ordinary print job Press the RESUME/CANCEL button on the printer to clear the error. Then check the Page Size setting in the Page Setup tab (Windows) or the Page Setup dialog box (Macintosh) in the printer driver and load paper that is the same size as the setting and try printing again. If this error occurs even when the paper loaded in the printer is the same as the setting, set the printer driver not to detect the width of the paper. See "Error Regarding the Width of Paper" on page 83. Twelve flashes The paper is not Press the RESUME/CANCEL button on the printer to clear the error, and then load loaded correctly in the paper correctly in the Front Tray according to the procedure described in the Front Tray "Loading Paper in the Front Tray" on page 9 and try printing again. Fourteen flashes The ink tank cannot be recognized The ink tank may not be compatible with this printer (The lamp on the ink tank is off). Install the appropriate ink tank. See "Replacing an Ink Tank" on page 35. Fifteen flashes The ink tank cannot Ink tank errors have occurred (The lamp on the ink tank is off). be recognized Replace the ink tank. See "Replacing an Ink Tank" on page 35. Seventeen Flashes Printer detected ink out condition Printer detected ink out condition (The lamp on the ink tank flashes). To avoid printing troubles such as the mixing of inks, this printer is designed to stop printing by flashing the ALARM lamp orange seventeen times when the remaining ink level in an ink tank goes under the amount of ink required to maintain both printer and print quality. Stop printing, replace the ink tank, and then print again. See "Replacing Ink Tanks" on page 42. If multiple ink lamps are flashing, check how fast they flash. Fast flashing (at about one second interval) indicates the ink is empty. Slow flashing (at about three second interval) indicates ink is low. For details on different flashing speeds, see "Getting the Ink Level Information" on page 36. 79
-
 1
1 -
2
-
3
-
4
-
5
-
6
-
7
-
8
-
9
-
10
-
11
-
12
-
13
-
14
-
15
-
16
-
17
-
18
-
19
-
20
-
21
-
22
-
23
-
24
-
25
-
26
-
27
-
28
-
29
-
30
-
31
-
32
-
33
-
34
-
35
-
36
-
37
-
38
-
39
-
40
-
41
-
42
-
43
-
44
-
45
-
46
-
47
-
48
-
49
-
50
-
51
-
52
-
53
-
54
-
55
-
56
-
57
-
58
-
59
-
60
-
61
-
62
-
63
-
64
-
65
-
66
-
67
-
68
-
69
-
70
-
71
-
72
-
73
-
74
-
75
-
76
-
77
-
 78
78 -
 79
79 -
 80
80 -
 81
81 -
 82
82 -
 83
83 -
 84
84 -
 85
85 -
 86
86 -
 87
87 -
 88
88 -
89
-
90
-
91
-
92
-
93
-
94
-
95
-
96
-
97
-
98
-
99
-
100
-
101
-
102
-
103
-
104
 |
 |