Canon PIXMA Pro9500 Quick Start Guide - Page 57
Print Head Cleaning, Cleaning the Print Head Without a Computer
 |
View all Canon PIXMA Pro9500 manuals
Add to My Manuals
Save this manual to your list of manuals |
Page 57 highlights
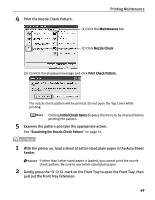
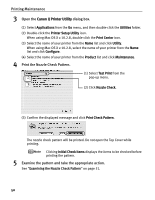
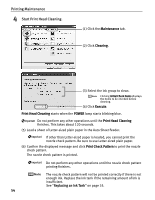
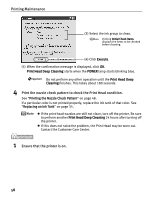
Printing Maintenance Print Head Cleaning Clean the Print Head if white stripes appear in the nozzle check pattern. Note that cleaning the Print Head causes ink used for cleaning to be absorbed in the ink absorber. Cleaning the Print Head consumes ink, so perform Print Head Cleaning only when necessary. Before performing Print Head Cleaning, open the Top Cover and ensure that all of the ink lamps are lit. If any one of the ink lamps flashes red fast or unlit, this tank has run out of ink. Be sure to replace the ink tank before performing Print Head Cleaning. To perform Print Head Cleaning under the ink out condition may cause the printing trouble such as the mixing of inks, or a printer malfunction. See "Replacing Ink Tanks" on page 42. z Ensure that the Inner Cover is closed. Cleaning the Print Head Without a Computer z The Print Head can also be cleaned from the printer itself. With the printer on, hold down the RESUME/CANCEL button until the POWER lamp flashes blue once, and then release it immediately. The Print Head Cleaning dialog box of (3) in step 4 is directly displayed when you click Cleaning on the Pattern Check dialog box. See "Examining the Nozzle Check Pattern" on page 51. 1 Ensure that the printer is on. 2 Gently press the mark on the Front Tray to open the Front Tray, then pull out the Front Tray Extension. 3 Open the printer properties dialog box. See "Opening the Printer Properties Dialog Box Directly from the Start Menu" on page 32. 53
-
 1
1 -
2
-
3
-
4
-
5
-
6
-
7
-
8
-
9
-
10
-
11
-
12
-
13
-
14
-
15
-
16
-
17
-
18
-
19
-
20
-
21
-
22
-
23
-
24
-
25
-
26
-
27
-
28
-
29
-
30
-
31
-
32
-
33
-
34
-
35
-
36
-
37
-
38
-
39
-
40
-
41
-
42
-
43
-
44
-
45
-
46
-
47
-
48
-
49
-
50
-
51
-
 52
52 -
 53
53 -
 54
54 -
 55
55 -
 56
56 -
 57
57 -
 58
58 -
 59
59 -
 60
60 -
 61
61 -
 62
62 -
63
-
64
-
65
-
66
-
67
-
68
-
69
-
70
-
71
-
72
-
73
-
74
-
75
-
76
-
77
-
78
-
79
-
80
-
81
-
82
-
83
-
84
-
85
-
86
-
87
-
88
-
89
-
90
-
91
-
92
-
93
-
94
-
95
-
96
-
97
-
98
-
99
-
100
-
101
-
102
-
103
-
104
 |
 |