Canon PIXMA Pro9500 Quick Start Guide - Page 85
An Error Message Appears on the Screen
 |
View all Canon PIXMA Pro9500 manuals
Add to My Manuals
Save this manual to your list of manuals |
Page 85 highlights
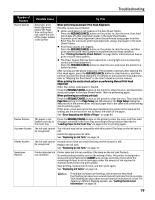
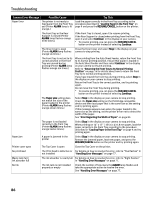
An Error Message Appears on the Screen Troubleshooting Problem Writing Error/ Output Error/ Communication Error Possible Cause Printer is not ready Try This Ensure that the POWER lamp lights. If the POWER lamp is off, turn the printer on. The POWER lamp will flash blue when the printer is initializing. Wait until the POWER lamp stops flashing and remains lit blue. When the ALARM lamp is flashing orange, an error may have occurred in the printer. For details on how to resolve the error, refer to "Handling Error Messages" on page 77. Printer port setting does not match the interface connected to the printer Check the printer port settings. 1. Click Start and select Control Panel, Printers and Other Hardware, and then Printers and Faxes. For non-Windows XP, click Start, select Settings, and then Printers. 2. Select the icon of your printer. 3. Open the File menu and select Properties. 4. Click the Ports tab to confirm the port settings. Make sure that a port named USBnnn (Canon Pro9500 series) (where "n" is a number) is selected for Print to the following port(s). If the port setting is not correct, change the port setting according to the interface you are using on the Ports tab, or reinstall the printer driver. Faulty connection Ensure that the printer is securely connected to the computer. z If you are using a relay device such as a USB hub, disconnect it, connect the printer directly to the computer, and try printing again. If printing starts normally, there is a problem with the relay device. Consult the reseller of the relay device for details. z There could also be a problem with the USB cable. Replace the USB cable and try printing again. Printer driver is not installed properly Uninstall then reinstall the printer driver. 1. Click Start, and select All Programs (or Programs), the name of your printer, and Uninstall. 2. Follow the on-screen instructions to uninstall the driver. 3. Follow the procedures described in the Easy Setup Instructions and reinstall the printer driver. 81
-
 1
1 -
2
-
3
-
4
-
5
-
6
-
7
-
8
-
9
-
10
-
11
-
12
-
13
-
14
-
15
-
16
-
17
-
18
-
19
-
20
-
21
-
22
-
23
-
24
-
25
-
26
-
27
-
28
-
29
-
30
-
31
-
32
-
33
-
34
-
35
-
36
-
37
-
38
-
39
-
40
-
41
-
42
-
43
-
44
-
45
-
46
-
47
-
48
-
49
-
50
-
51
-
52
-
53
-
54
-
55
-
56
-
57
-
58
-
59
-
60
-
61
-
62
-
63
-
64
-
65
-
66
-
67
-
68
-
69
-
70
-
71
-
72
-
73
-
74
-
75
-
76
-
77
-
78
-
79
-
 80
80 -
 81
81 -
 82
82 -
 83
83 -
 84
84 -
 85
85 -
 86
86 -
 87
87 -
 88
88 -
 89
89 -
 90
90 -
91
-
92
-
93
-
94
-
95
-
96
-
97
-
98
-
99
-
100
-
101
-
102
-
103
-
104
 |
 |
