Canon PowerShot G7 X User Guide - Page 43
Continuous Shooting
 |
View all Canon PowerShot G7 X manuals
Add to My Manuals
Save this manual to your list of manuals |
Page 43 highlights
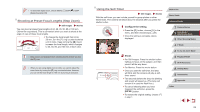
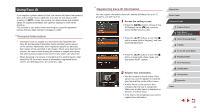
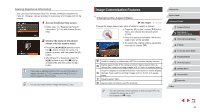
Continuous Shooting Still Images Movies In [ ] mode, hold the shutter button all the way down to shoot continuously. For details on the continuous shooting speed, see "Continuous Shooting Speed" (= 196). 1 Configure the setting. zzPress the [ ] button, choose [ ] (either press the [ ][ ] buttons or turn the [ ] dial), and then press the [ ] button. zzOnce the setting is complete, [ ] is displayed. 2 Shoot. zzHold the shutter button all the way down to shoot continuously. ●● During continuous shooting, focus and exposure are locked at the position/level determined when you pressed the shutter button halfway. ●● Cannot be used with the self-timer (=41). ●● Shooting may stop momentarily or continuous shooting may slow down depending on shooting conditions, camera settings, and the zoom position. ●● As more shots are taken, shooting may slow down. ●● Shooting may slow down if the flash fires. ●● Multi-area White Balance (=34) is not available. Similarly, [Hg Lamp Corr.] (=49) is set to [Off] and cannot be changed. ●● With Touch Shutter (=42), the camera shoots continuously while you touch the screen. Focus and exposure during continuous shooting remain constant, after they are determined for the first shot. Image Display during Playback Each set of images shot continuously is managed as a single group, and only the first image in that group will be displayed. To indicate that the image is part of a group, [ ] is displayed in the upper left of the screen. ●● If you erase a grouped image (=116), all images in the group are also erased. Be careful when erasing images. ●● Grouped images can be played back individually (=110) and ungrouped (=110). ●● Protecting (=114) a grouped image will protect all images in the group. ●● Grouped images can be viewed individually when played back using Image Search (=107) or Smart Shuffle (=113). In this case, images are temporarily ungrouped. ●● The following actions are not available for grouped images: editing Face ID information (=111), magnifying (=112), tagging as favorites (=118), editing (=120), printing (=166), setting up individual image printing (=170), or adding to a photobook (=171). To do these things, either view grouped images individually (=110) or cancel grouping (=110) first. Before Use Basic Guide Advanced Guide 1 Camera Basics 2 Auto Mode / Hybrid Auto Mode 3 Other Shooting Modes 4 P Mode 5 Tv, Av, M, and C Mode 6 Playback Mode 7 Wi-Fi Functions 8 Setting Menu 9 Accessories 10 Appendix Index 43
-
 1
1 -
2
-
3
-
4
-
5
-
6
-
7
-
8
-
9
-
10
-
11
-
12
-
13
-
14
-
15
-
16
-
17
-
18
-
19
-
20
-
21
-
22
-
23
-
24
-
25
-
26
-
27
-
28
-
29
-
30
-
31
-
32
-
33
-
34
-
35
-
36
-
37
-
 38
38 -
 39
39 -
 40
40 -
 41
41 -
 42
42 -
 43
43 -
 44
44 -
 45
45 -
 46
46 -
 47
47 -
 48
48 -
49
-
50
-
51
-
52
-
53
-
54
-
55
-
56
-
57
-
58
-
59
-
60
-
61
-
62
-
63
-
64
-
65
-
66
-
67
-
68
-
69
-
70
-
71
-
72
-
73
-
74
-
75
-
76
-
77
-
78
-
79
-
80
-
81
-
82
-
83
-
84
-
85
-
86
-
87
-
88
-
89
-
90
-
91
-
92
-
93
-
94
-
95
-
96
-
97
-
98
-
99
-
100
-
101
-
102
-
103
-
104
-
105
-
106
-
107
-
108
-
109
-
110
-
111
-
112
-
113
-
114
-
115
-
116
-
117
-
118
-
119
-
120
-
121
-
122
-
123
-
124
-
125
-
126
-
127
-
128
-
129
-
130
-
131
-
132
-
133
-
134
-
135
-
136
-
137
-
138
-
139
-
140
-
141
-
142
-
143
-
144
-
145
-
146
-
147
-
148
-
149
-
150
-
151
-
152
-
153
-
154
-
155
-
156
-
157
-
158
-
159
-
160
-
161
-
162
-
163
-
164
-
165
-
166
-
167
-
168
-
169
-
170
-
171
-
172
-
173
-
174
-
175
-
176
-
177
-
178
-
179
-
180
-
181
-
182
-
183
-
184
-
185
-
186
-
187
-
188
-
189
-
190
-
191
-
192
-
193
-
194
-
195
-
196
-
197
-
198
-
199
-
200
-
201
-
202
 |
 |
