Canon PowerShot G7 X User Guide - Page 80
Changing Image Color Tones My Colors
 |
View all Canon PowerShot G7 X manuals
Add to My Manuals
Save this manual to your list of manuals |
Page 80 highlights
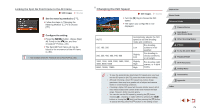
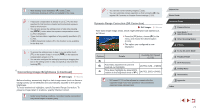
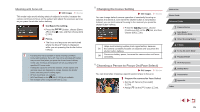
Changing Image Color Tones (My Colors) Still Images Movies Change image color tones as desired, such as converting images to sepia or black and white. zzPress the [ ] button, choose [ ] in the menu, and choose the desired option (= 29). zzThe option you configured is now displayed. My Colors Off Vivid Neutral Sepia B/W Positive Film Lighter Skin Tone Darker Skin Tone Vivid Blue Vivid Green Vivid Red Custom Color - Emphasizes contrast and color saturation, making images sharper. Tones down contrast and color saturation for subdued images. Creates sepia tone images. Creates black and white images. Combines the effects of Vivid Blue, Vivid Green, and Vivid Red to produce intense yet natural-looking colors resembling images on positive film. Lightens skin tones. Darkens skin tones. Emphasizes blues in images. Makes the sky, ocean, and other blue subjects more vivid. Emphasizes greens in images. Makes mountains, foliage, and other green subjects more vivid. Emphasizes reds in images. Makes red subjects more vivid. Adjust contrast, sharpness, color saturation, and other qualities as desired (=80). ●● White balance (=78) cannot be set in [ ] or [ ] modes. ●● With [ ] and [ ] modes, colors other than people's skin tone may change. These settings may not produce the expected results with some skin tones. Custom Color Still Images Movies Choose the desired level of image contrast, sharpness, color saturation, red, green, blue, and skin tones in a range of 1 - 5. 1 Access the setting screen. zzFollow the steps in "Changing Image Color Tones (My Colors)" (= 80) to choose [ ], and then press the [ ] button. 2 Configure the setting. zzPress the [ ][ ] buttons to choose an option, and then specify the value by pressing the [ ][ ] buttons or turning the [ ] dial. zzFor stronger/more intense effects (or darker skin tones), adjust the value to the right, and for weaker/lighter effects (or lighter skin tones), adjust the value to the left. zzPress the [ ] button to complete the setting. ●● You can also specify a value by touching or dragging the bar. Before Use Basic Guide Advanced Guide 1 Camera Basics 2 Auto Mode / Hybrid Auto Mode 3 Other Shooting Modes 4 P Mode 5 Tv, Av, M, and C Mode 6 Playback Mode 7 Wi-Fi Functions 8 Setting Menu 9 Accessories 10 Appendix Index 80
-
 1
1 -
2
-
3
-
4
-
5
-
6
-
7
-
8
-
9
-
10
-
11
-
12
-
13
-
14
-
15
-
16
-
17
-
18
-
19
-
20
-
21
-
22
-
23
-
24
-
25
-
26
-
27
-
28
-
29
-
30
-
31
-
32
-
33
-
34
-
35
-
36
-
37
-
38
-
39
-
40
-
41
-
42
-
43
-
44
-
45
-
46
-
47
-
48
-
49
-
50
-
51
-
52
-
53
-
54
-
55
-
56
-
57
-
58
-
59
-
60
-
61
-
62
-
63
-
64
-
65
-
66
-
67
-
68
-
69
-
70
-
71
-
72
-
73
-
74
-
 75
75 -
 76
76 -
 77
77 -
 78
78 -
 79
79 -
 80
80 -
 81
81 -
 82
82 -
 83
83 -
 84
84 -
 85
85 -
86
-
87
-
88
-
89
-
90
-
91
-
92
-
93
-
94
-
95
-
96
-
97
-
98
-
99
-
100
-
101
-
102
-
103
-
104
-
105
-
106
-
107
-
108
-
109
-
110
-
111
-
112
-
113
-
114
-
115
-
116
-
117
-
118
-
119
-
120
-
121
-
122
-
123
-
124
-
125
-
126
-
127
-
128
-
129
-
130
-
131
-
132
-
133
-
134
-
135
-
136
-
137
-
138
-
139
-
140
-
141
-
142
-
143
-
144
-
145
-
146
-
147
-
148
-
149
-
150
-
151
-
152
-
153
-
154
-
155
-
156
-
157
-
158
-
159
-
160
-
161
-
162
-
163
-
164
-
165
-
166
-
167
-
168
-
169
-
170
-
171
-
172
-
173
-
174
-
175
-
176
-
177
-
178
-
179
-
180
-
181
-
182
-
183
-
184
-
185
-
186
-
187
-
188
-
189
-
190
-
191
-
192
-
193
-
194
-
195
-
196
-
197
-
198
-
199
-
200
-
201
-
202
 |
 |
