Canon PowerShot G7 X User Guide - Page 75
Changing the ISO Speed
 |
View all Canon PowerShot G7 X manuals
Add to My Manuals
Save this manual to your list of manuals |
Page 75 highlights
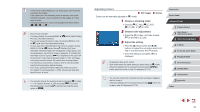
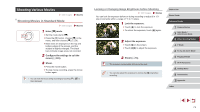
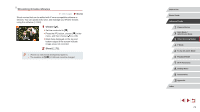
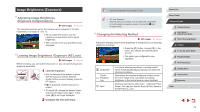
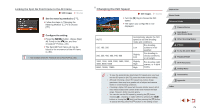
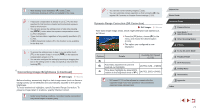
Linking the Spot AE Point Frame to the AF Frame Still Images Movies 1 Set the metering method to [ ]. zzFollow the steps in "Changing the Metering Method" (= 74) to choose [ ]. 2 Configure the setting. zzPress the [ ] button, choose [Spot AE Point] on the [ ] tab, and then choose [AF Point] (=30). zzThe Spot AE Point frame will now be linked to the movement of the AF frame (= 84). ●● Not available when [AF Frame] is set to [Face AiAF] (=84). Changing the ISO Speed Still Images Movies zzTurn the [ ] ring to choose the ISO speed. zzThe option you configured is now displayed. AUTO 125, 160, 200 250, 320, 400, 500, 640, 800 1000, 1250, 1600, 2000, 2500, 3200, 4000, 5000, 6400 8000, 10000, 12800 Automatically adjusts the ISO speed to suit the shooting mode and conditions. For shooting Low outdoors in fair weather. Slightly Low For shooting in cloudy conditions, or at twilight. Slightly High High For shooting night scenes, or in dark rooms. ●● To view the automatically determined ISO speed when you have set the ISO speed to [AUTO], press the shutter button halfway. ●● Although choosing a lower ISO speed may reduce image graininess, there may be a greater risk of subject and camera shake in some shooting conditions. ●● Choosing a higher ISO speed will increase shutter speed, which may reduce subject and camera shake and increase the flash range. However, shots may look grainy. ●● You can also set the ISO speed by pressing the [ ] button, choosing [ ], choosing an option (either by pressing the [ ][ ] buttons or turning the [ ] dial), and then pressing the [ ] button. To specify [AUTO], press the [ ] button on the setting screen. Before Use Basic Guide Advanced Guide 1 Camera Basics 2 Auto Mode / Hybrid Auto Mode 3 Other Shooting Modes 4 P Mode 5 Tv, Av, M, and C Mode 6 Playback Mode 7 Wi-Fi Functions 8 Setting Menu 9 Accessories 10 Appendix Index 75
-
 1
1 -
2
-
3
-
4
-
5
-
6
-
7
-
8
-
9
-
10
-
11
-
12
-
13
-
14
-
15
-
16
-
17
-
18
-
19
-
20
-
21
-
22
-
23
-
24
-
25
-
26
-
27
-
28
-
29
-
30
-
31
-
32
-
33
-
34
-
35
-
36
-
37
-
38
-
39
-
40
-
41
-
42
-
43
-
44
-
45
-
46
-
47
-
48
-
49
-
50
-
51
-
52
-
53
-
54
-
55
-
56
-
57
-
58
-
59
-
60
-
61
-
62
-
63
-
64
-
65
-
66
-
67
-
68
-
69
-
 70
70 -
 71
71 -
 72
72 -
 73
73 -
 74
74 -
 75
75 -
 76
76 -
 77
77 -
 78
78 -
 79
79 -
 80
80 -
81
-
82
-
83
-
84
-
85
-
86
-
87
-
88
-
89
-
90
-
91
-
92
-
93
-
94
-
95
-
96
-
97
-
98
-
99
-
100
-
101
-
102
-
103
-
104
-
105
-
106
-
107
-
108
-
109
-
110
-
111
-
112
-
113
-
114
-
115
-
116
-
117
-
118
-
119
-
120
-
121
-
122
-
123
-
124
-
125
-
126
-
127
-
128
-
129
-
130
-
131
-
132
-
133
-
134
-
135
-
136
-
137
-
138
-
139
-
140
-
141
-
142
-
143
-
144
-
145
-
146
-
147
-
148
-
149
-
150
-
151
-
152
-
153
-
154
-
155
-
156
-
157
-
158
-
159
-
160
-
161
-
162
-
163
-
164
-
165
-
166
-
167
-
168
-
169
-
170
-
171
-
172
-
173
-
174
-
175
-
176
-
177
-
178
-
179
-
180
-
181
-
182
-
183
-
184
-
185
-
186
-
187
-
188
-
189
-
190
-
191
-
192
-
193
-
194
-
195
-
196
-
197
-
198
-
199
-
200
-
201
-
202
 |
 |
