Canon PowerShot G7 X User Guide - Page 44
Using Face ID
 |
View all Canon PowerShot G7 X manuals
Add to My Manuals
Save this manual to your list of manuals |
Page 44 highlights
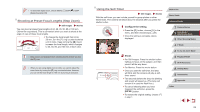
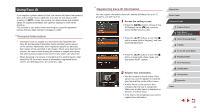
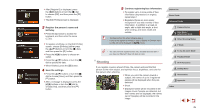
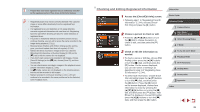
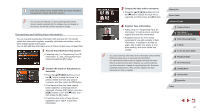
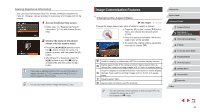
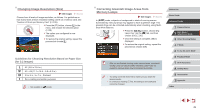
Using Face ID If you register a person ahead of time, the camera will detect that person's face, and prioritize focus, brightness, and color for that person when shooting. In [ ] mode, the camera can detect babies and children based on registered birthdays and optimize settings for them when shooting. This function is also useful when searching for a specific registered person among a large number of images (=108). Personal Information ●● Information such as images of a face (face info) registered with Face ID, and personal information (name, birthday) will be saved on the camera. Additionally, when registered people are detected, their names will be recorded in still images. When using the Face ID function, be careful when sharing the camera or images with others, and when posting images online where many others can view them. ●● When disposing of a camera or transferring it to another person after using Face ID, be sure to erase all information (registered faces, names, and birthdays) from the camera (=48). Registering Face ID Information You can register information (face info, names, birthdays) for up to 12 people to use with Face ID. 1 Access the setting screen. zzPress the [ ] button, choose [Face ID Settings] on the [ ] tab, and then press the [ ] button (=30). zzPress the [ ][ ] buttons or turn the [ ] dial to choose [Add to Registry], and then press the [ ] button. zzPress the [ ][ ] buttons or turn the [ ] dial to choose [Add a New Face], and then press the [ ] button. 2 Register face information. zzAim the camera so that the face of the person you want to register is inside the gray frame at the center of the screen. zzA white frame on the person's face indicates that the face is recognized. Make sure a white frame is displayed on the face, and then shoot. zzIf the face is not recognized, you cannot register face information. Before Use Basic Guide Advanced Guide 1 Camera Basics 2 Auto Mode / Hybrid Auto Mode 3 Other Shooting Modes 4 P Mode 5 Tv, Av, M, and C Mode 6 Playback Mode 7 Wi-Fi Functions 8 Setting Menu 9 Accessories 10 Appendix Index 44
-
 1
1 -
2
-
3
-
4
-
5
-
6
-
7
-
8
-
9
-
10
-
11
-
12
-
13
-
14
-
15
-
16
-
17
-
18
-
19
-
20
-
21
-
22
-
23
-
24
-
25
-
26
-
27
-
28
-
29
-
30
-
31
-
32
-
33
-
34
-
35
-
36
-
37
-
38
-
 39
39 -
 40
40 -
 41
41 -
 42
42 -
 43
43 -
 44
44 -
 45
45 -
 46
46 -
 47
47 -
 48
48 -
 49
49 -
50
-
51
-
52
-
53
-
54
-
55
-
56
-
57
-
58
-
59
-
60
-
61
-
62
-
63
-
64
-
65
-
66
-
67
-
68
-
69
-
70
-
71
-
72
-
73
-
74
-
75
-
76
-
77
-
78
-
79
-
80
-
81
-
82
-
83
-
84
-
85
-
86
-
87
-
88
-
89
-
90
-
91
-
92
-
93
-
94
-
95
-
96
-
97
-
98
-
99
-
100
-
101
-
102
-
103
-
104
-
105
-
106
-
107
-
108
-
109
-
110
-
111
-
112
-
113
-
114
-
115
-
116
-
117
-
118
-
119
-
120
-
121
-
122
-
123
-
124
-
125
-
126
-
127
-
128
-
129
-
130
-
131
-
132
-
133
-
134
-
135
-
136
-
137
-
138
-
139
-
140
-
141
-
142
-
143
-
144
-
145
-
146
-
147
-
148
-
149
-
150
-
151
-
152
-
153
-
154
-
155
-
156
-
157
-
158
-
159
-
160
-
161
-
162
-
163
-
164
-
165
-
166
-
167
-
168
-
169
-
170
-
171
-
172
-
173
-
174
-
175
-
176
-
177
-
178
-
179
-
180
-
181
-
182
-
183
-
184
-
185
-
186
-
187
-
188
-
189
-
190
-
191
-
192
-
193
-
194
-
195
-
196
-
197
-
198
-
199
-
200
-
201
-
202
 |
 |
