Canon PowerShot G7 X User Guide - Page 92
Switching the Color of Shooting-Screen, Information
 |
View all Canon PowerShot G7 X manuals
Add to My Manuals
Save this manual to your list of manuals |
Page 92 highlights
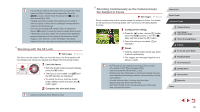
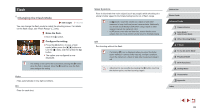
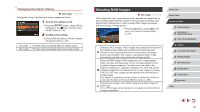
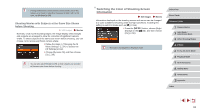
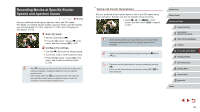
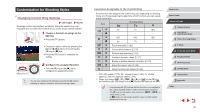
●● If image stabilization cannot prevent camera shake, mount the camera on a tripod or take other measures to hold it still. In this case, set [IS Mode] to [Off]. Shooting Movies with Subjects at the Same Size Shown before Shooting Still Images Movies Normally, once movie recording begins, the image display area changes and subjects are enlarged to allow for correction of significant camera shake. To shoot subjects at the same size shown before shooting, you can choose not to reduce significant camera shake. zzFollow the steps in "Changing the IS Mode Settings" (= 91) to access the [IS Settings] screen. zzChoose [Dynamic IS], and then choose [2] (=30). ●● You can also set [IS Mode] to [Off], so that subjects are recorded at the same size shown before shooting. Switching the Color of Shooting-Screen Information Still Images Movies Information displayed on the shooting screen and menus can be changed to a color suitable for shooting under low-light conditions. Enabling this setting is useful in modes such as [ ] (=66). zzPress the [ ] button, choose [Night Display] on the [ ] tab, and then choose [On] (=30). ●● The color is not adjusted in Playback mode. Before Use Basic Guide Advanced Guide 1 Camera Basics 2 Auto Mode / Hybrid Auto Mode 3 Other Shooting Modes 4 P Mode 5 Tv, Av, M, and C Mode 6 Playback Mode 7 Wi-Fi Functions 8 Setting Menu 9 Accessories 10 Appendix Index 92
-
 1
1 -
2
-
3
-
4
-
5
-
6
-
7
-
8
-
9
-
10
-
11
-
12
-
13
-
14
-
15
-
16
-
17
-
18
-
19
-
20
-
21
-
22
-
23
-
24
-
25
-
26
-
27
-
28
-
29
-
30
-
31
-
32
-
33
-
34
-
35
-
36
-
37
-
38
-
39
-
40
-
41
-
42
-
43
-
44
-
45
-
46
-
47
-
48
-
49
-
50
-
51
-
52
-
53
-
54
-
55
-
56
-
57
-
58
-
59
-
60
-
61
-
62
-
63
-
64
-
65
-
66
-
67
-
68
-
69
-
70
-
71
-
72
-
73
-
74
-
75
-
76
-
77
-
78
-
79
-
80
-
81
-
82
-
83
-
84
-
85
-
86
-
 87
87 -
 88
88 -
 89
89 -
 90
90 -
 91
91 -
 92
92 -
 93
93 -
 94
94 -
 95
95 -
 96
96 -
 97
97 -
98
-
99
-
100
-
101
-
102
-
103
-
104
-
105
-
106
-
107
-
108
-
109
-
110
-
111
-
112
-
113
-
114
-
115
-
116
-
117
-
118
-
119
-
120
-
121
-
122
-
123
-
124
-
125
-
126
-
127
-
128
-
129
-
130
-
131
-
132
-
133
-
134
-
135
-
136
-
137
-
138
-
139
-
140
-
141
-
142
-
143
-
144
-
145
-
146
-
147
-
148
-
149
-
150
-
151
-
152
-
153
-
154
-
155
-
156
-
157
-
158
-
159
-
160
-
161
-
162
-
163
-
164
-
165
-
166
-
167
-
168
-
169
-
170
-
171
-
172
-
173
-
174
-
175
-
176
-
177
-
178
-
179
-
180
-
181
-
182
-
183
-
184
-
185
-
186
-
187
-
188
-
189
-
190
-
191
-
192
-
193
-
194
-
195
-
196
-
197
-
198
-
199
-
200
-
201
-
202
 |
 |
