Canon PowerShot G7 X User Guide - Page 57
Using Functions for Underwater Shots
 |
View all Canon PowerShot G7 X manuals
Add to My Manuals
Save this manual to your list of manuals |
Page 57 highlights
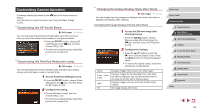
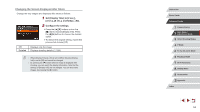
Using Functions for Underwater Shots Shooting with an Underwater Focusing Range Still Images Movies If focusing is difficult in [ ] mode (=55) with a focus range of [ ], using a focus range designed for underwater shooting can ensure optimal underwater shots. 1 Configure the setting. zzFollow steps 1 - 2 in "Specific Scenes" (=55) and choose [ ]. zzPress the [ ] button, choose the desired focus range (either press the [ ][ ] buttons or turn the [ ] dial), and then press the [ ] button. 2 Shoot. Focusing Range Description Underwater Take close-ups of sea life, using the digital zoom for Macro even closer shots. Quick Avoid missing unexpected underwater shooting opportunities when shooting subjects some distance away. Especially effective for moving subjects. Manual Focus Focus on subjects manually (=81). Refer to "Shooting Range" (= 196) for details on the range of each focus range. ●● In [ ] mode, optical zoom is set to maximum wide angle. ●● In [ ] mode, use of digital zoom may cause images to appear grainy at some resolutions (=49). ●● In [ ] mode, subjects at close range may not be in focus. In this case, try setting the focus range to [ ]. ●● You can also configure this setting by pressing the [ ] button, touching the desired focusing range, and then touching it again. Correcting White Balance Still Images Movies White balance can be manually corrected in [ ] mode (=55). This adjustment can match the effect of using a commercially available colorcompensating filter. 1 Choose [ ]. zzFollow steps 1 - 2 in "Specific Scenes" (=55) and choose [ ]. 2 Choose white balance. zzPress the [ ] button, and then choose [ ] in the menu. 3 Adjust the setting. zzTurn the [ ] ring to adjust the correction level for B and A, and then press the [ ] button. zzOnce the setting is complete, [ ] is displayed. ●● The camera will retain white balance correction levels even if you switch to another white balance option in step 2, but correction levels will be reset if you record custom white balance data. ●● B represents blue and A, amber. ●● White balance can also be manually corrected by recording custom white balance data (=79) before following the preceding steps. Before Use Basic Guide Advanced Guide 1 Camera Basics 2 Auto Mode / Hybrid Auto Mode 3 Other Shooting Modes 4 P Mode 5 Tv, Av, M, and C Mode 6 Playback Mode 7 Wi-Fi Functions 8 Setting Menu 9 Accessories 10 Appendix Index 57
-
 1
1 -
2
-
3
-
4
-
5
-
6
-
7
-
8
-
9
-
10
-
11
-
12
-
13
-
14
-
15
-
16
-
17
-
18
-
19
-
20
-
21
-
22
-
23
-
24
-
25
-
26
-
27
-
28
-
29
-
30
-
31
-
32
-
33
-
34
-
35
-
36
-
37
-
38
-
39
-
40
-
41
-
42
-
43
-
44
-
45
-
46
-
47
-
48
-
49
-
50
-
51
-
 52
52 -
 53
53 -
 54
54 -
 55
55 -
 56
56 -
 57
57 -
 58
58 -
 59
59 -
 60
60 -
 61
61 -
 62
62 -
63
-
64
-
65
-
66
-
67
-
68
-
69
-
70
-
71
-
72
-
73
-
74
-
75
-
76
-
77
-
78
-
79
-
80
-
81
-
82
-
83
-
84
-
85
-
86
-
87
-
88
-
89
-
90
-
91
-
92
-
93
-
94
-
95
-
96
-
97
-
98
-
99
-
100
-
101
-
102
-
103
-
104
-
105
-
106
-
107
-
108
-
109
-
110
-
111
-
112
-
113
-
114
-
115
-
116
-
117
-
118
-
119
-
120
-
121
-
122
-
123
-
124
-
125
-
126
-
127
-
128
-
129
-
130
-
131
-
132
-
133
-
134
-
135
-
136
-
137
-
138
-
139
-
140
-
141
-
142
-
143
-
144
-
145
-
146
-
147
-
148
-
149
-
150
-
151
-
152
-
153
-
154
-
155
-
156
-
157
-
158
-
159
-
160
-
161
-
162
-
163
-
164
-
165
-
166
-
167
-
168
-
169
-
170
-
171
-
172
-
173
-
174
-
175
-
176
-
177
-
178
-
179
-
180
-
181
-
182
-
183
-
184
-
185
-
186
-
187
-
188
-
189
-
190
-
191
-
192
-
193
-
194
-
195
-
196
-
197
-
198
-
199
-
200
-
201
-
202
 |
 |
