Canon PowerShot G7 X User Guide - Page 81
Shooting Range and Focusing
 |
View all Canon PowerShot G7 X manuals
Add to My Manuals
Save this manual to your list of manuals |
Page 81 highlights
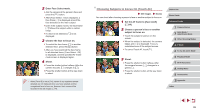
Shooting Range and Focusing Shooting Close-Ups (Macro) Still Images Movies To restrict the focus to subjects at close range, set the camera to [ ]. For details on the focusing range, see "Shooting Range" (= 196). zzPress the [ ] button, choose [ ] (either press the [ ][ ] buttons or turn the [ ] dial), and then press the [ ] button. zzOnce the setting is complete, [ ] is displayed. ●● If the flash fires, vignetting may occur. ●● To prevent camera shake, try mounting the camera on a tripod and shooting with the camera set to [ ] (=42). ●● You can also configure this setting by pressing the [ ] button, touching [ ], and then touching it again. Shooting in Manual Focus Mode Still Images Movies When focusing is not possible in AF mode, use manual focus. You can specify the general focal position and then press the shutter button halfway to have the camera determine the optimal focal position near the position you specified. For details on the focusing range, see "Shooting Range" (= 196). 1 Choose [ ]. zzPress the [ ] button, choose [ ] (either press the [ ][ ] buttons or turn the [ ] dial), and then press the [ ] button. zz[ ] and the MF indicator are displayed. 2 Specify the general focal position. zzReferring to the on-screen MF indicator bar (1, which shows the distance and focal position) and the magnified display area, press the [ ][ ] buttons or turn the [ ] dial to specify the general focal (1) position, and then press the [ ] button. zzTo adjust the magnification, press the [ ] button. zzDuring magnified display, you can move the focusing frame by dragging on the screen. 3 Fine-tune the focus. zzPress the shutter button halfway to have the camera fine-tune the focal position (Safety MF). Before Use Basic Guide Advanced Guide 1 Camera Basics 2 Auto Mode / Hybrid Auto Mode 3 Other Shooting Modes 4 P Mode 5 Tv, Av, M, and C Mode 6 Playback Mode 7 Wi-Fi Functions 8 Setting Menu 9 Accessories 10 Appendix Index 81
-
 1
1 -
2
-
3
-
4
-
5
-
6
-
7
-
8
-
9
-
10
-
11
-
12
-
13
-
14
-
15
-
16
-
17
-
18
-
19
-
20
-
21
-
22
-
23
-
24
-
25
-
26
-
27
-
28
-
29
-
30
-
31
-
32
-
33
-
34
-
35
-
36
-
37
-
38
-
39
-
40
-
41
-
42
-
43
-
44
-
45
-
46
-
47
-
48
-
49
-
50
-
51
-
52
-
53
-
54
-
55
-
56
-
57
-
58
-
59
-
60
-
61
-
62
-
63
-
64
-
65
-
66
-
67
-
68
-
69
-
70
-
71
-
72
-
73
-
74
-
75
-
 76
76 -
 77
77 -
 78
78 -
 79
79 -
 80
80 -
 81
81 -
 82
82 -
 83
83 -
 84
84 -
 85
85 -
 86
86 -
87
-
88
-
89
-
90
-
91
-
92
-
93
-
94
-
95
-
96
-
97
-
98
-
99
-
100
-
101
-
102
-
103
-
104
-
105
-
106
-
107
-
108
-
109
-
110
-
111
-
112
-
113
-
114
-
115
-
116
-
117
-
118
-
119
-
120
-
121
-
122
-
123
-
124
-
125
-
126
-
127
-
128
-
129
-
130
-
131
-
132
-
133
-
134
-
135
-
136
-
137
-
138
-
139
-
140
-
141
-
142
-
143
-
144
-
145
-
146
-
147
-
148
-
149
-
150
-
151
-
152
-
153
-
154
-
155
-
156
-
157
-
158
-
159
-
160
-
161
-
162
-
163
-
164
-
165
-
166
-
167
-
168
-
169
-
170
-
171
-
172
-
173
-
174
-
175
-
176
-
177
-
178
-
179
-
180
-
181
-
182
-
183
-
184
-
185
-
186
-
187
-
188
-
189
-
190
-
191
-
192
-
193
-
194
-
195
-
196
-
197
-
198
-
199
-
200
-
201
-
202
 |
 |
