Dell PowerEdge 2950 Hardware Owner's Manual (PDF) - Page 56
Before You Begin, Removing a Drive Blank, When you format a high-capacity hard drive - replacement drives
 |
View all Dell PowerEdge 2950 manuals
Add to My Manuals
Save this manual to your list of manuals |
Page 56 highlights
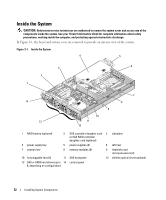
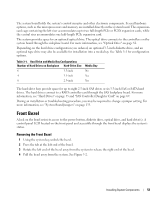
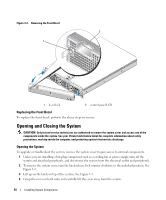
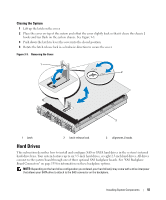
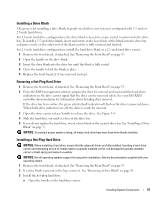
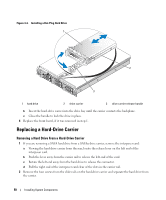
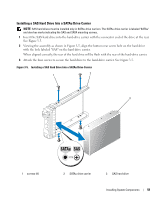
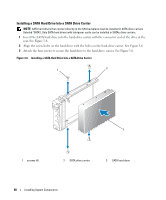
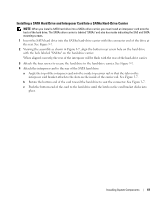
Before You Begin Hard drives are supplied in special hot-pluggable drive carriers that fit in the hard-drive bays. Depending on your configuration, you received one of the following two drive carrier types: • SATA drive carrier - Usable only with a SATA hard drive. • SATAu drive carrier - Usable with either a SAS hard drive or a SATA hard drive with a universal interposer card. The interposer card provides enhanced functionality that makes the SATA hard drive usable in some storage systems. NOTICE: Before attempting to remove or install a drive while the system is running, see the documentation for the optional SAS RAID controller daughter card to ensure that the host adapter is configured correctly to support hotplug drive removal and insertion. NOTE: It is recommended that you use only drives that have been tested and approved for use with the SAS backplane board. You may need to use different programs than those provided with the operating system to partition and format SAS or SATA hard drives. NOTICE: Do not turn off or reboot your system while the drive is being formatted. Doing so can cause a drive failure. When you format a high-capacity hard drive, allow enough time for the formatting to be completed. Long format times for these drives are normal. A 9-GB hard drive, for example, can take up to 2.5 hours to format. Removing a Drive Blank NOTICE: To maintain proper system cooling, all empty hard-drive bays must have drive blanks installed. If you remove a hard-drive carrier from the system and do not reinstall it, you must replace the carrier with a drive blank. The process for removing a drive blank depends on whether your system is configured with 3.5-inch or 2.5-inch hard drives. For 3.5-inch hard drive configurations: 1 Remove the front bezel, if attached. See "Removing the Front Bezel" on page 53. 2 Insert your finger under the shrouded end of the blank and press in on the latch to eject the blank outward from the bay. 3 Pry the ends of the blank outward until the blank is free. For 2.5-inch hard drive configurations, remove the blank as you would the 2.5-inch hard drive carrier: 1 Remove the front bezel, if attached. See "Removing the Front Bezel" on page 53. 2 Open the drive blank release handle to release the blank. See Figure 3-4. 3 Slide the drive blank out until it is free of the drive bay. 56 Installing System Components
-
 1
1 -
2
-
3
-
4
-
5
-
6
-
7
-
8
-
9
-
10
-
11
-
12
-
13
-
14
-
15
-
16
-
17
-
18
-
19
-
20
-
21
-
22
-
23
-
24
-
25
-
26
-
27
-
28
-
29
-
30
-
31
-
32
-
33
-
34
-
35
-
36
-
37
-
38
-
39
-
40
-
41
-
42
-
43
-
44
-
45
-
46
-
47
-
48
-
49
-
50
-
 51
51 -
 52
52 -
 53
53 -
 54
54 -
 55
55 -
 56
56 -
 57
57 -
 58
58 -
 59
59 -
 60
60 -
 61
61 -
62
-
63
-
64
-
65
-
66
-
67
-
68
-
69
-
70
-
71
-
72
-
73
-
74
-
75
-
76
-
77
-
78
-
79
-
80
-
81
-
82
-
83
-
84
-
85
-
86
-
87
-
88
-
89
-
90
-
91
-
92
-
93
-
94
-
95
-
96
-
97
-
98
-
99
-
100
-
101
-
102
-
103
-
104
-
105
-
106
-
107
-
108
-
109
-
110
-
111
-
112
-
113
-
114
-
115
-
116
-
117
-
118
-
119
-
120
-
121
-
122
-
123
-
124
-
125
-
126
-
127
-
128
-
129
-
130
-
131
-
132
-
133
-
134
-
135
-
136
-
137
-
138
-
139
-
140
-
141
-
142
-
143
-
144
-
145
-
146
-
147
-
148
-
149
-
150
-
151
-
152
-
153
-
154
-
155
-
156
-
157
-
158
-
159
-
160
-
161
-
162
-
163
-
164
-
165
-
166
-
167
-
168
-
169
-
170
-
171
-
172
-
173
-
174
-
175
-
176
-
177
-
178
-
179
-
180
-
181
-
182
 |
 |