Dell PowerEdge 2950 Hardware Owner's Manual (PDF) - Page 98
Expansion-Card Riser Boards, Removing the Left Expansion-Card Riser Board - riser card
 |
View all Dell PowerEdge 2950 manuals
Add to My Manuals
Save this manual to your list of manuals |
Page 98 highlights
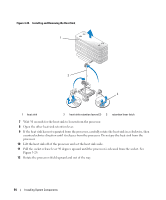
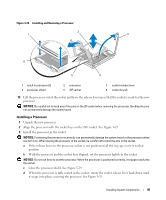
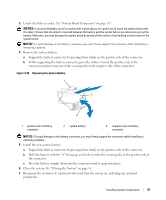
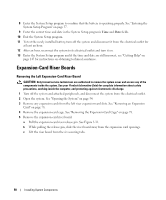
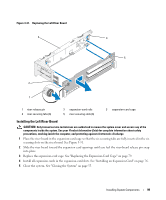
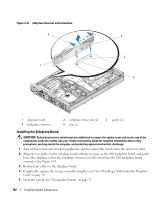
8 Enter the System Setup program to confirm that the battery is operating properly. See "Entering the System Setup Program" on page 37. 9 Enter the correct time and date in the System Setup program's Time and Date fields. 10 Exit the System Setup program. 11 To test the newly installed battery, turn off the system and disconnect it from the electrical outlet for at least an hour. 12 After an hour, reconnect the system to its electrical outlet and turn it on. 13 Enter the System Setup program and if the time and date are still incorrect, see "Getting Help" on page 147 for instructions on obtaining technical assistance. Expansion-Card Riser Boards Removing the Left Expansion-Card Riser Board CAUTION: Only trained service technicians are authorized to remove the system cover and access any of the components inside the system. See your Product Information Guide for complete information about safety precautions, working inside the computer, and protecting against electrostatic discharge. 1 Turn off the system and attached peripherals, and disconnect the system from the electrical outlet. 2 Open the system. See "Opening the System" on page 54. 3 Remove any expansion cards from the left riser expansion-card slots. See "Removing an Expansion Card" on page 78. 4 Remove the expansion-card cage. See "Removing the Expansion-Card Cage" on page 78. 5 Remove the expansion-card riser board: a Pull the expansion-card riser release pin. See Figure 3-31. b While pulling the release pin, slide the riser board away from the expansion card openings. c Lift the riser board from the six securing tabs. 98 Installing System Components
-
 1
1 -
2
-
3
-
4
-
5
-
6
-
7
-
8
-
9
-
10
-
11
-
12
-
13
-
14
-
15
-
16
-
17
-
18
-
19
-
20
-
21
-
22
-
23
-
24
-
25
-
26
-
27
-
28
-
29
-
30
-
31
-
32
-
33
-
34
-
35
-
36
-
37
-
38
-
39
-
40
-
41
-
42
-
43
-
44
-
45
-
46
-
47
-
48
-
49
-
50
-
51
-
52
-
53
-
54
-
55
-
56
-
57
-
58
-
59
-
60
-
61
-
62
-
63
-
64
-
65
-
66
-
67
-
68
-
69
-
70
-
71
-
72
-
73
-
74
-
75
-
76
-
77
-
78
-
79
-
80
-
81
-
82
-
83
-
84
-
85
-
86
-
87
-
88
-
89
-
90
-
91
-
92
-
 93
93 -
 94
94 -
 95
95 -
 96
96 -
 97
97 -
 98
98 -
 99
99 -
 100
100 -
 101
101 -
 102
102 -
 103
103 -
104
-
105
-
106
-
107
-
108
-
109
-
110
-
111
-
112
-
113
-
114
-
115
-
116
-
117
-
118
-
119
-
120
-
121
-
122
-
123
-
124
-
125
-
126
-
127
-
128
-
129
-
130
-
131
-
132
-
133
-
134
-
135
-
136
-
137
-
138
-
139
-
140
-
141
-
142
-
143
-
144
-
145
-
146
-
147
-
148
-
149
-
150
-
151
-
152
-
153
-
154
-
155
-
156
-
157
-
158
-
159
-
160
-
161
-
162
-
163
-
164
-
165
-
166
-
167
-
168
-
169
-
170
-
171
-
172
-
173
-
174
-
175
-
176
-
177
-
178
-
179
-
180
-
181
-
182
 |
 |