Dell PowerEdge 2950 Hardware Owner's Manual (PDF) - Page 76
Configuring the Boot Device, Expansion Cards, Expansion Card Installation Guidelines - 64 bit
 |
View all Dell PowerEdge 2950 manuals
Add to My Manuals
Save this manual to your list of manuals |
Page 76 highlights
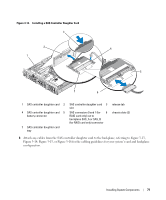
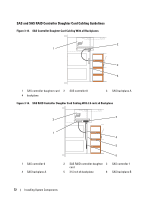
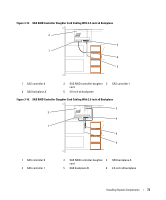
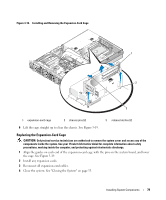
Configuring the Boot Device NOTE: System boot is not supported from an external device attached to a SAS or SCSI adapter. See support.dell.com for the latest support information about booting from external devices. If you plan to boot the system from a hard drive, the drive must be attached to the primary (or boot) controller. The device that the system boots from is determined by the boot order specified in the System Setup program. The System Setup program provides options that the system uses to scan for installed boot devices. See "Using the System Setup Program" on page 37 for information about the System Setup program. Expansion Cards The system is available with either a PCI-X or a PCI Express (PCIe) left riser board option. The PCI-X left riser board provides two PCI-X 64-bit/133-MHz expansion slots, while the PCIe left riser board provides one PCIe x8-lane expansion slot and one PCIe x4-lane expansion slot. The half-height center riser board provided with both PCI-X and PCIe left riser board options features one PCIe x8-lane expansion slot. The three expansion card slots are on separate buses. Expansion Card Installation Guidelines To identify expansion slots, see "Expansion-Card Riser-Board Components and PCI Buses" on page 142. NOTE: The expansion-card slots are not hot-pluggable. NOTE: Although the PCIe x4-lane expansion slot on the PCIe left riser option is physically a PCIe x8 connector, it functions only as a PCIe x4-lane slot. NOTE: Slot 1 on the central riser supports half-length expansion cards only. Slots 2 and 3 on the left riser support full-length expansion cards. NOTE: Your system supports up to two RAID expansion cards to manage external storage. Installing an Expansion Card CAUTION: Only trained service technicians are authorized to remove the system cover and access any of the components inside the system. See your Product Information Guide for complete information about safety precautions, working inside the computer, and protecting against electrostatic discharge. NOTE: The procedure for installing expansion cards into the left and central risers is the same except that there is no card guide for cards installing into the central riser, and only half-height cards are supported on the central riser. Full-length expansion card installation is illustrated in Figure 3-18. 1 Unpack the expansion card and prepare it for installation. For instructions, see the documentation accompanying the card. 2 Turn off the system, including any attached peripherals, and disconnect the system from the electrical outlet. 3 Open the system. See "Opening the System" on page 54. 76 Installing System Components
-
 1
1 -
2
-
3
-
4
-
5
-
6
-
7
-
8
-
9
-
10
-
11
-
12
-
13
-
14
-
15
-
16
-
17
-
18
-
19
-
20
-
21
-
22
-
23
-
24
-
25
-
26
-
27
-
28
-
29
-
30
-
31
-
32
-
33
-
34
-
35
-
36
-
37
-
38
-
39
-
40
-
41
-
42
-
43
-
44
-
45
-
46
-
47
-
48
-
49
-
50
-
51
-
52
-
53
-
54
-
55
-
56
-
57
-
58
-
59
-
60
-
61
-
62
-
63
-
64
-
65
-
66
-
67
-
68
-
69
-
70
-
 71
71 -
 72
72 -
 73
73 -
 74
74 -
 75
75 -
 76
76 -
 77
77 -
 78
78 -
 79
79 -
 80
80 -
 81
81 -
82
-
83
-
84
-
85
-
86
-
87
-
88
-
89
-
90
-
91
-
92
-
93
-
94
-
95
-
96
-
97
-
98
-
99
-
100
-
101
-
102
-
103
-
104
-
105
-
106
-
107
-
108
-
109
-
110
-
111
-
112
-
113
-
114
-
115
-
116
-
117
-
118
-
119
-
120
-
121
-
122
-
123
-
124
-
125
-
126
-
127
-
128
-
129
-
130
-
131
-
132
-
133
-
134
-
135
-
136
-
137
-
138
-
139
-
140
-
141
-
142
-
143
-
144
-
145
-
146
-
147
-
148
-
149
-
150
-
151
-
152
-
153
-
154
-
155
-
156
-
157
-
158
-
159
-
160
-
161
-
162
-
163
-
164
-
165
-
166
-
167
-
168
-
169
-
170
-
171
-
172
-
173
-
174
-
175
-
176
-
177
-
178
-
179
-
180
-
181
-
182
 |
 |