HP Brio ba410 hp brio ba410, user guide - Page 60
To Replace the Power Supply
 |
View all HP Brio ba410 manuals
Add to My Manuals
Save this manual to your list of manuals |
Page 60 highlights
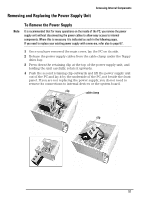
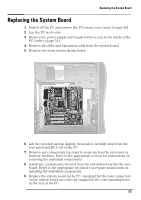
Accessing Internal Components To Replace the Power Supply Caution Ensure that you do not trap or crush any internal cables when replacing the power supply. 1 Insert the protruding pins at the back of the unit in the guiding grooves. 2 Rotate the power supply back into place, making sure that you are not trapping or crushing any cables on the underside of the unit (especially if your power supply has an airflow guide fitted). 3 Snap the unit back into place. 52
-
 1
1 -
2
-
3
-
4
-
5
-
6
-
7
-
8
-
9
-
10
-
11
-
12
-
13
-
14
-
15
-
16
-
17
-
18
-
19
-
20
-
21
-
22
-
23
-
24
-
25
-
26
-
27
-
28
-
29
-
30
-
31
-
32
-
33
-
34
-
35
-
36
-
37
-
38
-
39
-
40
-
41
-
42
-
43
-
44
-
45
-
46
-
47
-
48
-
49
-
50
-
51
-
52
-
53
-
54
-
 55
55 -
 56
56 -
 57
57 -
 58
58 -
 59
59 -
 60
60 -
 61
61 -
 62
62 -
 63
63 -
 64
64 -
 65
65 -
66
-
67
-
68
-
69
-
70
-
71
-
72
-
73
-
74
-
75
-
76
-
77
-
78
-
79
-
80
-
81
-
82
-
83
-
84
-
85
-
86
-
87
-
88
-
89
-
90
-
91
-
92
-
93
-
94
-
95
-
96
-
97
-
98
-
99
-
100
-
101
-
102
-
103
-
104
-
105
-
106
-
107
-
108
-
109
-
110
-
111
-
112
-
113
-
114
 |
 |

Accessing Internal Components
52
To Replace the Power Supply
Caution
Ensure that you do not trap or crush any internal cables when replacing the power supply.
1
Insert the protruding pins at the back of the unit in the guiding grooves.
2
Rotate the power supply back into place, making sure that you are not
trapping or crushing any cables on the underside of the unit (especially
if your power supply has an airflow guide fitted).
3
Snap the unit back into place.