HP Brio ba410 hp brio ba410, user guide - Page 66
Replacing a Processor
 |
View all HP Brio ba410 manuals
Add to My Manuals
Save this manual to your list of manuals |
Page 66 highlights
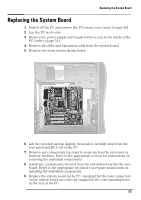
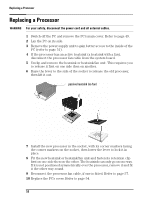
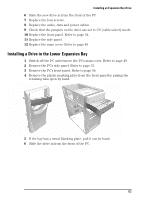
Replacing a Processor Replacing a Processor WARNING For your safety, disconnect the power cord and all external cables. 1 Switch off the PC and remove the PC's main cover. Refer to page 49. 2 Lay the PC on its side. 3 Remove the power supply unit to gain better access to the inside of the PC (refer to page 51). 4 If the processor has an active heatsink (a heatsink with a fan), disconnect the processor fan cable from the system board. 5 Unclip and remove the heatsink or heatsink/fan unit. This requires you to release it first on one side then on another. 6 Raise the lever to the side of the socket to release the old processor, then lift it out. passive heatsink (no fan) 7 Install the new processor in the socket, with its corner markers facing the corner markers on the socket, then lower the lever to lock it in place. 8 Fit the new heatsink or heatsink/fan unit and fasten its retention clip first on one side then on the other. The heatsink can only go on one way. If it is not positioned symmetrically over the processor, remove it and fit it the other way round. 9 Reconnect the processor fan cable, if one is fitted. Refer to page 57. 10 Replace the PC's cover. Refer to page 54. 58
-
 1
1 -
2
-
3
-
4
-
5
-
6
-
7
-
8
-
9
-
10
-
11
-
12
-
13
-
14
-
15
-
16
-
17
-
18
-
19
-
20
-
21
-
22
-
23
-
24
-
25
-
26
-
27
-
28
-
29
-
30
-
31
-
32
-
33
-
34
-
35
-
36
-
37
-
38
-
39
-
40
-
41
-
42
-
43
-
44
-
45
-
46
-
47
-
48
-
49
-
50
-
51
-
52
-
53
-
54
-
55
-
56
-
57
-
58
-
59
-
60
-
 61
61 -
 62
62 -
 63
63 -
 64
64 -
 65
65 -
 66
66 -
 67
67 -
 68
68 -
 69
69 -
 70
70 -
 71
71 -
72
-
73
-
74
-
75
-
76
-
77
-
78
-
79
-
80
-
81
-
82
-
83
-
84
-
85
-
86
-
87
-
88
-
89
-
90
-
91
-
92
-
93
-
94
-
95
-
96
-
97
-
98
-
99
-
100
-
101
-
102
-
103
-
104
-
105
-
106
-
107
-
108
-
109
-
110
-
111
-
112
-
113
-
114
 |
 |