HP Brio ba410 hp brio ba410, user guide - Page 61
Removing and Replacing the Side Panel
 |
View all HP Brio ba410 manuals
Add to My Manuals
Save this manual to your list of manuals |
Page 61 highlights
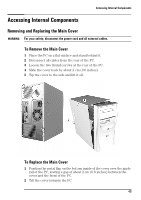
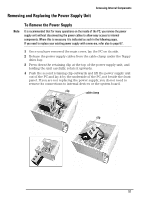
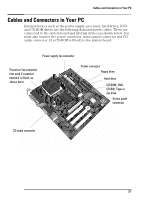
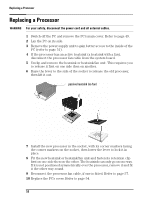
Removing and Replacing the Side Panel Accessing Internal Components To Remove the Side Panel You are only required to remove the side panel of the PC when removing or replacing 5.25 inch devices (such as CD-ROM, CD-RW, DVD-ROM or Zip drives) in the upper expansion shelves. 1 Once the main cover has been removed, loosen the screw on the side panel. 2 Slide the side panel back by about 2 cm (0.6 inches). 3 Lift the side panel up and off the PC. To Replace the Side Panel 1 Lower the side panel onto the PC, making sure that the inside of the panel fits correctly into the guide rail. Leave a gap of about 2 cm (0.6 inches) between the panel and the front of the PC. 2 When you are sure that the inside of the panel fits correctly into the guide rail, slide the panel towards the front of the PC. 3 Tighten the screw that holds the panel in place. 53
-
 1
1 -
2
-
3
-
4
-
5
-
6
-
7
-
8
-
9
-
10
-
11
-
12
-
13
-
14
-
15
-
16
-
17
-
18
-
19
-
20
-
21
-
22
-
23
-
24
-
25
-
26
-
27
-
28
-
29
-
30
-
31
-
32
-
33
-
34
-
35
-
36
-
37
-
38
-
39
-
40
-
41
-
42
-
43
-
44
-
45
-
46
-
47
-
48
-
49
-
50
-
51
-
52
-
53
-
54
-
55
-
 56
56 -
 57
57 -
 58
58 -
 59
59 -
 60
60 -
 61
61 -
 62
62 -
 63
63 -
 64
64 -
 65
65 -
 66
66 -
67
-
68
-
69
-
70
-
71
-
72
-
73
-
74
-
75
-
76
-
77
-
78
-
79
-
80
-
81
-
82
-
83
-
84
-
85
-
86
-
87
-
88
-
89
-
90
-
91
-
92
-
93
-
94
-
95
-
96
-
97
-
98
-
99
-
100
-
101
-
102
-
103
-
104
-
105
-
106
-
107
-
108
-
109
-
110
-
111
-
112
-
113
-
114
 |
 |