HP Brio ba410 hp brio ba410, user guide - Page 70
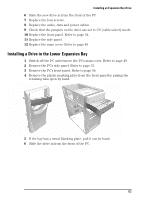
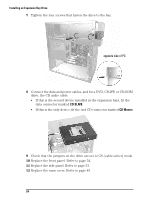
Installing an Expansion Bay Drive
 |
View all HP Brio ba410 manuals
Add to My Manuals
Save this manual to your list of manuals |
Page 70 highlights
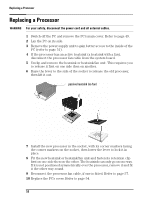
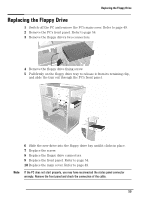
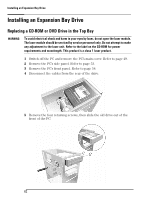
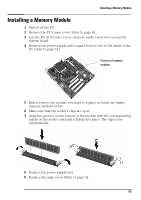
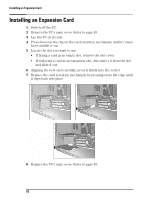
Installing an Expansion Bay Drive Installing an Expansion Bay Drive Replacing a CD-ROM or DVD Drive in the Top Bay WARNING To avoid electrical shock and harm to your eyes by laser, do not open the laser module. The laser module should be serviced by service personnel only. Do not attempt to make any adjustment to the laser unit. Refer to the label on the CD-ROM for power requirements and wavelength. This product is a class 1 laser product. 1 Switch off the PC and remove the PC's main cover. Refer to page 49. 2 Remove the PC's side panel. Refer to page 53. 3 Remove the PC's front panel. Refer to page 54. 4 Disconnect the cables from the rear of the drive. 5 Remove the four retaining screws, then slide the old drive out of the front of the PC. 62
-
 1
1 -
2
-
3
-
4
-
5
-
6
-
7
-
8
-
9
-
10
-
11
-
12
-
13
-
14
-
15
-
16
-
17
-
18
-
19
-
20
-
21
-
22
-
23
-
24
-
25
-
26
-
27
-
28
-
29
-
30
-
31
-
32
-
33
-
34
-
35
-
36
-
37
-
38
-
39
-
40
-
41
-
42
-
43
-
44
-
45
-
46
-
47
-
48
-
49
-
50
-
51
-
52
-
53
-
54
-
55
-
56
-
57
-
58
-
59
-
60
-
61
-
62
-
63
-
64
-
 65
65 -
 66
66 -
 67
67 -
 68
68 -
 69
69 -
 70
70 -
 71
71 -
 72
72 -
 73
73 -
 74
74 -
 75
75 -
76
-
77
-
78
-
79
-
80
-
81
-
82
-
83
-
84
-
85
-
86
-
87
-
88
-
89
-
90
-
91
-
92
-
93
-
94
-
95
-
96
-
97
-
98
-
99
-
100
-
101
-
102
-
103
-
104
-
105
-
106
-
107
-
108
-
109
-
110
-
111
-
112
-
113
-
114
 |
 |