HP Color LaserJet Enterprise CP4020 HP Designjet 4020 and 4520 Printer Series - Page 101
Insert an ink cartridge
 |
View all HP Color LaserJet Enterprise CP4020 manuals
Add to My Manuals
Save this manual to your list of manuals |
Page 101 highlights
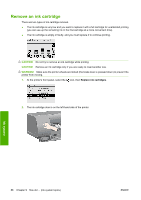
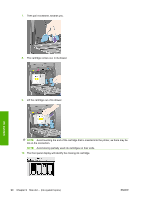
Insert an ink cartridge 1. Pick up the new ink cartridge and find the label identifying the ink color. Hold the ink cartridge so that you can see the identifying colored label at the top of the side facing you. 2. Check that the colored label above the empty slot in the printer matches the color of the label on the cartridge. 3. Insert the ink cartridge into the cartridge drawer. Position the cartridge at the rear of the drawer as indicated below. NOTE: A larger black ink cartridge is available that uses the whole length of the drawer. Ink system 4. Slide the drawer and cartridge into the slot until it locks into position. If you have difficulty, see I cannot insert an ink cartridge on page 168. ENWW Insert an ink cartridge 91
-
 1
1 -
2
-
3
-
4
-
5
-
6
-
7
-
8
-
9
-
10
-
11
-
12
-
13
-
14
-
15
-
16
-
17
-
18
-
19
-
20
-
21
-
22
-
23
-
24
-
25
-
26
-
27
-
28
-
29
-
30
-
31
-
32
-
33
-
34
-
35
-
36
-
37
-
38
-
39
-
40
-
41
-
42
-
43
-
44
-
45
-
46
-
47
-
48
-
49
-
50
-
51
-
52
-
53
-
54
-
55
-
56
-
57
-
58
-
59
-
60
-
61
-
62
-
63
-
64
-
65
-
66
-
67
-
68
-
69
-
70
-
71
-
72
-
73
-
74
-
75
-
76
-
77
-
78
-
79
-
80
-
81
-
82
-
83
-
84
-
85
-
86
-
87
-
88
-
89
-
90
-
91
-
92
-
93
-
94
-
95
-
 96
96 -
 97
97 -
 98
98 -
 99
99 -
 100
100 -
 101
101 -
 102
102 -
 103
103 -
 104
104 -
 105
105 -
 106
106 -
107
-
108
-
109
-
110
-
111
-
112
-
113
-
114
-
115
-
116
-
117
-
118
-
119
-
120
-
121
-
122
-
123
-
124
-
125
-
126
-
127
-
128
-
129
-
130
-
131
-
132
-
133
-
134
-
135
-
136
-
137
-
138
-
139
-
140
-
141
-
142
-
143
-
144
-
145
-
146
-
147
-
148
-
149
-
150
-
151
-
152
-
153
-
154
-
155
-
156
-
157
-
158
-
159
-
160
-
161
-
162
-
163
-
164
-
165
-
166
-
167
-
168
-
169
-
170
-
171
-
172
-
173
-
174
-
175
-
176
-
177
-
178
-
179
-
180
-
181
-
182
-
183
-
184
-
185
-
186
-
187
-
188
-
189
-
190
-
191
-
192
-
193
-
194
-
195
-
196
-
197
-
198
-
199
-
200
-
201
-
202
-
203
-
204
-
205
-
206
-
207
-
208
-
209
-
210
-
211
-
212
-
213
-
214
-
215
-
216
-
217
-
218
-
219
-
220
-
221
-
222
-
223
-
224
-
225
-
226
-
227
-
228
-
229
-
230
-
231
-
232
-
233
-
234
-
235
 |
 |

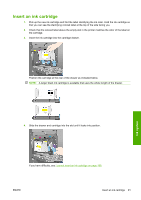
Insert an ink cartridge
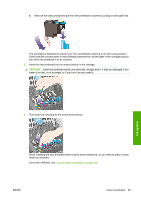
1.
Pick up the new ink cartridge and find the label identifying the ink color. Hold the ink cartridge so
that you can see the identifying colored label at the top of the side facing you.
2.
Check that the colored label above the empty slot in the printer matches the color of the label on
the cartridge.
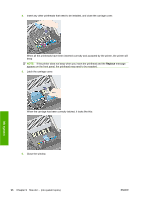
3.
Insert the ink cartridge into the cartridge drawer.
Position the cartridge at the rear of the drawer as indicated below.
NOTE:
A larger black ink cartridge is available that uses the whole length of the drawer.
4.
Slide the drawer and cartridge into the slot until it locks into position.
If you have difficulty, see
I cannot insert an ink cartridge
on page
168
.
ENWW
Insert an ink cartridge
91
Ink system