HP Color LaserJet Enterprise CP4020 HP Designjet 4020 and 4520 Printer Series - Page 81
Proof Setup, Custom, Profile, Preserve Color Numbers, Intent, Use Black Point Compensation
 |
View all HP Color LaserJet Enterprise CP4020 manuals
Add to My Manuals
Save this manual to your list of manuals |
Page 81 highlights
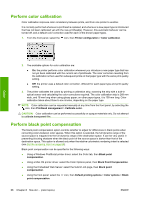
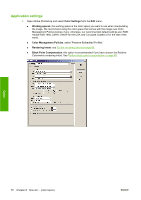
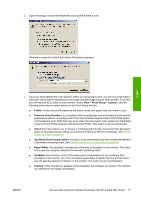
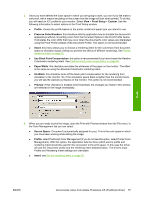
2. Open the image. Accept the embedded color profile if there is one: Color Otherwise accept the default that Adobe Photoshop proposes: 3. Once you have defined the color space in which you are going to work, you can if you like make a soft proof, which means emulating on the screen how the image will look when printed. To do this, you will need an ICC profile for your monitor. Select View > Proof Setup > Custom. Use the following information to select options in the Proof Setup window. ● Profile: choose the profile based on the printer model and paper type you intend to use. ● Preserve Color Numbers: this checkbox tells the application how to simulate the document's appearance without converting colors from the Document Space to the Proof Profile Space. It simulates the color shifts that may occur when the document's color values are interpreted using the Proof Profile instead of the Document Profile. This option is not recommended. ● Intent: this menu allows you to choose a rendering intent for the conversion from document space to simulation space, letting you preview the effects of different renderings. See Set the rendering intent on page 69. ● Use Black Point Compensation: this option is recommended if you have chosen the Relative Colorimetric rendering intent. See Perform black point compensation on page 68. ● Paper White: this checkbox emulates the whiteness of the paper on the monitor. The effect is the same as using the Absolute Colorimetric rendering intent. ● Ink Black: this checkbox turns off the black point compensation for the rendering from simulation to the monitor. So, if the simulation space black is lighter than the monitor black, you will see the washed-out blacks on the monitor. This option is not recommended. ● Preview: if this checkbox is enabled (recommended), the changes you make in this window are reflected in the image immediately. ENWW Get accurate colors from Adobe Photoshop CS (HP-GL/2 & RTL driver) 71
-
 1
1 -
2
-
3
-
4
-
5
-
6
-
7
-
8
-
9
-
10
-
11
-
12
-
13
-
14
-
15
-
16
-
17
-
18
-
19
-
20
-
21
-
22
-
23
-
24
-
25
-
26
-
27
-
28
-
29
-
30
-
31
-
32
-
33
-
34
-
35
-
36
-
37
-
38
-
39
-
40
-
41
-
42
-
43
-
44
-
45
-
46
-
47
-
48
-
49
-
50
-
51
-
52
-
53
-
54
-
55
-
56
-
57
-
58
-
59
-
60
-
61
-
62
-
63
-
64
-
65
-
66
-
67
-
68
-
69
-
70
-
71
-
72
-
73
-
74
-
75
-
 76
76 -
 77
77 -
 78
78 -
 79
79 -
 80
80 -
 81
81 -
 82
82 -
 83
83 -
 84
84 -
 85
85 -
 86
86 -
87
-
88
-
89
-
90
-
91
-
92
-
93
-
94
-
95
-
96
-
97
-
98
-
99
-
100
-
101
-
102
-
103
-
104
-
105
-
106
-
107
-
108
-
109
-
110
-
111
-
112
-
113
-
114
-
115
-
116
-
117
-
118
-
119
-
120
-
121
-
122
-
123
-
124
-
125
-
126
-
127
-
128
-
129
-
130
-
131
-
132
-
133
-
134
-
135
-
136
-
137
-
138
-
139
-
140
-
141
-
142
-
143
-
144
-
145
-
146
-
147
-
148
-
149
-
150
-
151
-
152
-
153
-
154
-
155
-
156
-
157
-
158
-
159
-
160
-
161
-
162
-
163
-
164
-
165
-
166
-
167
-
168
-
169
-
170
-
171
-
172
-
173
-
174
-
175
-
176
-
177
-
178
-
179
-
180
-
181
-
182
-
183
-
184
-
185
-
186
-
187
-
188
-
189
-
190
-
191
-
192
-
193
-
194
-
195
-
196
-
197
-
198
-
199
-
200
-
201
-
202
-
203
-
204
-
205
-
206
-
207
-
208
-
209
-
210
-
211
-
212
-
213
-
214
-
215
-
216
-
217
-
218
-
219
-
220
-
221
-
222
-
223
-
224
-
225
-
226
-
227
-
228
-
229
-
230
-
231
-
232
-
233
-
234
-
235
 |
 |
