HP Color LaserJet Enterprise CP4020 HP Designjet 4020 and 4520 Printer Series - Page 90
Color Manage CMYK sources to CMYK destinations
 |
View all HP Color LaserJet Enterprise CP4020 manuals
Add to My Manuals
Save this manual to your list of manuals |
Page 90 highlights
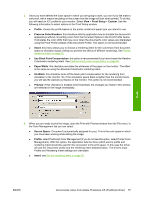
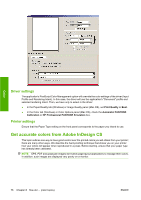
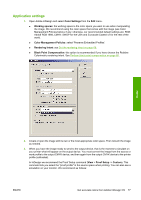
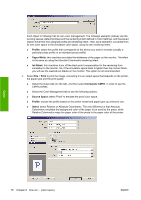
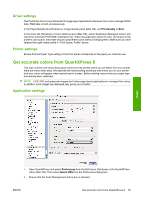
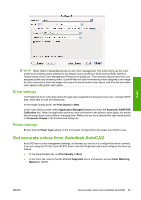
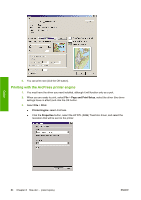
3. The Destination Profiles area lets you choose profiles that correspond to your devices: Monitor profile, Composite Output profile and Separation Output profile. Select in the Separation Output profile the profile of your output device (press) which you want to emulate on your printer later. Select in the Composite Output profile your printer profile; remember that it depends on the printer model, paper type and print quality option. 4. In the Default Source Profiles you must set the default profiles for solid colors and images that don't have embedded profiles. The following default profiles are recommended: RGB: Adobe RGB 1998, CMYK: SWOP for the USA and Euroscale Coated v2 for the rest of the world. Also select the rendering intent, which QuarkXPress uses for all conversions; if in doubt, select Relative Colorimetric. See Set the rendering intent on page 69. 5. Check the box Color Manage RGB sources to RGB destinations in the RGB Default Source Profiles and Color Manage CMYK sources to CMYK destinations in the CMYK Default Source Profiles. 6. The Display Simulation tells QuarkXPress how the display simulation should behave: ● None means that it doesn't simulate anything on the display. ● Monitor Color Space means that it converts from the source profile to the display profile for display only. ● Composite Output Color Space makes the display simulate a composite printer: that is, a printer without separate plates for different colors, such as an inkjet printer. ● Separation Output Color Space makes the display simulate a separations printer: that is, a printer with separate plates for different colors, such as a digital press. You can select Monitor Color Space if you want to display only, or you can select the Separation Output Color Space if you also want to see the simulation of the output device on the monitor. You can simulate the final output with the printer (hard-proofing) and with the monitor (softproofing ). 7. Open and retouch the document as you like. 8. Select File > Print > Setup > Printer Description, and select your printer. 9. Select File > Print > Profiles. ● Select the appropriate Separation Output Profile (emulation) and Composite Output Profile (printer). ● Check the Composite Simulates Separation box, then Quark will perform the simulation. Color 80 Chapter 8 How do I... (color topics) ENWW
-
 1
1 -
2
-
3
-
4
-
5
-
6
-
7
-
8
-
9
-
10
-
11
-
12
-
13
-
14
-
15
-
16
-
17
-
18
-
19
-
20
-
21
-
22
-
23
-
24
-
25
-
26
-
27
-
28
-
29
-
30
-
31
-
32
-
33
-
34
-
35
-
36
-
37
-
38
-
39
-
40
-
41
-
42
-
43
-
44
-
45
-
46
-
47
-
48
-
49
-
50
-
51
-
52
-
53
-
54
-
55
-
56
-
57
-
58
-
59
-
60
-
61
-
62
-
63
-
64
-
65
-
66
-
67
-
68
-
69
-
70
-
71
-
72
-
73
-
74
-
75
-
76
-
77
-
78
-
79
-
80
-
81
-
82
-
83
-
84
-
 85
85 -
 86
86 -
 87
87 -
 88
88 -
 89
89 -
 90
90 -
 91
91 -
 92
92 -
 93
93 -
 94
94 -
 95
95 -
96
-
97
-
98
-
99
-
100
-
101
-
102
-
103
-
104
-
105
-
106
-
107
-
108
-
109
-
110
-
111
-
112
-
113
-
114
-
115
-
116
-
117
-
118
-
119
-
120
-
121
-
122
-
123
-
124
-
125
-
126
-
127
-
128
-
129
-
130
-
131
-
132
-
133
-
134
-
135
-
136
-
137
-
138
-
139
-
140
-
141
-
142
-
143
-
144
-
145
-
146
-
147
-
148
-
149
-
150
-
151
-
152
-
153
-
154
-
155
-
156
-
157
-
158
-
159
-
160
-
161
-
162
-
163
-
164
-
165
-
166
-
167
-
168
-
169
-
170
-
171
-
172
-
173
-
174
-
175
-
176
-
177
-
178
-
179
-
180
-
181
-
182
-
183
-
184
-
185
-
186
-
187
-
188
-
189
-
190
-
191
-
192
-
193
-
194
-
195
-
196
-
197
-
198
-
199
-
200
-
201
-
202
-
203
-
204
-
205
-
206
-
207
-
208
-
209
-
210
-
211
-
212
-
213
-
214
-
215
-
216
-
217
-
218
-
219
-
220
-
221
-
222
-
223
-
224
-
225
-
226
-
227
-
228
-
229
-
230
-
231
-
232
-
233
-
234
-
235
 |
 |
