HP Color LaserJet Enterprise CP4020 HP Designjet 4020 and 4520 Printer Series - Page 42
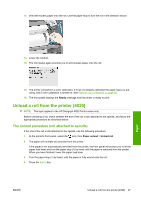
presses the roll against the stop., Ensure there is no space between the roll and the black stop.
 |
View all HP Color LaserJet Enterprise CP4020 manuals
Add to My Manuals
Save this manual to your list of manuals |
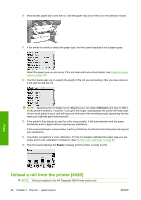
Page 42 highlights
4. Slide the new roll onto the spindle. Make sure the paper type is oriented as shown. If it is not, remove the roll, turn it 180 degrees and slide it back on to the spindle. NOTE: There is also a diagram on the outside face of each paper stop showing the correct orientation. 5. Press the roll towards the black paper stop until it clicks into place. NOTE: If you have difficulty with this, try turning the spindle to a vertical position, so that gravity presses the roll against the stop. 6. Ensure there is no space between the roll and the black stop. 7. Put the blue paper stop on to the other end of the spindle, and push it towards the end of the roll. Paper 32 Chapter 4 How do I... (paper topics) ENWW
-
 1
1 -
2
-
3
-
4
-
5
-
6
-
7
-
8
-
9
-
10
-
11
-
12
-
13
-
14
-
15
-
16
-
17
-
18
-
19
-
20
-
21
-
22
-
23
-
24
-
25
-
26
-
27
-
28
-
29
-
30
-
31
-
32
-
33
-
34
-
35
-
36
-
 37
37 -
 38
38 -
 39
39 -
 40
40 -
 41
41 -
 42
42 -
 43
43 -
 44
44 -
 45
45 -
 46
46 -
 47
47 -
48
-
49
-
50
-
51
-
52
-
53
-
54
-
55
-
56
-
57
-
58
-
59
-
60
-
61
-
62
-
63
-
64
-
65
-
66
-
67
-
68
-
69
-
70
-
71
-
72
-
73
-
74
-
75
-
76
-
77
-
78
-
79
-
80
-
81
-
82
-
83
-
84
-
85
-
86
-
87
-
88
-
89
-
90
-
91
-
92
-
93
-
94
-
95
-
96
-
97
-
98
-
99
-
100
-
101
-
102
-
103
-
104
-
105
-
106
-
107
-
108
-
109
-
110
-
111
-
112
-
113
-
114
-
115
-
116
-
117
-
118
-
119
-
120
-
121
-
122
-
123
-
124
-
125
-
126
-
127
-
128
-
129
-
130
-
131
-
132
-
133
-
134
-
135
-
136
-
137
-
138
-
139
-
140
-
141
-
142
-
143
-
144
-
145
-
146
-
147
-
148
-
149
-
150
-
151
-
152
-
153
-
154
-
155
-
156
-
157
-
158
-
159
-
160
-
161
-
162
-
163
-
164
-
165
-
166
-
167
-
168
-
169
-
170
-
171
-
172
-
173
-
174
-
175
-
176
-
177
-
178
-
179
-
180
-
181
-
182
-
183
-
184
-
185
-
186
-
187
-
188
-
189
-
190
-
191
-
192
-
193
-
194
-
195
-
196
-
197
-
198
-
199
-
200
-
201
-
202
-
203
-
204
-
205
-
206
-
207
-
208
-
209
-
210
-
211
-
212
-
213
-
214
-
215
-
216
-
217
-
218
-
219
-
220
-
221
-
222
-
223
-
224
-
225
-
226
-
227
-
228
-
229
-
230
-
231
-
232
-
233
-
234
-
235
 |
 |

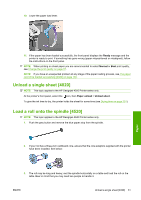
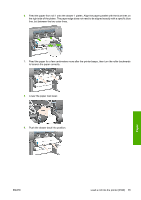
4.
Slide the new roll onto the spindle. Make sure the paper type is oriented as shown. If it is not,
remove the roll, turn it 180 degrees and slide it back on to the spindle.
NOTE:
There is also a diagram on the outside face of each paper stop showing the correct
orientation.
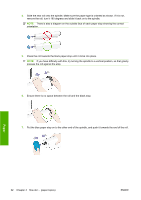
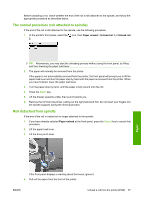
5.
Press the roll towards the black paper stop until it clicks into place.
NOTE:
If you have difficulty with this, try turning the spindle to a vertical position, so that gravity
presses the roll against the stop.
6.
Ensure there is no space between the roll and the black stop.
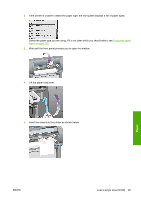
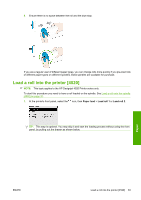
7.
Put the blue paper stop on to the other end of the spindle, and push it towards the end of the roll.
32
Chapter 4
How do I... (paper topics)
ENWW
Paper