HP Color LaserJet Enterprise CP4020 HP Designjet 4020 and 4520 Printer Series - Page 202
The printer's rear lights, The printer's internal prints
 |
View all HP Color LaserJet Enterprise CP4020 manuals
Add to My Manuals
Save this manual to your list of manuals |
Page 202 highlights
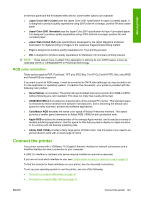
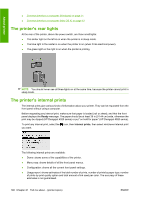
About printer ● Connect directly to a computer (Windows) on page 11 ● Connect directly to a computer (Mac OS X) on page 12 The printer's rear lights At the rear of the printer, above the power switch, are three small lights: ● The amber light on the left is on when the printer is in sleep mode. ● The blue light in the center is on when the printer is on (when it has electrical power). ● The green light on the right is on when the printer is printing. NOTE: You should never see all three lights on at the same time, because the printer cannot print in sleep mode. The printer's internal prints The internal prints give various kinds of information about your printer. They can be requested from the front panel without using a computer. Before requesting any internal print, make sure that paper is loaded (roll or sheet), and that the front panel displays the Ready message. The paper should be at least 36 in (91.44 cm) wide, otherwise the print may be clipped (HP Designjet 4020 series) or put "on hold for paper" (HP Designjet 4520 series). To print any internal print, select the icon, then Internal prints, then select whichever internal print you want. The following internal prints are available: ● Demo: shows some of the capabilities of the printer. ● Menu map: shows details of all the front panel menus. ● Configuration: shows all the current front panel settings. ● Usage report: shows estimates of the total number of prints, number of prints by paper type, number of prints by print quality option and total amount of ink used per color. The accuracy of these estimates is not guaranteed. 192 Chapter 21 Tell me about... (printer topics) ENWW
-
 1
1 -
2
-
3
-
4
-
5
-
6
-
7
-
8
-
9
-
10
-
11
-
12
-
13
-
14
-
15
-
16
-
17
-
18
-
19
-
20
-
21
-
22
-
23
-
24
-
25
-
26
-
27
-
28
-
29
-
30
-
31
-
32
-
33
-
34
-
35
-
36
-
37
-
38
-
39
-
40
-
41
-
42
-
43
-
44
-
45
-
46
-
47
-
48
-
49
-
50
-
51
-
52
-
53
-
54
-
55
-
56
-
57
-
58
-
59
-
60
-
61
-
62
-
63
-
64
-
65
-
66
-
67
-
68
-
69
-
70
-
71
-
72
-
73
-
74
-
75
-
76
-
77
-
78
-
79
-
80
-
81
-
82
-
83
-
84
-
85
-
86
-
87
-
88
-
89
-
90
-
91
-
92
-
93
-
94
-
95
-
96
-
97
-
98
-
99
-
100
-
101
-
102
-
103
-
104
-
105
-
106
-
107
-
108
-
109
-
110
-
111
-
112
-
113
-
114
-
115
-
116
-
117
-
118
-
119
-
120
-
121
-
122
-
123
-
124
-
125
-
126
-
127
-
128
-
129
-
130
-
131
-
132
-
133
-
134
-
135
-
136
-
137
-
138
-
139
-
140
-
141
-
142
-
143
-
144
-
145
-
146
-
147
-
148
-
149
-
150
-
151
-
152
-
153
-
154
-
155
-
156
-
157
-
158
-
159
-
160
-
161
-
162
-
163
-
164
-
165
-
166
-
167
-
168
-
169
-
170
-
171
-
172
-
173
-
174
-
175
-
176
-
177
-
178
-
179
-
180
-
181
-
182
-
183
-
184
-
185
-
186
-
187
-
188
-
189
-
190
-
191
-
192
-
193
-
194
-
195
-
196
-
 197
197 -
 198
198 -
 199
199 -
 200
200 -
 201
201 -
 202
202 -
 203
203 -
 204
204 -
 205
205 -
 206
206 -
 207
207 -
208
-
209
-
210
-
211
-
212
-
213
-
214
-
215
-
216
-
217
-
218
-
219
-
220
-
221
-
222
-
223
-
224
-
225
-
226
-
227
-
228
-
229
-
230
-
231
-
232
-
233
-
234
-
235
 |
 |
