HP Color LaserJet Enterprise CP4020 HP Designjet 4020 and 4520 Printer Series - Page 62
Install the stacker, Change the temperature, Accessories, Stacker
 |
View all HP Color LaserJet Enterprise CP4020 manuals
Add to My Manuals
Save this manual to your list of manuals |
Page 62 highlights
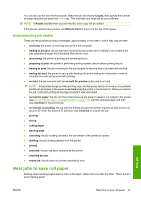
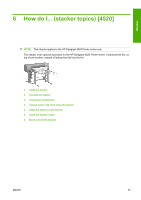
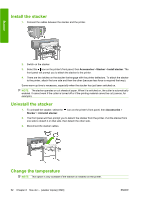
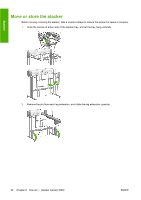
Stacker Install the stacker 1. Connect the cables between the stacker and the printer. 2. Switch on the stacker. 3. Select the icon on the printer's front panel, then Accessories > Stacker > Install stacker. The front panel will prompt you to attach the stacker to the printer. 4. There are two latches on the stacker that engage with the printer deflectors. To attach the stacker to the printer, attach first one side and then the other (because less force is required that way). Some warm-up time is necessary, especially when the stacker has just been switched on. NOTE: The stacker operates on cut sheets of paper. When it is switched on, the cutter is automatically enabled. It cannot work if the cutter is turned off or if the printing material cannot be cut (canvas, for example). Uninstall the stacker 1. To uninstall the stacker, select the icon on the printer's front panel, then Accessories > Stacker > Uninstall stacker. 2. The front panel will then prompt you to detach the stacker from the printer. Pull the stacker from one side to detach it on that side, then detach the other side. 3. Disconnect the stacker cables. Change the temperature NOTE: This option is only available if the stacker is installed on the printer. 52 Chapter 6 How do I... (stacker topics) [4520] ENWW
-
 1
1 -
2
-
3
-
4
-
5
-
6
-
7
-
8
-
9
-
10
-
11
-
12
-
13
-
14
-
15
-
16
-
17
-
18
-
19
-
20
-
21
-
22
-
23
-
24
-
25
-
26
-
27
-
28
-
29
-
30
-
31
-
32
-
33
-
34
-
35
-
36
-
37
-
38
-
39
-
40
-
41
-
42
-
43
-
44
-
45
-
46
-
47
-
48
-
49
-
50
-
51
-
52
-
53
-
54
-
55
-
56
-
 57
57 -
 58
58 -
 59
59 -
 60
60 -
 61
61 -
 62
62 -
 63
63 -
 64
64 -
 65
65 -
 66
66 -
 67
67 -
68
-
69
-
70
-
71
-
72
-
73
-
74
-
75
-
76
-
77
-
78
-
79
-
80
-
81
-
82
-
83
-
84
-
85
-
86
-
87
-
88
-
89
-
90
-
91
-
92
-
93
-
94
-
95
-
96
-
97
-
98
-
99
-
100
-
101
-
102
-
103
-
104
-
105
-
106
-
107
-
108
-
109
-
110
-
111
-
112
-
113
-
114
-
115
-
116
-
117
-
118
-
119
-
120
-
121
-
122
-
123
-
124
-
125
-
126
-
127
-
128
-
129
-
130
-
131
-
132
-
133
-
134
-
135
-
136
-
137
-
138
-
139
-
140
-
141
-
142
-
143
-
144
-
145
-
146
-
147
-
148
-
149
-
150
-
151
-
152
-
153
-
154
-
155
-
156
-
157
-
158
-
159
-
160
-
161
-
162
-
163
-
164
-
165
-
166
-
167
-
168
-
169
-
170
-
171
-
172
-
173
-
174
-
175
-
176
-
177
-
178
-
179
-
180
-
181
-
182
-
183
-
184
-
185
-
186
-
187
-
188
-
189
-
190
-
191
-
192
-
193
-
194
-
195
-
196
-
197
-
198
-
199
-
200
-
201
-
202
-
203
-
204
-
205
-
206
-
207
-
208
-
209
-
210
-
211
-
212
-
213
-
214
-
215
-
216
-
217
-
218
-
219
-
220
-
221
-
222
-
223
-
224
-
225
-
226
-
227
-
228
-
229
-
230
-
231
-
232
-
233
-
234
-
235
 |
 |
