HP Color LaserJet Enterprise CP4020 HP Designjet 4020 and 4520 Printer Series - Page 110
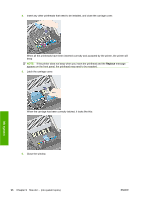
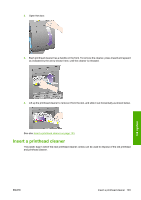
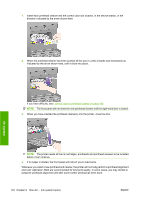
After waiting a few moments to allow both connectors to dry, replace the printhead into the printhead
 |
View all HP Color LaserJet Enterprise CP4020 manuals
Add to My Manuals
Save this manual to your list of manuals |
Page 110 highlights
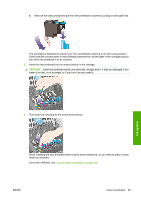
8. Take special care to clean all contacts thoroughly, including the ones at the lowest point of the connector. 9. Using the same sponge, clean the lower strip of electrical contacts on the printhead (unless the printhead is new), avoid touching the upper set of electrical contacts. CAUTION: Do not touch the surface of the printhead containing the nozzles, which are easily damaged. 10. After waiting a few moments to allow both connectors to dry, replace the printhead into the printhead carriage. See Insert a printhead on page 94. 11. On completion of the cleaning process, open the carriage interconnect wiper by pulling on the sponge tab. Ink system 100 Chapter 9 How do I... (ink system topics) ENWW
-
 1
1 -
2
-
3
-
4
-
5
-
6
-
7
-
8
-
9
-
10
-
11
-
12
-
13
-
14
-
15
-
16
-
17
-
18
-
19
-
20
-
21
-
22
-
23
-
24
-
25
-
26
-
27
-
28
-
29
-
30
-
31
-
32
-
33
-
34
-
35
-
36
-
37
-
38
-
39
-
40
-
41
-
42
-
43
-
44
-
45
-
46
-
47
-
48
-
49
-
50
-
51
-
52
-
53
-
54
-
55
-
56
-
57
-
58
-
59
-
60
-
61
-
62
-
63
-
64
-
65
-
66
-
67
-
68
-
69
-
70
-
71
-
72
-
73
-
74
-
75
-
76
-
77
-
78
-
79
-
80
-
81
-
82
-
83
-
84
-
85
-
86
-
87
-
88
-
89
-
90
-
91
-
92
-
93
-
94
-
95
-
96
-
97
-
98
-
99
-
100
-
101
-
102
-
103
-
104
-
 105
105 -
 106
106 -
 107
107 -
 108
108 -
 109
109 -
 110
110 -
 111
111 -
 112
112 -
 113
113 -
 114
114 -
 115
115 -
116
-
117
-
118
-
119
-
120
-
121
-
122
-
123
-
124
-
125
-
126
-
127
-
128
-
129
-
130
-
131
-
132
-
133
-
134
-
135
-
136
-
137
-
138
-
139
-
140
-
141
-
142
-
143
-
144
-
145
-
146
-
147
-
148
-
149
-
150
-
151
-
152
-
153
-
154
-
155
-
156
-
157
-
158
-
159
-
160
-
161
-
162
-
163
-
164
-
165
-
166
-
167
-
168
-
169
-
170
-
171
-
172
-
173
-
174
-
175
-
176
-
177
-
178
-
179
-
180
-
181
-
182
-
183
-
184
-
185
-
186
-
187
-
188
-
189
-
190
-
191
-
192
-
193
-
194
-
195
-
196
-
197
-
198
-
199
-
200
-
201
-
202
-
203
-
204
-
205
-
206
-
207
-
208
-
209
-
210
-
211
-
212
-
213
-
214
-
215
-
216
-
217
-
218
-
219
-
220
-
221
-
222
-
223
-
224
-
225
-
226
-
227
-
228
-
229
-
230
-
231
-
232
-
233
-
234
-
235
 |
 |

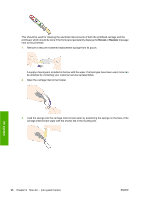
8.
Take special care to clean all contacts thoroughly, including the ones at the lowest point of the
connector.
9.
Using the same sponge, clean the lower strip of electrical contacts on the printhead (unless the
printhead is new), avoid touching the upper set of electrical contacts.
CAUTION:
Do not touch the surface of the printhead containing the nozzles, which are easily
damaged.
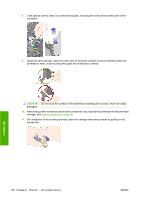
10.
After waiting a few moments to allow both connectors to dry, replace the printhead into the printhead
carriage. See
Insert a printhead
on page
94
.
11.
On completion of the cleaning process, open the carriage interconnect wiper by pulling on the
sponge tab.
100
Chapter 9
How do I... (ink system topics)
ENWW
Ink system