HP Color LaserJet Enterprise CP4020 HP Designjet 4020 and 4520 Printer Series - Page 131
Corrective action, Horizontal bands across all the colored strips, Interpret Image Diagnostics part 3
 |
View all HP Color LaserJet Enterprise CP4020 manuals
Add to My Manuals
Save this manual to your list of manuals |
Page 131 highlights
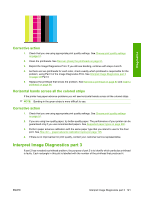
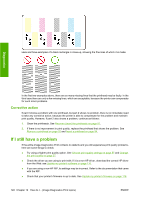
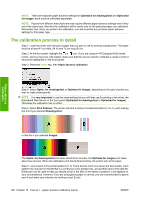
Diagnostics Corrective action 1. Check that you are using appropriate print quality settings. See Choose print quality settings on page 57. 2. Clean the printheads. See Recover (clean) the printheads on page 97. 3. Reprint the Image Diagnostics Print. If you still see banding, continue with steps 4 and 5. 4. As there are two printheads for each color, check exactly which printhead is responsible for the problem, using Part 3 of the Image Diagnostics Print. See Interpret Image Diagnostics part 3 on page 121Part 3. 5. Replace the printhead that shows the problem. See Remove a printhead on page 92 and Insert a printhead on page 94. Horizontal bands across all the colored strips If the printer has paper advance problems you will see horizontal bands across all the colored strips. NOTE: Banding in the green strips is more difficult to see. Corrective action 1. Check that you are using appropriate print quality settings. See Choose print quality settings on page 57. 2. If you are using low-quality paper, try better-quality paper. The performance of your printer can be guaranteed only if you use recommended papers. See Supported paper types on page 200. 3. Perform paper advance calibration with the same paper type that you intend to use for the final print. See How do I... (paper advance calibration topics) on page 125. 4. If there is no improvement in print quality, contact your customer service representative. Interpret Image Diagnostics part 3 If part 2 has revealed a printhead problem, the purpose of part 3 is to identify which particular printhead is faulty. Each rectangle in this plot is labelled with the number of the printhead that produced it. ENWW Interpret Image Diagnostics part 3 121
-
 1
1 -
2
-
3
-
4
-
5
-
6
-
7
-
8
-
9
-
10
-
11
-
12
-
13
-
14
-
15
-
16
-
17
-
18
-
19
-
20
-
21
-
22
-
23
-
24
-
25
-
26
-
27
-
28
-
29
-
30
-
31
-
32
-
33
-
34
-
35
-
36
-
37
-
38
-
39
-
40
-
41
-
42
-
43
-
44
-
45
-
46
-
47
-
48
-
49
-
50
-
51
-
52
-
53
-
54
-
55
-
56
-
57
-
58
-
59
-
60
-
61
-
62
-
63
-
64
-
65
-
66
-
67
-
68
-
69
-
70
-
71
-
72
-
73
-
74
-
75
-
76
-
77
-
78
-
79
-
80
-
81
-
82
-
83
-
84
-
85
-
86
-
87
-
88
-
89
-
90
-
91
-
92
-
93
-
94
-
95
-
96
-
97
-
98
-
99
-
100
-
101
-
102
-
103
-
104
-
105
-
106
-
107
-
108
-
109
-
110
-
111
-
112
-
113
-
114
-
115
-
116
-
117
-
118
-
119
-
120
-
121
-
122
-
123
-
124
-
125
-
 126
126 -
 127
127 -
 128
128 -
 129
129 -
 130
130 -
 131
131 -
 132
132 -
 133
133 -
 134
134 -
 135
135 -
 136
136 -
137
-
138
-
139
-
140
-
141
-
142
-
143
-
144
-
145
-
146
-
147
-
148
-
149
-
150
-
151
-
152
-
153
-
154
-
155
-
156
-
157
-
158
-
159
-
160
-
161
-
162
-
163
-
164
-
165
-
166
-
167
-
168
-
169
-
170
-
171
-
172
-
173
-
174
-
175
-
176
-
177
-
178
-
179
-
180
-
181
-
182
-
183
-
184
-
185
-
186
-
187
-
188
-
189
-
190
-
191
-
192
-
193
-
194
-
195
-
196
-
197
-
198
-
199
-
200
-
201
-
202
-
203
-
204
-
205
-
206
-
207
-
208
-
209
-
210
-
211
-
212
-
213
-
214
-
215
-
216
-
217
-
218
-
219
-
220
-
221
-
222
-
223
-
224
-
225
-
226
-
227
-
228
-
229
-
230
-
231
-
232
-
233
-
234
-
235
 |
 |
