HP Integrity Superdome SX1000 Installation (Smart Setup) Guide, Windows Server - Page 54
Enable Windows Components, Set IP Addresses from a Headless Console
 |
View all HP Integrity Superdome SX1000 manuals
Add to My Manuals
Save this manual to your list of manuals |
Page 54 highlights
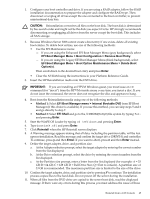
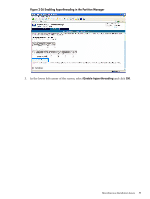
6. Click Install to continue with the installation or click Close to exit setup. When you click Install, a command window appears, listing each update as it installs. Sometimes these are large updates that can take several minutes each to install. 7. When prompted, click Reboot to complete the installation. HP recommends rebooting after each QFE bundle installs to ensure correct installation. 8. To install all Security updates, click Install in the Security Updates section. The HP Package Setup screen appears. 9. Click Install. The HP Setup screen appears. 10. Click Install to continue with the installation or click Close to exit setup. When you click Install, a command window appears, listing each update as it installs. Sometimes these are large updates that can take several minutes each to install. 11. When prompted, click Reboot to complete the installation. HP recommends rebooting after each QFE bundle installs to ensure correct installation. 12. To read a detailed description about an update, click on its Knowledge Base (KB) ID number. You are linked to the relevant article on the Microsoft website. You can do this at any time. 13. If your server will function in a SAN environment or as a node in a Microsoft Cluster, install the Clustering Updates in the same manner. 14. After installing updates, use Microsoft Windows Update (Start > Help and Support > Support Tasks > Windows Update) to check for updates that have been issued since your Smart Update media was released. NOTE: You can also extract Smart Components to your hard drive and install the QFEs individually, but HP recommends installing them as a group, as described above. Enable Windows Components This section describes installation of the Windows components that enable networking. Set IP Addresses from a Headless Console To set the MP IP from a headless console, complete the following steps: 1. Use an RS232 cable to connect the target server console port to the COM port of a working system. 2. Launch a terminal emulation program, such as HyperTerminal. 3. In the Connect Using pull-down list, select the COM port connected to the RS232 cable and click OK. 4. When prompted, enter the default baud rate of 9600, and HyperTerminal connects to the MP. 5. Log in to the MP using the default MP administration user name and password Admin / Admin. 6. Enter the CM command to access the Command menu. 7. Enter the LC command to configure the network settings. Enter A to configure all the parameters, or enter the letter designating the parameters you want to modify. Typically, I = IP address, S = Subnet mask, and G = Gateway address. To set the server IP address from a headless console, complete the following steps: 1. Use HyperTerminal or PuTTY to log in to the MP. 2. Enter the CO command to go to the SAC prompt. 3. At the SAC> prompt, enter the I command to specify the network number, IP address, and subnet mask. For example: I 54 Installing the OS
-
 1
1 -
2
-
3
-
4
-
5
-
6
-
7
-
8
-
9
-
10
-
11
-
12
-
13
-
14
-
15
-
16
-
17
-
18
-
19
-
20
-
21
-
22
-
23
-
24
-
25
-
26
-
27
-
28
-
29
-
30
-
31
-
32
-
33
-
34
-
35
-
36
-
37
-
38
-
39
-
40
-
41
-
42
-
43
-
44
-
45
-
46
-
47
-
48
-
 49
49 -
 50
50 -
 51
51 -
 52
52 -
 53
53 -
 54
54 -
 55
55 -
 56
56 -
 57
57 -
 58
58 -
 59
59 -
60
-
61
-
62
-
63
-
64
-
65
-
66
-
67
-
68
-
69
-
70
-
71
-
72
-
73
-
74
-
75
-
76
-
77
-
78
-
79
-
80
-
81
-
82
-
83
-
84
-
85
-
86
-
87
-
88
-
89
-
90
-
91
-
92
-
93
-
94
-
95
-
96
-
97
-
98
-
99
-
100
-
101
-
102
-
103
-
104
-
105
-
106
-
107
-
108
-
109
-
110
-
111
-
112
-
113
-
114
 |
 |