HP Integrity Superdome SX1000 Installation (Smart Setup) Guide, Windows Server - Page 66
Con the Management Agents, Activate and Deactivate Agents
 |
View all HP Integrity Superdome SX1000 manuals
Add to My Manuals
Save this manual to your list of manuals |
Page 66 highlights
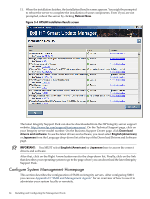
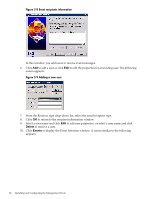
IMPORTANT: For Windows operating systems, the file system must be NTFS for the private key to have administrator-only access through the file. If the private key is compromised, the administrator can delete the \hp\sslshare\cert.pem file and restart the server. This causes HP SMH to generate a new certificate and private key. NOTE: Certificate and private key generation only occur the first time HP SMH is started or when no certificate and key pair exist. You can use a certificate from a certificate authority (CA), such as Verisign or Entrust, to replace a self-generated certificate. These certificates and key files are shared with other HP management software, such as HP Systems Insight Manager. Configure the Management Agents This section describes the configuration of the HP Insight Management Agents on Integrity servers. The management agents are a collection of services that report system information and status to the SMH application. After configuring the agents you can use Appendix D "SMH and Management Agents" to see what each agent does. NOTE: HP management agents require TCP/IP and SNMP on the system. Activate and Deactivate Agents Agents are activated when they are installed (except for Clustering Information agents). Inactive agents remain installed but are dormant until you reactivate them. To activate or deactivate an agent, complete the following steps: 1. Log in with Administrator rights. You must have Admin rights to access the management agents from the Windows Control Panel. 2. Open the Windows Control Panel and select HP Management Agents for Integrity Servers. The installed agents are listed in the window. All agents except clustering information are activated at installation. Figure 3-5 Services tab 3. From the Services tab, select an agent from either column to change the active or inactive status. 4. Click Add or Remove to change the status of the selected agent. 5. Click OK when you have made all required status changes. 66 Installing and Configuring the Management Tools
-
 1
1 -
2
-
3
-
4
-
5
-
6
-
7
-
8
-
9
-
10
-
11
-
12
-
13
-
14
-
15
-
16
-
17
-
18
-
19
-
20
-
21
-
22
-
23
-
24
-
25
-
26
-
27
-
28
-
29
-
30
-
31
-
32
-
33
-
34
-
35
-
36
-
37
-
38
-
39
-
40
-
41
-
42
-
43
-
44
-
45
-
46
-
47
-
48
-
49
-
50
-
51
-
52
-
53
-
54
-
55
-
56
-
57
-
58
-
59
-
60
-
 61
61 -
 62
62 -
 63
63 -
 64
64 -
 65
65 -
 66
66 -
 67
67 -
 68
68 -
 69
69 -
 70
70 -
 71
71 -
72
-
73
-
74
-
75
-
76
-
77
-
78
-
79
-
80
-
81
-
82
-
83
-
84
-
85
-
86
-
87
-
88
-
89
-
90
-
91
-
92
-
93
-
94
-
95
-
96
-
97
-
98
-
99
-
100
-
101
-
102
-
103
-
104
-
105
-
106
-
107
-
108
-
109
-
110
-
111
-
112
-
113
-
114
 |
 |
