HP Integrity Superdome SX1000 Installation (Smart Setup) Guide, Windows Server - Page 83
HP Service Partition HPSP., Microsoft Reserved Partition MSR.
 |
View all HP Integrity Superdome SX1000 manuals
Add to My Manuals
Save this manual to your list of manuals |
Page 83 highlights
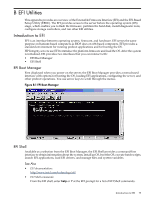
- Installing offline diagnostic tools - Installing Windows • Maintain Firmware - Maintains the firmware for selected devices with flashable firmware. You can flash devices individually or all at once. NOTE: You cannot flash the firmware if the installed version is the same as or higher than the version on the Smart Setup media. Also, you cannot use EBSU to flash the management processor (MP) firmware. You must download the latest MP firmware from the HP Integrity support site at http://www.hp.com/support/itaniumservers/ and flash it separately. • Create Partitions - creates the following partitions: - EFI System Partition. This partition is required to boot the OS. Store only EFI drivers and OS system files here. This partition is labeled EFIPART. - HP Service Partition (HPSP). This is optional. The files from the HP Integrity Offline Diagnostics and Utilities CD are stored here. This partition is labeled HPPART. - Microsoft Reserved Partition (MSR). Windows requires this partition on the boot drive and all data drives. The MSR partition is created by this utility if the HPSP partition has also been created; otherwise, it is created by the Windows installer. • Install Diagnostics - Installs a copy of the diagnostics programs from the HP Integrity Offline Diagnostics CD in the HPSP partition. Some options available from the EBSU main menu are not part of Express Setup, but you can use them to diagnose problems or customize firmware settings. • Drive Explorer - Offers the following options: - Launch. Launches the Drive Explorer, which displays the directories present on the disks in the EFI partition or executes EFI programs. - Install. Installs the Drive Explorer • Load OEM Boot Driver - Loads OEM drivers for boot devices into memory. Ordinarily, boot drivers not on the Windows CD are installed using the floppy drive. Because Integrity servers do not have floppy drives, the drivers must be loaded into memory and then installed. EBSU shows detected devices that have a virtual floppy image available. To load the virtual floppy image manually, follow these steps: 1. At the EFI Shell prompt, enter fs0:. 2. Navigate to the \efi\io_cards\vfloppy directory. 3. Enter the following: set -v VirtualFloppySourcePath \efi\io_cards\vfloppy\SA6400.img 4. Enter the following: set -v VirtualFloppyHandleNumber 0 5. Enter the following: load vfloppy.efi 6. Enter the following: map -r You cannot unload or change the virtual floppy file system unless you reset the computer. CAUTION: When Windows installation begins, you are prompted to press F6 to install a third-party SCSI or RAID driver. Do not press F6. Pressing F6 forces Windows to look for the driver on a physical floppy drive, which does not exist. The driver is loaded into memory and installed automatically. • System Inventory - Retrieves system information and displays a report of the system hardware. Introduction to EFI 83
-
 1
1 -
2
-
3
-
4
-
5
-
6
-
7
-
8
-
9
-
10
-
11
-
12
-
13
-
14
-
15
-
16
-
17
-
18
-
19
-
20
-
21
-
22
-
23
-
24
-
25
-
26
-
27
-
28
-
29
-
30
-
31
-
32
-
33
-
34
-
35
-
36
-
37
-
38
-
39
-
40
-
41
-
42
-
43
-
44
-
45
-
46
-
47
-
48
-
49
-
50
-
51
-
52
-
53
-
54
-
55
-
56
-
57
-
58
-
59
-
60
-
61
-
62
-
63
-
64
-
65
-
66
-
67
-
68
-
69
-
70
-
71
-
72
-
73
-
74
-
75
-
76
-
77
-
 78
78 -
 79
79 -
 80
80 -
 81
81 -
 82
82 -
 83
83 -
 84
84 -
 85
85 -
 86
86 -
 87
87 -
 88
88 -
89
-
90
-
91
-
92
-
93
-
94
-
95
-
96
-
97
-
98
-
99
-
100
-
101
-
102
-
103
-
104
-
105
-
106
-
107
-
108
-
109
-
110
-
111
-
112
-
113
-
114
 |
 |
