HP LD4730 User Guide - Page 44
Navigating with the control panel,
 |
View all HP LD4730 manuals
Add to My Manuals
Save this manual to your list of manuals |
Page 44 highlights
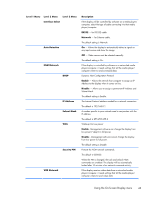
Navigating with the control panel If you have access to the control panel at the back of the display, you can use it to turn the screen on and off, and to open and navigate the OSD menu. Figure 4-5 Display control panel INPUT MENU To change the video source, press the INPUT button, then select the desired source from the menu that opens on the screen. To bring up the On-Screen Display menu, press the MENU button. Press it again to exit the OSD. Once inside the menu, ● Use the arrow buttons to highlight your choice. Use them to adjust settings as well. ● To accept a highlighted selection or setting, press the INPUT button. To put the display into low power mode, press the power ( ) button. Press it again to restore full power. The buttons can be disabled by pressing the left and right arrows buttons simultaneously and holding for 5 seconds. Repeat this procedure to enable the buttons again. Single buttons can be disabled and enabled with the following 5-second key presses: To enable/disable this: Power button IR remote control MENU button Hold these buttons: Right arrow and MENU buttons Left arrow and MENU buttons Up and down arrows. The LED indicates the power status: ● Green - full power ● Red - low power (the screen is dark but the controller is listening for commands) ● Off - no power If the buttons remain untouched for 20 seconds after adjustments have been made but not saved, the current settings will be saved and the OSD menu will close. If the input source, resolution, aspect ratio or frequency changes while the OSD is active, the OSD will close without saving new settings. 38 Chapter 4 Operating the display
-
 1
1 -
2
-
3
-
4
-
5
-
6
-
7
-
8
-
9
-
10
-
11
-
12
-
13
-
14
-
15
-
16
-
17
-
18
-
19
-
20
-
21
-
22
-
23
-
24
-
25
-
26
-
27
-
28
-
29
-
30
-
31
-
32
-
33
-
34
-
35
-
36
-
37
-
38
-
 39
39 -
 40
40 -
 41
41 -
 42
42 -
 43
43 -
 44
44 -
 45
45 -
 46
46 -
 47
47 -
 48
48 -
 49
49 -
50
-
51
-
52
-
53
-
54
-
55
-
56
-
57
-
58
-
59
-
60
-
61
-
62
-
63
-
64
-
65
-
66
-
67
-
68
-
69
-
70
-
71
-
72
-
73
-
74
-
75
 |
 |
