HP LD4730 User Guide - Page 55
Preventing and fixing ghost images, Using Tile Mode, Orbiter, Inversion, White wash, Normal, Dot wash
 |
View all HP LD4730 manuals
Add to My Manuals
Save this manual to your list of manuals |
Page 55 highlights
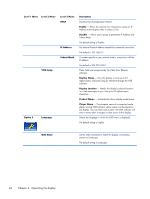
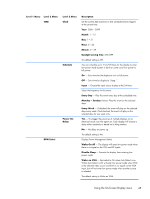
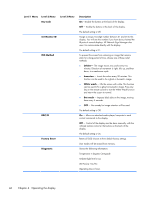
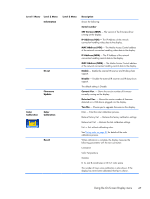
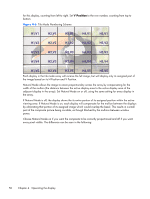
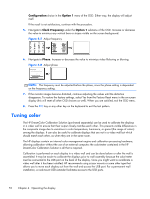
Preventing and fixing ghost images Displaying a static image on the screen for a long time can result in "burn-in" or image retention. To avoid image retention, do not display a fixed image for long periods of time. Either turn the display off, use one of the image retention choices (ISM) in the OSD, or change the image. You can help to avoid or correct ghost images by using one of the ISM Method options: 1. Navigate to the Option 2 submenu and then to the ISM Method option. 2. Select one of the following menu options: ● Orbiter - The image will move two pixels every two minutes, alternately moving left, right, up, and down. Orbiter will remain on until changed in the ISM Method menu. ● Inversion - This function can be used to fix a ghost or burned-in image. It will invert the image colors every 30 minutes. The inversion function will remain on until changed in the ISM Method menu. ● White wash - This function can also be used to fix a ghost or burned-in image. This function will fill the screen with solid white. This helps to remove permanent images burned into the screen. Pressing any key on the remote control will exit the White Wash function and return the screen to Normal. ● Dot wash - Imposes a pattern of black dots on the image and moves them every 5 seconds. ● OFF - Choose if you do not want the ISM function to be active. When the display is turned off, the ISM setting is lost and will be OFF when the display is next turned on. Using Tile Mode Tile Mode lets you define an array of up to 25 displays showing a single image. The array need not have the same number of columns as rows, and the displays can be in landscape or portrait orientation. Tile mode is designed for use with daisy chained displays receiving VGA or DisplayPort input. If the input source is Video Over Ethernet, each display must be sent the same image for tile mode to work. (See the Video Over Ethernet User Guide for details). Video signal strength will determine how many displays may be daisy chained together. Degradation of the video signal due to distance may limit the maximum number of displays to less than 25. You can set up tiling through the OSD menu of each display in the array. That method is described here. You can also use HP Network Sign Manager for the same purpose. See the HP Network Sign Manager User Guide for details. On each display, enter the OSD and navigate to the Tile submenu. Set H Monitors to the number of columns in the array and V Monitors to the number of rows. Set H Position to the column number Using the On-Screen Display menu 49
-
 1
1 -
2
-
3
-
4
-
5
-
6
-
7
-
8
-
9
-
10
-
11
-
12
-
13
-
14
-
15
-
16
-
17
-
18
-
19
-
20
-
21
-
22
-
23
-
24
-
25
-
26
-
27
-
28
-
29
-
30
-
31
-
32
-
33
-
34
-
35
-
36
-
37
-
38
-
39
-
40
-
41
-
42
-
43
-
44
-
45
-
46
-
47
-
48
-
49
-
 50
50 -
 51
51 -
 52
52 -
 53
53 -
 54
54 -
 55
55 -
 56
56 -
 57
57 -
 58
58 -
 59
59 -
 60
60 -
61
-
62
-
63
-
64
-
65
-
66
-
67
-
68
-
69
-
70
-
71
-
72
-
73
-
74
-
75
 |
 |
