HP LD4730 User Guide - Page 58
Tuning color, Configuration, Option 1, Clock Frequency, Phase
 |
View all HP LD4730 manuals
Add to My Manuals
Save this manual to your list of manuals |
Page 58 highlights
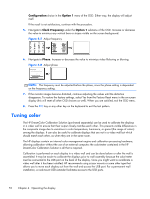
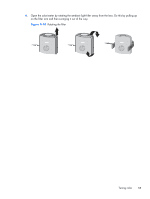
Configuration choice in the Option 1 menu of the OSD. Either way, the display will adjust itself. If the result is not satisfactory, continue with the procedure. 5. Navigate to Clock Frequency under the Option 1 submenu of the OSD. Increase or decrease the value to minimize any vertical bars or stripes visible on the screen background. Figure 4-7 Adjust frequency 6. Navigate to Phase. Increase or decrease the value to minimize video flickering or blurring. Figure 4-8 Adjust phase NOTE: The frequency must be adjusted before the phase, since the phase setting is dependent on the frequency setting. 7. If the monitor images become distorted, continue adjusting the values until the distortion disappears. To restore the factory settings, select Yes from the Factory Reset menu in the on-screen display (this will reset all other OSD choices as well). When you are satisfied, exit the OSD menu. 8. Press the ESC key or any other key on the keyboard to exit the test pattern. Tuning color The HP DreamColor Calibration Solution (purchased separately) can be used to calibrate the displays in a video wall to ensure that their output closely matches each other. This prevents visible differences in the composite image due to variations in color temperature, luminance, or gamut (the range of colors) among the displays. It can also be useful to calibrate displays that are not in a video wall but which should match each other, as when they are in the same room. The HP displays contain an internal color management engine and calibration processing hardware, allowing calibration without the use of an external computer; the colorimeter contained in the HP DreamColor Calibration Solution is all that is required. Calibration is performed on each display in a video wall and can be done before or after the wall is assembled. It may be easier to calibrate the displays prior to wall assembly because the colorimeter must be connected to the USB port on the back of the display. Since you might want to recalibrate a video wall after it has been installed, HP recommends using scissor mounts or some other type that allows you to move each display out from the wall and access the USB port. For a permanent wall installation, a rack-mount USB extender facilitates access to the USB ports. 52 Chapter 4 Operating the display
-
 1
1 -
2
-
3
-
4
-
5
-
6
-
7
-
8
-
9
-
10
-
11
-
12
-
13
-
14
-
15
-
16
-
17
-
18
-
19
-
20
-
21
-
22
-
23
-
24
-
25
-
26
-
27
-
28
-
29
-
30
-
31
-
32
-
33
-
34
-
35
-
36
-
37
-
38
-
39
-
40
-
41
-
42
-
43
-
44
-
45
-
46
-
47
-
48
-
49
-
50
-
51
-
52
-
 53
53 -
 54
54 -
 55
55 -
 56
56 -
 57
57 -
 58
58 -
 59
59 -
 60
60 -
 61
61 -
 62
62 -
 63
63 -
64
-
65
-
66
-
67
-
68
-
69
-
70
-
71
-
72
-
73
-
74
-
75
 |
 |
