HP LaserJet Pro M1212nf HP LaserJet M1319 MFP Series - Software Technical Refe - Page 148
Resizing Options, Actual size, Print document on, Scale to fit
 |
View all HP LaserJet Pro M1212nf manuals
Add to My Manuals
Save this manual to your list of manuals |
Page 148 highlights
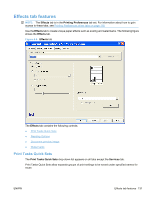
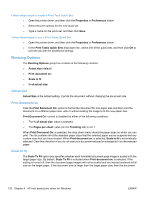
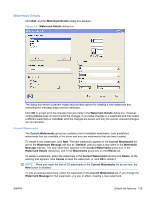
Follow these steps to create a Print Task Quick Set. ● Open the printer driver, and then click the Properties or Preferences button. ● Select the print options for the new quick set. ● Type a name for the quick set, and then click Save. Follow these steps to use a Print Tasks Quick Set. ● Open the printer driver, and then click the Properties or Preferences button. ● In the Print Tasks Quick Sets drop-down list , select one of the quick sets, and then click OK to print the job with the predefined settings. Resizing Options The Resizing Options group box consists of the following controls: ● Actual size (default) ● Print document on: ● Scale to fit ● % of actual size: Actual size Actual Size is the default setting. It prints the document without changing the document size. Print document on Click the Print Document On: option to format the document for one paper size and then print the document on a different paper size, with or without scaling the image to fit the new paper size. Print Document On: control is disabled by either of the following conditions: ● The % of actual size: value is selected. ● The Pages per sheet: value (on the Finishing tab) is not 1. When Print Document On: is selected, the drop-down menu shows the paper sizes on which you can print. The list contains all of the standard paper sizes that the selected paper source supports and any custom sizes that you have created. When Print document on: is selected, Scale to fit is automatically selected. Clear this check box if you do not want your document reduced or enlarged to fit on the selected paper. Scale to fit The Scale To Fit option box specifies whether each formatted document page image is scaled to fit the target paper size. By default, Scale To Fit is selected when Print document on: is selected. If the setting is turned off, then the document page images will not be scaled and are instead centered at full size on the target paper. If the document size is larger than the target paper size, then the document 132 Chapter 4 HP host based print driver for Windows ENWW
-
 1
1 -
2
-
3
-
4
-
5
-
6
-
7
-
8
-
9
-
10
-
11
-
12
-
13
-
14
-
15
-
16
-
17
-
18
-
19
-
20
-
21
-
22
-
23
-
24
-
25
-
26
-
27
-
28
-
29
-
30
-
31
-
32
-
33
-
34
-
35
-
36
-
37
-
38
-
39
-
40
-
41
-
42
-
43
-
44
-
45
-
46
-
47
-
48
-
49
-
50
-
51
-
52
-
53
-
54
-
55
-
56
-
57
-
58
-
59
-
60
-
61
-
62
-
63
-
64
-
65
-
66
-
67
-
68
-
69
-
70
-
71
-
72
-
73
-
74
-
75
-
76
-
77
-
78
-
79
-
80
-
81
-
82
-
83
-
84
-
85
-
86
-
87
-
88
-
89
-
90
-
91
-
92
-
93
-
94
-
95
-
96
-
97
-
98
-
99
-
100
-
101
-
102
-
103
-
104
-
105
-
106
-
107
-
108
-
109
-
110
-
111
-
112
-
113
-
114
-
115
-
116
-
117
-
118
-
119
-
120
-
121
-
122
-
123
-
124
-
125
-
126
-
127
-
128
-
129
-
130
-
131
-
132
-
133
-
134
-
135
-
136
-
137
-
138
-
139
-
140
-
141
-
142
-
 143
143 -
 144
144 -
 145
145 -
 146
146 -
 147
147 -
 148
148 -
 149
149 -
 150
150 -
 151
151 -
 152
152 -
 153
153 -
154
-
155
-
156
-
157
-
158
-
159
-
160
-
161
-
162
-
163
-
164
-
165
-
166
-
167
-
168
-
169
-
170
-
171
-
172
-
173
-
174
-
175
-
176
-
177
-
178
-
179
-
180
-
181
-
182
-
183
-
184
-
185
-
186
-
187
-
188
-
189
-
190
-
191
-
192
-
193
-
194
 |
 |