HP LaserJet Pro M1212nf HP LaserJet M1319 MFP Series - Software Technical Refe - Page 76
Microsoft Windows general installation overview - mfp drivers
 |
View all HP LaserJet Pro M1212nf manuals
Add to My Manuals
Save this manual to your list of manuals |
Page 76 highlights
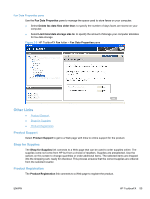
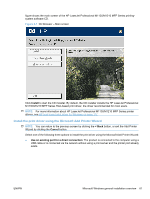
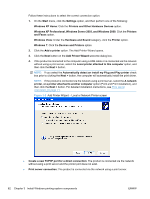
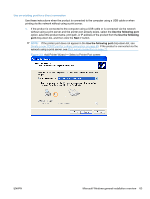
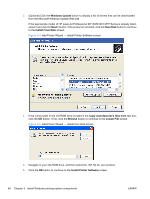
Microsoft Windows general installation overview HP LaserJet Professional M1130/M1210 MFP Series printing-system software for Windows systems HP LaserJet Professional M1130/M1210 MFP Series printing-system software can be installed either via a direct USB connection to the product or from the printing-system software CD USB installation NOTE: This installation type is supported for Windows only. The HP Smart Install allows you to install the product driver and software by connecting the product to a computer through a USB cable. NOTE: The installation CD is not required during a HP Smart Install. Do not insert the software installation CD into the computer CD drive. 1. Turn the product on. 2. Connect the USB cable. 3. The HP Smart Install program should start automatically. Follow the onscreen instructions to install the software. ● If the HP Smart Install program does not start automatically, AutoPlay might be disabled on the computer. Browse the computer and double-click the HP Smart Install drive to run the program. If you cannot find the HP Smart Install drive, use the product installation CD to install the software. ● If the program prompts you to select a connection type, select the connection type you will use to print to the product after installation. CD installation In supported Windows environments (Windows 7, Windows Server 2003, Windows Server 2008, Windows XP, and Windows Vista), insert the printing-system software CD in the CD-ROM drive to open an interactive CD Browser. Use the CD Browser to install the drivers and related components, and to gain access to online user documentation and optional HP software. If the installation screen does not appear when you insert the printing-system software CD into the CDROM drive, follow these steps to open the CD Browser: 1. On the Start menu, click the Run option. 2. Type the following: X:\SETUP.EXE (where X is the letter of the CD-ROM drive). 3. Click the OK button. The main screen of the software CD Browser contains installation and documentation options in the left panel. Move the cursor over each option to see a description of the option in the right panel. The following 60 Chapter 3 Install Windows printing-system components ENWW
-
 1
1 -
2
-
3
-
4
-
5
-
6
-
7
-
8
-
9
-
10
-
11
-
12
-
13
-
14
-
15
-
16
-
17
-
18
-
19
-
20
-
21
-
22
-
23
-
24
-
25
-
26
-
27
-
28
-
29
-
30
-
31
-
32
-
33
-
34
-
35
-
36
-
37
-
38
-
39
-
40
-
41
-
42
-
43
-
44
-
45
-
46
-
47
-
48
-
49
-
50
-
51
-
52
-
53
-
54
-
55
-
56
-
57
-
58
-
59
-
60
-
61
-
62
-
63
-
64
-
65
-
66
-
67
-
68
-
69
-
70
-
 71
71 -
 72
72 -
 73
73 -
 74
74 -
 75
75 -
 76
76 -
 77
77 -
 78
78 -
 79
79 -
 80
80 -
 81
81 -
82
-
83
-
84
-
85
-
86
-
87
-
88
-
89
-
90
-
91
-
92
-
93
-
94
-
95
-
96
-
97
-
98
-
99
-
100
-
101
-
102
-
103
-
104
-
105
-
106
-
107
-
108
-
109
-
110
-
111
-
112
-
113
-
114
-
115
-
116
-
117
-
118
-
119
-
120
-
121
-
122
-
123
-
124
-
125
-
126
-
127
-
128
-
129
-
130
-
131
-
132
-
133
-
134
-
135
-
136
-
137
-
138
-
139
-
140
-
141
-
142
-
143
-
144
-
145
-
146
-
147
-
148
-
149
-
150
-
151
-
152
-
153
-
154
-
155
-
156
-
157
-
158
-
159
-
160
-
161
-
162
-
163
-
164
-
165
-
166
-
167
-
168
-
169
-
170
-
171
-
172
-
173
-
174
-
175
-
176
-
177
-
178
-
179
-
180
-
181
-
182
-
183
-
184
-
185
-
186
-
187
-
188
-
189
-
190
-
191
-
192
-
193
-
194
 |
 |