HP ML150 HP ProLiant ML150 G6 Server Maintenance and Service Guide - Page 34
Optical and tape drives, Installing an optical or tape drive
 |
UPC - 884420743644
View all HP ML150 manuals
Add to My Manuals
Save this manual to your list of manuals |
Page 34 highlights
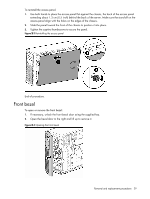
PUSH Optical and tape drives Installing an optical or tape drive NOTE: The following procedure shows the installation of an optical drive in bay 10. The procedure for installing a tape drive in bay 9 is virtually the same. To add an optical drive to the server: 1. Power down the server. 2. Disconnect the power cord(s). 3. Remove the access panel and front bezel as described in the section titled "System covers." 4. Remove the EMI shield from the drive bay by placing the thumb and forefinger into the large holes of the shield and pulling the shield straight out of the chassis. Figure 3-7 Removing the EMI shield 2 3 UP UP CAUTION: Do not discard the EMI shield. If the drive is removed in the future, the shield must be reinstalled to maintain proper EMI shielding. 5. Remove the new drive from the protective packaging. Removal and replacement procedures 34
-
 1
1 -
2
-
3
-
4
-
5
-
6
-
7
-
8
-
9
-
10
-
11
-
12
-
13
-
14
-
15
-
16
-
17
-
18
-
19
-
20
-
21
-
22
-
23
-
24
-
25
-
26
-
27
-
28
-
 29
29 -
 30
30 -
 31
31 -
 32
32 -
 33
33 -
 34
34 -
 35
35 -
 36
36 -
 37
37 -
 38
38 -
 39
39 -
40
-
41
-
42
-
43
-
44
-
45
-
46
-
47
-
48
-
49
-
50
-
51
-
52
-
53
-
54
-
55
-
56
-
57
-
58
-
59
-
60
-
61
-
62
-
63
-
64
-
65
-
66
-
67
-
68
-
69
-
70
-
71
-
72
-
73
-
74
-
75
-
76
-
77
-
78
-
79
-
80
-
81
-
82
-
83
-
84
-
85
-
86
-
87
-
88
-
89
-
90
-
91
-
92
-
93
-
94
-
95
-
96
-
97
-
98
-
99
-
100
-
101
-
102
-
103
-
104
-
105
-
106
 |
 |
